

The DHCP server of the Barracuda NextGen Firewall X-Series automatically assigns IP addresses to clients that reside in a defined subnet. This article provides an example of how to configure a DHCP server on the NextGen Firewall X-Series.
Before you begin
Configure a static interface by using the network the DHCP server subnet is in. For more information, see How to Configure Static Network Interfaces
Step 1. Enable the DHCP server
- Go to the NETWORK > DHCP Server page.
- In the DHCP Server section, select Yes to enable the DHCP server.

- Click Save.
Step 2. Configure the DHCP server subnet
This example configures a DHCP server subnet named LAN that uses an IP range from 192.168.200.150 to 192.168.200.160, a subnet mask of 255.255.255.0, and an NTP server at ntp.barracudacentral.com.
- Go to the NETWORK > DHCP Server page.
- Click Add DHCP Server Subnet. The Add DHCP Server Subnet popover opens.
- Enter the DHCP server subnet settings:
- Name – Enter the Name of the DHCP server subnet.
- Beginning IP Address – Enter the first IP address in the DHCP server subnet. E.g.,
192.168.200.150 - Ending IP Address – Enter the last IP address in the DHCP server subnet. E.g.,
192.168.200.160 - Subnet Mask – Enter the subnet mask. E.g.,
255.255.255.0 - Gateway – Enter the gateway IP address. E.g.,
192.168.200.200 - DNS Server 1 to 4 – Enter the IP address(es) of your DNS server(s).
- NTP Server 1 to 2 – Enter
ntp.barracudacentral.com (optional) Vendor Options – Enter any string containing DHCP options required by your DHCP clients. Make sure to use the exact formatting and delimiters required by your DHCP clients.
- (optional) Specify the Default Lease Time and Maximum Lease Time.
- If you use WINS servers in your network, enter their IP addresses in the WINS Server 1 and WINS Server 2 fields.
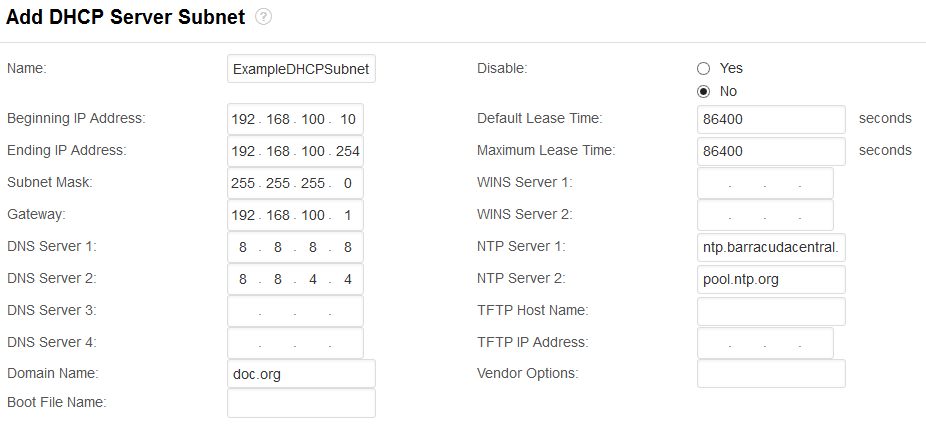
- Click Save.
Step 3. Configure the client
The DHCP server is now ready to assign DHCP leases to connected clients. For clients that currently have manually assigned IP addresses, reconfigure them to receive IP addresses from the DHCP server.
Assigning static IP addresses via DHCP
For a client to always receive the same IP address, configure a static DHCP lease. The DHCP server uses the MAC address to identify the client.
- In the ACTIVE LEASES section, click + in the Actions column. The Add DHCP static lease pop-over window opens.

- Enter the following settings:
- IP Address – Enter the IP address that you want to assign to the system. Click the plus sign (+) next to the address line.
- Hostname – Enter a name for the system to be assigned a static address. For example,
Workstation. - MAC Address – Enter the MAC address of the selected system. You can also copy the MAC address from the Active Leases section.
- (optional) Client ID – Enter the client identifier for this client.
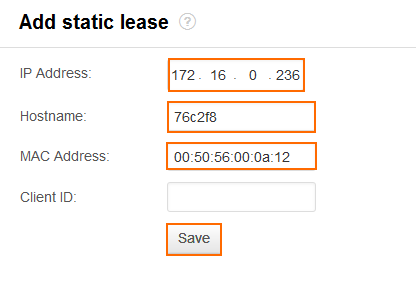
- Click Save.
In the Active Leases section of the DHCP Server window, the IP address lease is displayed as Static.
Removing a DHCP lease
To free up an IP address that is in use for another DHCP lease, you can delete DHCP leases for inactive DHCP clients. Power off or disconnect the client for the DHCP lease to change its state from active to inactive.
- In the DHCP Server Subnets section, click the trashcan icon in the Actions column. The Clear dynamic lease pop-over window opens.

- Verify the IP addresses matches the DHCP lease you want to delete, and click Clear.
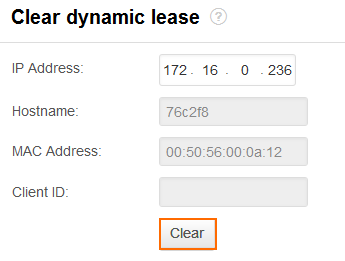
- Force the client using this DHCP lease to renew the DHCP lease.
Monitoring active leases
In the Active Leases section of the NETWORK > DHCP Server page, you can monitor active DHCP leases. The information for each lease is displayed in the following columns:
| Column | Description |
|---|---|
| Range | The IP range of the subnet. |
| Hostname | The hostname of the Windows client. |
| IP Address | The percentage of actively used IP addresses from the range. |
| State | The current state of the lease pool and the number of addresses that are in use. |
| Start | The start lease time of the IP address range. |
| End | The end lease time of the IP address range. |
| MAC Address | The MAC address of the client. |
| Type | The type of the IP address. The IP address can be either Static or Dynamic. |