

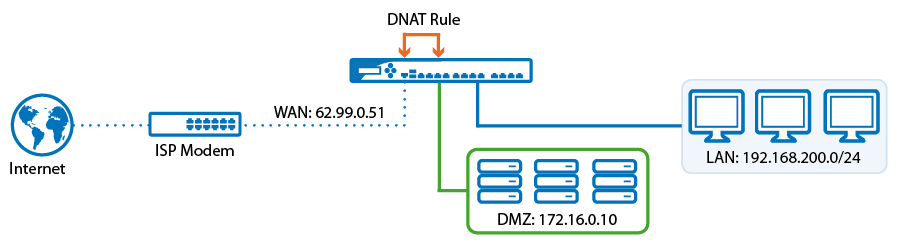
In some cases, you might want to redirect network traffic from the Internet to a network host residing in a network segment protected by the Barracuda NextGen X-Series Firewall. For example, you have a web server hosting a website that is reachable through the Internet. For additional security, you can put the web server in the DMZ segment to logically separate hosts in the DMZ from other hosts in different network segments.
With a DMZ configuration, you have full control over network traffic from the Internet to the web server, as well as traffic from other network segments to the web server. This configuration might be necessary if hosts from other network segments must access the same web server.
If your web server listens on TCP port 8080 instead of 80 and you do not want to change the listening socket of your web server, you can use the Port Address Translation (PAT) feature of the DNAT rule to modify the destination port of IP packets passing the firewall. In the Redirect To field of the rule settings, append the port to be translated to the IP address field (e.g., 172.16.10.1:8080).
Step 1. Configure the interface
Create a network segment (e.g., 172.16.0.0/24 on port 3).
- Go to the NETWORK > IP Configuration page.
- In the Static Interface Configuration section, click Add Static Network Interface.
- In the Add Static Network Interface window, specify the following settings:
- Network Interface – Select the interface connected to the DMZ (e.g., p3).
- Name – Enter a name for the interface.
- IP Address – Enter the interface IP address for the DMZ (e.g.,
172.16.0.1). This IP address represents the default gateway for clients within this network segment. - Netmask – Enter the netmask (e.g.,
255.255.255.0). - Classification – Select DMZ.
- Network Interface – Select the interface connected to the DMZ (e.g., p3).
- Click Save.
- At the top of the page, click on the warning message to execute the new network configuration.
Step 2. Configure the access rule
Create an access rule that allows HTTP traffic from the Internet to the web server residing in the DMZ.
- Go to the FIREWALL > Firewall Rules page.
- Click Add Access Rule to create a new rule.
- In the Add Access Rule window, enter a name and description for the rule.
Specify the following settings:

- Action – Select DNAT.
- Connection – Select Default (SNAT).
- Source – Click Network Objects and add Internet.
- Network Services – Add the service objects to redirect (e.g., HTTP).
- Destination – Either click IP Address and enter the WAN IP address (e.g.,
80.90.100.200), or click Network Objects and select the object containing the WAN IP address (e.g., WAN-ISP1). - Redirected To – Enter the IP address and port number of the DMZ server (e.g.,
172.16.0.10:8080).
- Click Save.
Step 3. Verify the order of the access rules
New rules are created at the bottom of the firewall rule set. Because rules are processed from top to bottom in the rule set, you must arrange your rules in the correct order. Ensure that your rules are placed above the BLOCKALL rule; otherwise, the rules are blocked. For more information, see Firewall Rules Order.
After adjusting the order of the rules in the rule set, click Save.