

To use the Barracuda Cloud Protection Layer (CPL), you must have a current Advanced Threat Protection (ATP) subscription for your Barracuda Email Security Gateway. After setting up your CPL, see Cloud Protection Layer for how to configure policies at the CPL level.
Create or Log Into Your Barracuda Cloud Control Account
Begin setup of your CPL by either creating a Barracuda Cloud Control account or logging in with your existing account. If you already have an account, skip to Configure Cloud Control below.
To create a Barracuda Cloud Control account:
- Visit https://login.barracudanetworks.com/ and click the Create a user link.
- Enter your name and email address, and click Create User. Follow the instructions emailed to the entered email account to log in and create your Barracuda Cloud Control account.
- After submitting your new account information, the Account page displays your account name, associated privileges, username, and Barracuda Networks products you associate with your Barracuda Cloud Control account.
Ensure Connectivity and Redundancy
When using CPL, all of your incoming mail should come from the Barracuda IP ranges specified in CPL IP Ranges (which also apply to Email Gateway Defense). If desired, you can restrict incoming mail to only these IP addresses, which will prevent any spammers from sending mail directly to your Barracuda Email Security Gateway. Block all port 25 traffic except for that originating from the Email Gateway Defense IP address ranges specified.
Configure Cloud Control
- Log into your account at https://login.barracudanetworks.com/ by entering your email address and password.
- Click Sign In. Once logged in, you can create users in your Barracuda Cloud Control account (see How to Add Users and Configure Product Entitlements and Permissions) and assign various permissions to each user for access to Barracuda Cloud Control.
- Click on the Appliance Control link on the left side of the page. If you have not yet connected any appliances or services to your account, click the Set up your Barracuda Cloud Control button. You’ll see the Barracuda Cloud Control Dashboard page and a message indicating that no products have yet been connected.
- In another browser tab or window, log into your Barracuda Email Security Gateway. From the product ADVANCED > Firmware Upgrade page, check to make sure you have the latest firmware installed. If not, download and install it now.
- From the ADVANCED > Cloud Control page, enter the username and password you created for your Barracuda Cloud Control account. Click Yes for Connect to Barracuda Cloud Control to connect your Barracuda Email Security Gateway to the Barracuda Cloud Control, and then click the Save Changes button. Note that your Barracuda Email Security Gateway can connect with only one Barracuda Cloud Control account at a time.
- In the Barracuda Cloud Control window, refresh your browser page. In the Products column on the left side of the page, you should see the Email Security Gateway group with two components, or ‘nodes’ listed:
- The CPL node
- Each Barracuda Email Security Gateway you have connected, with its serial number
Click on the CPL link and navigate to the Domains page.
Complete the following steps for each domain for which you want CPL to filter email:
- For each domain you have configured on the Barracuda Email Security Gateway, click Add Domain and enter the Domain Name. In the Mail Server field, enter the external facing (public) IP address of your Barracuda Email Security Gateway. This is typically, but not always, the IP Address from the BASIC > IP Configuration page. CPL must be able to establish and confirm a connection to the Barracuda Email Security Gateway in order to receive the required MX records.
- Click Add Domain.
Each of the domains for which you want to filter email must be verified by CPL for proof of ownership. To verify the domain, click Verify in the Status column. If you do not verify a domain you add, CPL does not process email for that domain.
After adding and verifying the domain, click Edit in the Settings column to add/configure mail servers, SMTP over TLS, and spooling of mail (in case the Barracuda Email Security Gateway is temporarily unavailable).
- CPL will verify domain ownership, and, if CPL can communicate with the Barracuda Email Security Gateway, the Status of the domain in the table will change from Not Verified to Verified.
Click the domain name to expand the domain details, and you will see the MX records configuration for that domain on the Domains page. CPL must be able to establish and confirm a connection to the Barracuda Email Security Gateway in order to receive the required MX records. If ownership of the domain cannot be verified, CPL will not receive email for that domain.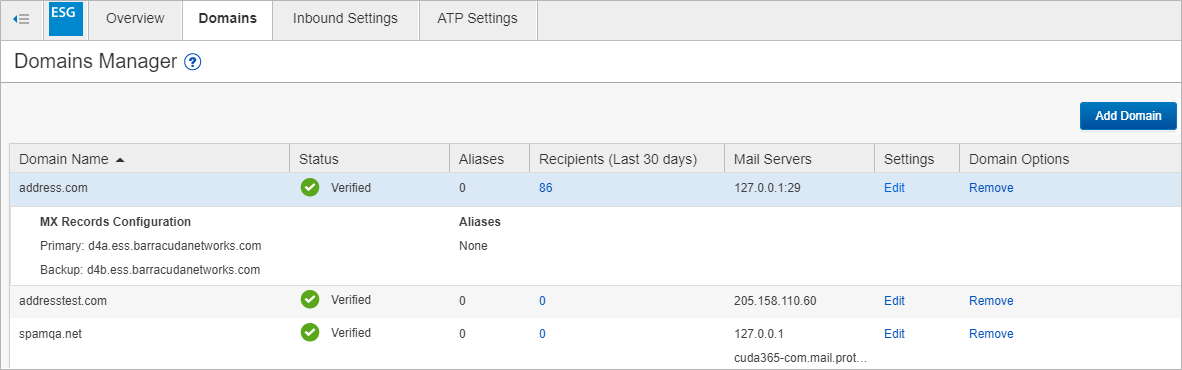
- Add the Recommended MX record on the Domains page for each domain to your external DNS through your ISP or domain hosting provider. Once the DNS entries have propagated, CPL will begin receiving mail immediately.
Configure CPL Filtering Policies
You can configure most of the same filtering policies and SMTP settings in the CPL web interface that you can on your Barracuda Email Security Gateway using the Inbound Settings page. See Cloud Protection Layer for details.
View Email Statistics
To see how many messages were blocked by CPL:
- Click on the Cloud Protection Layer.
- On the Overview > Dashboard page, for Inbound Email Statistics, select Blocked.
The Dashboard page shows you ONLY statistics for inbound traffic through CPL. Use these traffic profiles along with the Message Log page to determine how to best tune your spam policies.
To see how many messages were blocked by one or more of your Barracuda Email Security Gateways:
- Expand the Email Security Gateway link and click on the system you want to view.
- Navigate to the BASIC > Dashboard page.
Monitor Incoming Emails
Once email is flowing through CPL, the administrator can view the Message Log page of the service to get an idea of how many messages are being blocked by CPL, with reasons for each of those actions. Reviewing the log will give an idea of how current CPL (as well as Barracuda Email Security Gateway) settings are filtering messages.
Integration With the Barracuda Email Security Gateway
The CPL Message Log fully integrates inbound email activity processed by CPL with inbound email activity processed by the Barracuda Email Security Gateway. The Delivery and Reason columns in the CPL Message Log are the key to seeing how CPL blocks spam and virus threats before they reach your network.
The Delivery column indicates the following:
- Not Delivered For messages blocked by CPL that never reach the Barracuda Email Security Gateway.
- Rejected For messages passed through CPL to the Barracuda Email Security Gateway, which blocked the message.
- Delivered For messages allowed by CPL and the Barracuda Email Security Gateway.
Messages allowed by CPL may be quarantined, redirected, or encrypted by the Barracuda Email Security Gateway.
The Reason column in the log indicates why CPL blocked the message. Click the ? on the Message Log page for details.
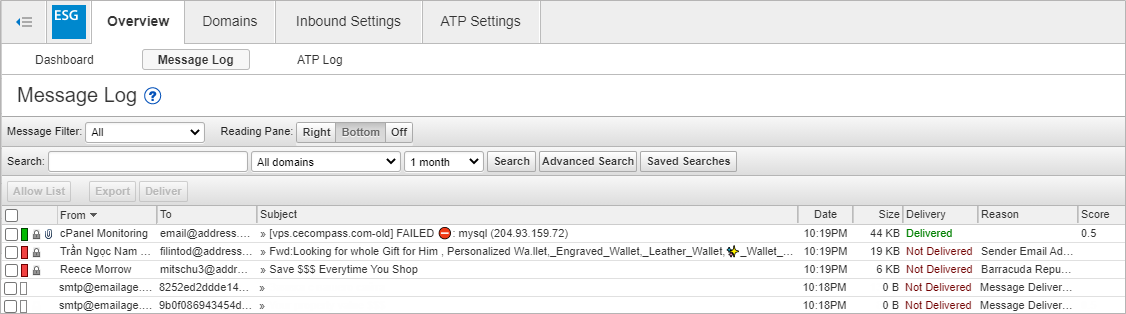
The Status column to the left of the From column indicates the following:
- Green – Allowed by CPL
- Red – Blocked by CPL
- White – Deferred by CPL
Remember that only the Barracuda Email Security Gateway can tag or quarantine messages. Messages that are Delivered passed through filters in both CPL and the Barracuda Email Security Gateway.