The Barracuda Web Application Firewall can be configured as a RADIUS client to the RSA SecurID server system, comprised of the RSA Authentication Manager and the Radius server. Integrating the Barracuda Web Application Firewall with RSA SecurID requires three steps:
- Configure the RSA Authentication Manager.
- Configure the Barracuda Web Application Firewall.
- Verify the Setup and Authentication Process.
Configure the RSA Authentication Manager
Perform the following settings on the RSA Authentication Manager Server:
- Configure the RADIUS protocol settings to be used by the Barracuda Web Application Firewall
- Add the Barracuda Web Application Firewall as an Agent Host within the RSA Authentication Manager's Database
- Import SecurID Tokens
- Add Users to the RSA Authentication Manager and Assign Tokens
Configure the RADIUS Protocol Settings
- Before configuring the RADIUS protocol, ensure the RADIUS server is up and running on the RSA Authentication Manager server system. To check:
- Go to Start > Programs > RSA Security and select RSA Authentication Manager Control Panel.
- Select Start & Stop RSA Auth Mgr Services in the tree on the left pane. The Status of RSA RADIUS Server must be Running. If not, click Start RADIUS to bring it up.
- On the RSA Authentication Manager Server System, go to Start > Programs > RSA Security and select RSA Authentication Manager Host Mode. Select the RADIUS menu, and select Manage RADIUS Server.
- When the RSA RADIUS window appears, select RADIUS Clients in the tree on the left pane.
- Click Add. The Add RADIUS Client window appears.
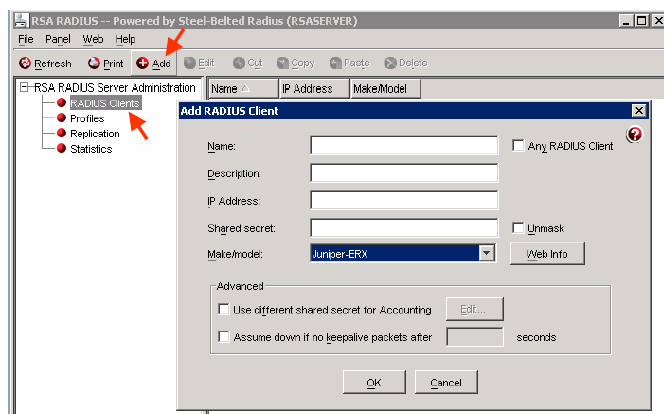
- Specify values for the following fields:
- Name – Enter the hostname of the Barracuda Web Application Firewall.
- Description – Optional.
- IP Address– Enter the IP address of the Barracuda Web Application Firewall.
- Shared Secret – Type the secret key. You will need to configure the same Shared Secret on the Barracuda Web Application Firewall in ACCESS CONTROL > Authentication Services > RSA SECURID.
As a best practice, use a unique account for this integration point and grant it the least level of privileges required, coordinating with the RSA SecurID administrator. This account requires READ privileges. For additional information, see Security for Integrating with Other Systems - Best Practices. - Make/Model– Select Juniper-ERX.
Click OK to save your settings.
Add the Barracuda Web Application Firewall as an Agent Host
- On the RSA Authentication Manager Server System, go to Start > Programs > RSA Security and select RSA Authentication Manager Host Mode.
Select the Agent Host menu, and select Add Agent Host. The Add Agent Host window appears.
- Specify values for the following fields:
- Name: Enter the hostname of the Barracuda Web Application Firewall.
- Network Address: Enter the IP address of the Barracuda Web Application Firewall.
- Agent Type: Select RADIUS Server.
- Encryption Type: Select DES or SDI encryption.
- Select Open to All Locally Known Users and Requires Name Lock.
Click User Activations... to assign users to the Agent host.
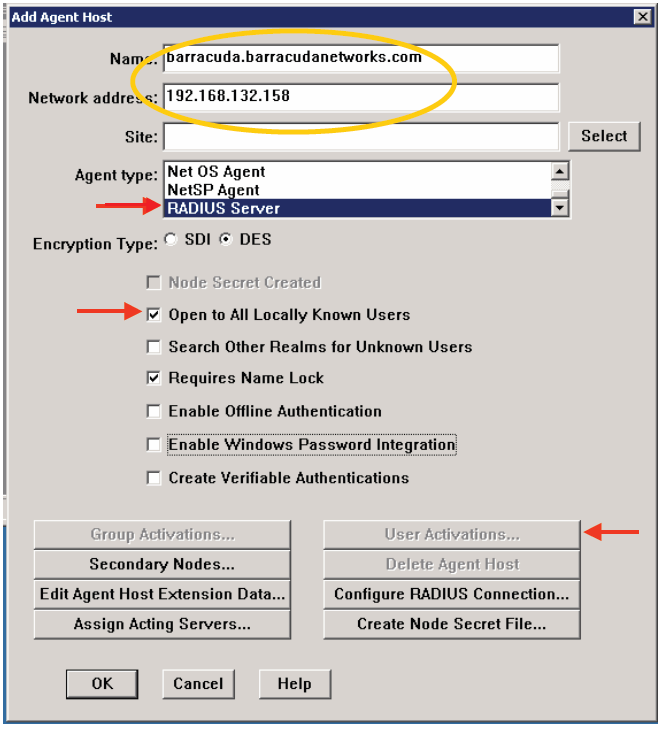
Click OK. Now, the Barracuda Web Application Firewall is added as an agent host on the RSA Authentication Manager.
Import SecurID Tokens
- On the RSA Authentication Manager Server System, go to Start > Programs > RSA Security and select RSA Authentication Manager Host Mode.
- From the Token menu, select Import Tokens.
- Navigate to the token XML file provided by RSA and click Open to import the tokens.
- The Import Status window appears displaying the number of tokens imported.

Add Users to the RSA Authentication Manager and Assign Tokens
On the RSA Authentication Manager Server System, go to Start > Programs > RSA Security and select RSA Authentication Manager Host Mode.
- From the User menu, select Add User.
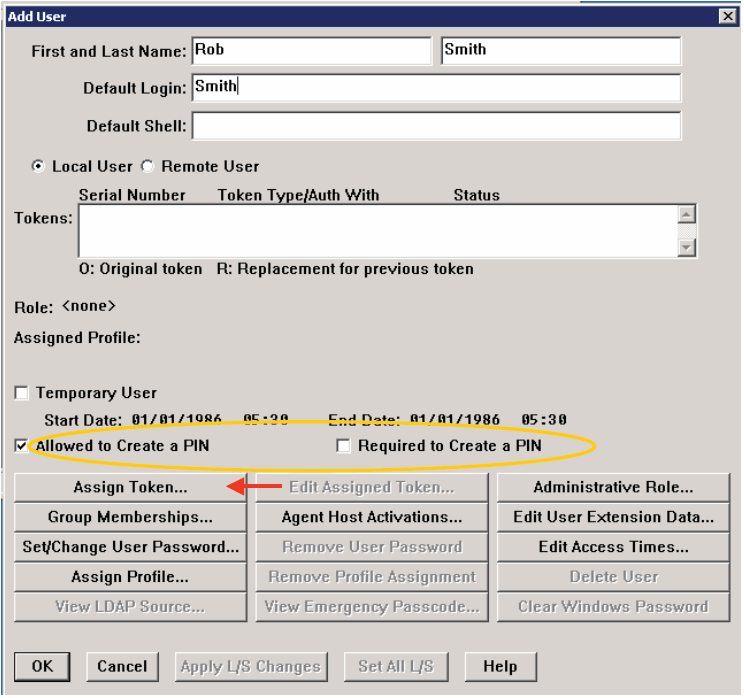
- The Add User window appears. Specify values for the following fields:
- First and Last Name – Enter a user's first and last name.
- Default Login– Enter the default user name that will be used by the user to log in.
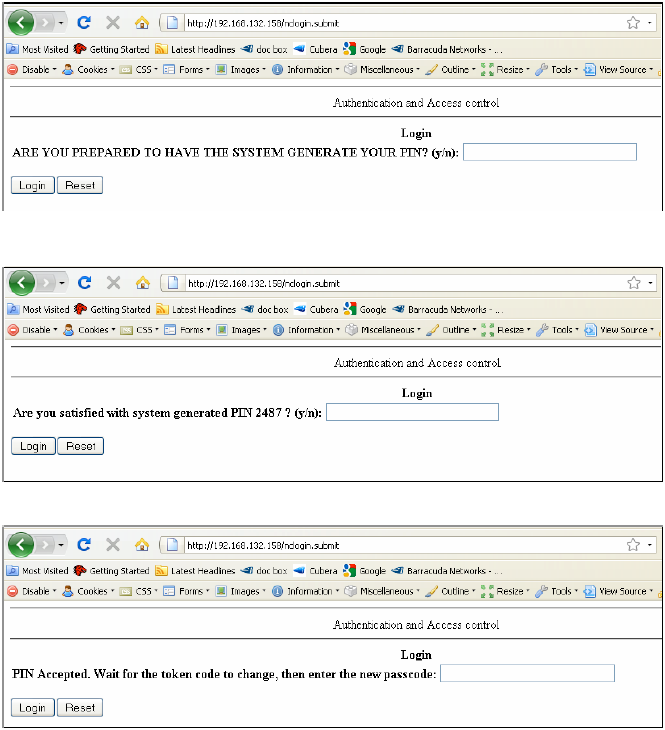
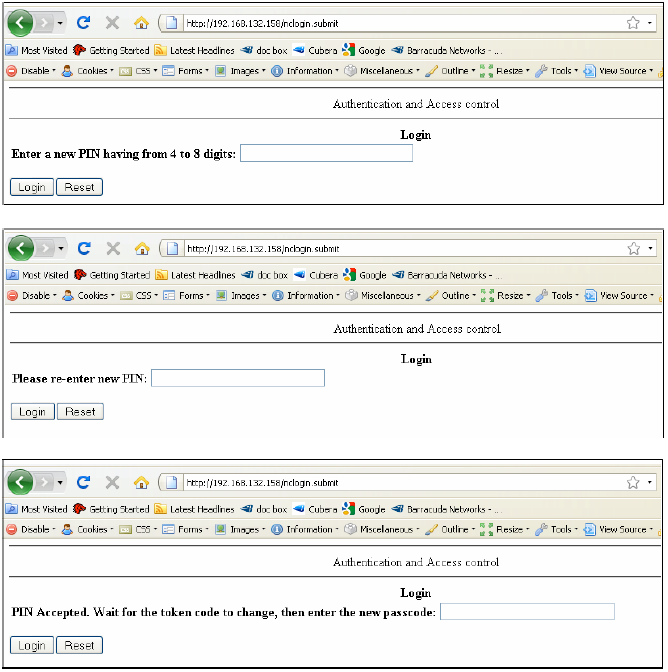
Users on the RSA Server can be authenticated in two ways: Token Mode or Passcode Mode(default). In Token Mode, users authenticate using the Tokencode currently generated by the RSA SecurID authenticator. In Passcode Mode, users authenticate using a Passcode (Personal Identification Number (PIN) followed by the Tokencode).
A PIN can be generated:- If Allowed to Create a PIN or Required to Create a PIN is not selected, the system generates the PIN and gives it to the user.
- If Allowed to Create a PIN is selected, the user may choose to create a PIN or have the system generate the PIN. The user is offered a system generated pin, and if declined, is prompted to enter a PIN.
- If Required to Create a PIN is selected, the user must enter a PIN and is prompted to do so when logging in.
- Select Allowed to Create a PIN or Required to Create a PIN as you prefer.
- Select Assign Token. Click Yes to confirm. The Select Token window appears.
- To automatically assign a token, select the method by which you want to sort the token using Sorted by in the Auto Select section. Click Unassigned Token, and then click OK.
To manually select the token, click Select Token from List. In the Select Token window, select the serial number for the token to assign, and click OK.
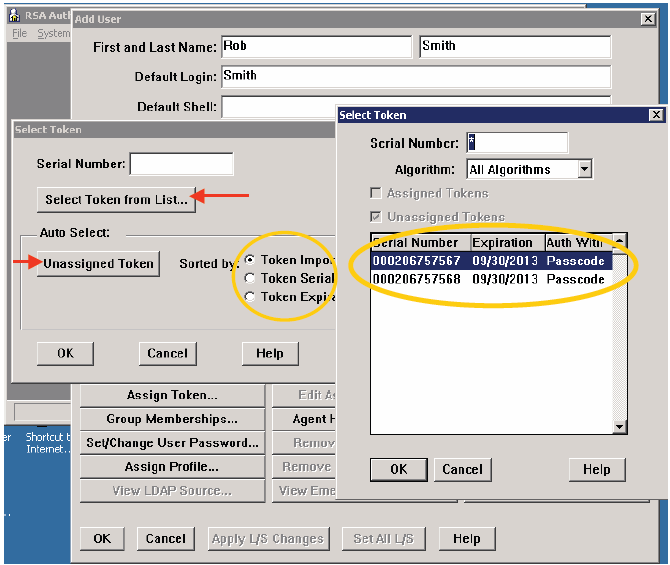
- Give the user the serial number of the assigned token.
The RSA Authentication Manager configuration is now complete.
Configure the Barracuda Web Application Firewall
- Add the RSA SecurID server as an Authentication Service on the Barracuda Web Application Firewall
- Associate the RSA SecurID Authentication Service with a Service
- Configure the authorization policy for the service
Add the RSA SecurID Server as an Authentication Service
On the Barracuda Web Application Firewall web interface, go to ACCESS CONTROL > Authentication Services:
- Select the RSA SECURID tab, and specify values for the following fields:
- Realm Name – Enter the realm name.
- Server IP– Enter the IP address of the RSA Authentication Server.
- Server Port– Default is 1812. If you are not sure of the port, you can check on the RSA Authentication Manager server system.
- Go to Start > Programs > RSA Security.
- Select RSA Authentication Manager Host Mode.
- On the Agent Host menu, choose Edit Agent Host to verify the values.
- Shared Secret– Provide the same shared secret you configured on the RSA Authentication Manager in the Configure the RADIUS Protocol Settings steps.
As a best practice, use a unique account for this integration point and grant it the least level of privileges required, coordinating with the RSA SecurID administrator. This account requires READ privileges. For additional information, see Security for Integrating with Other Systems - Best Practices. - Timeout– Enter the time the Barracuda Web Application Firewall waits for a response from the RSA RADIUS Server before retransmitting the packet.
- Retries– Enter the maximum number of times the Barracuda Web Application Firewall transmits a request packet to the RSA RADIUS server.
- Click Add to save your settings.
Associate the RSA SecurID Authentication Service with a Service
On the Barracuda Web Application Firewall web interface, go to the ACCESS CONTROL > Authentication Policies page:
- Click Edit Authentication next to the service that you want to associate with the RSA SecurID Authentication Service.
- On the Edit Authentication Policy window:
- Set Status to On.
- From the Authentication Service list, select the RSA SecurID authentication service you created in Add the RSA SecurID Server as an Authentication Service.
- Specify values for other parameters, and click Save. For more information on how to configure an authentication policy, click Help .
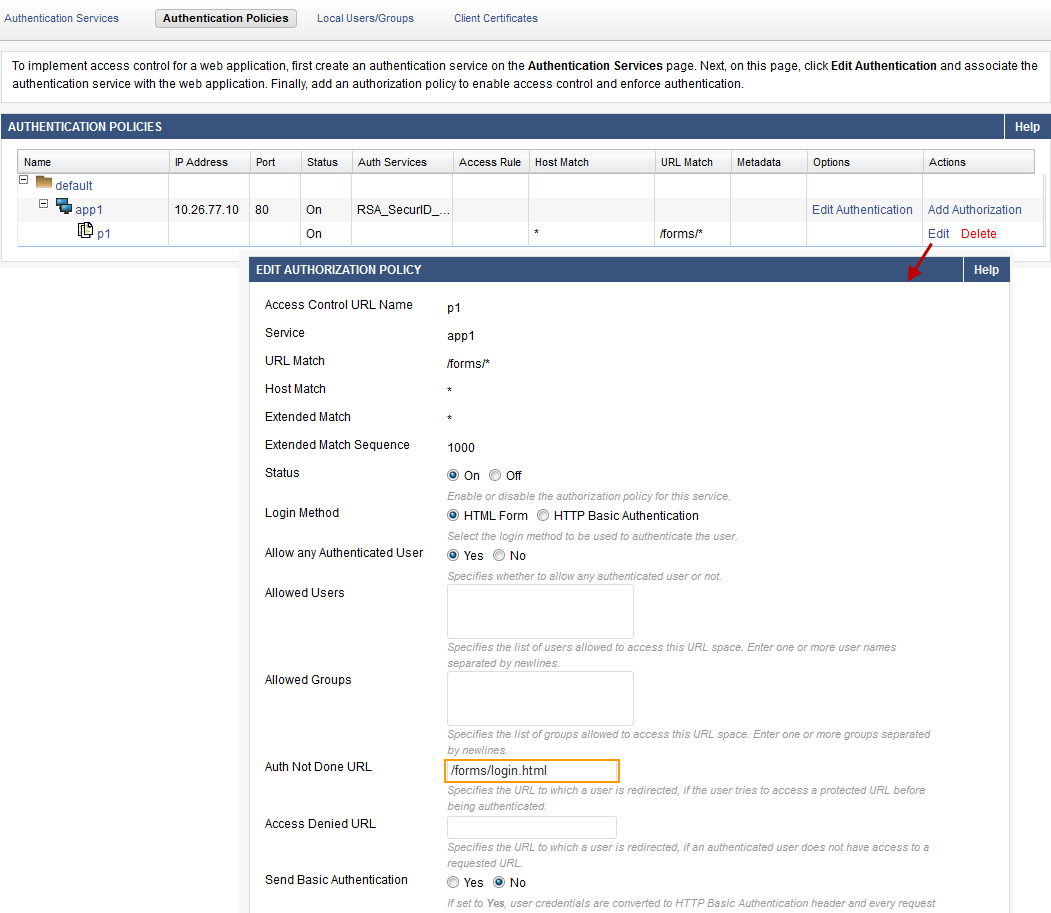
Configure the Authorization Policy for the Service
On the Barracuda Web Application Firewall web interface, go to the ACCESS CONTROL > Authentication Policies page:
- Click Add Authorization next to the service for which you want to configure the authorization policy.
- On the Add Authorization Policy window:
- Policy Name: Enter a name for the authorization policy.
- Status: Set to On.
- Specify values for other parameters as required, and click Save. For more information on how to configure an authorization policy, click Help.
- Click Edit next to the policy in the Authentication Policies section to configure advanced authorization settings.
Verify the Setup and Authentication Process
- Navigate to the restricted URL by entering the IP address into the address bar of your web browser.
- The default authentication page, or the custom login page for authentication if you configured it on ACCESS CONTROL > Authorization , will be presented.
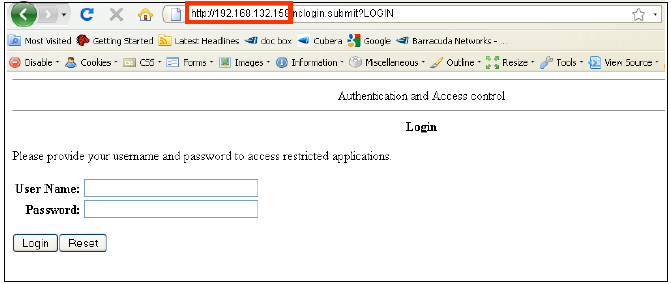
Depending on your configuration, you will be prompted to enter your user name and password. If configured in Passcode mode, you will be offered a system generated PIN, or instructed to provide a PIN.
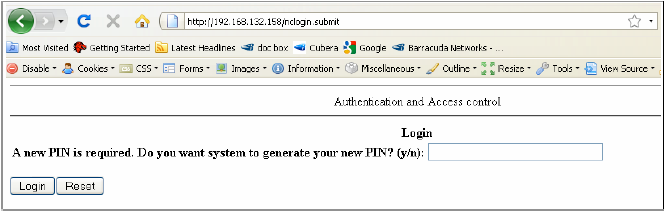
System Generated Pin Screens
User Generated Pin Screens
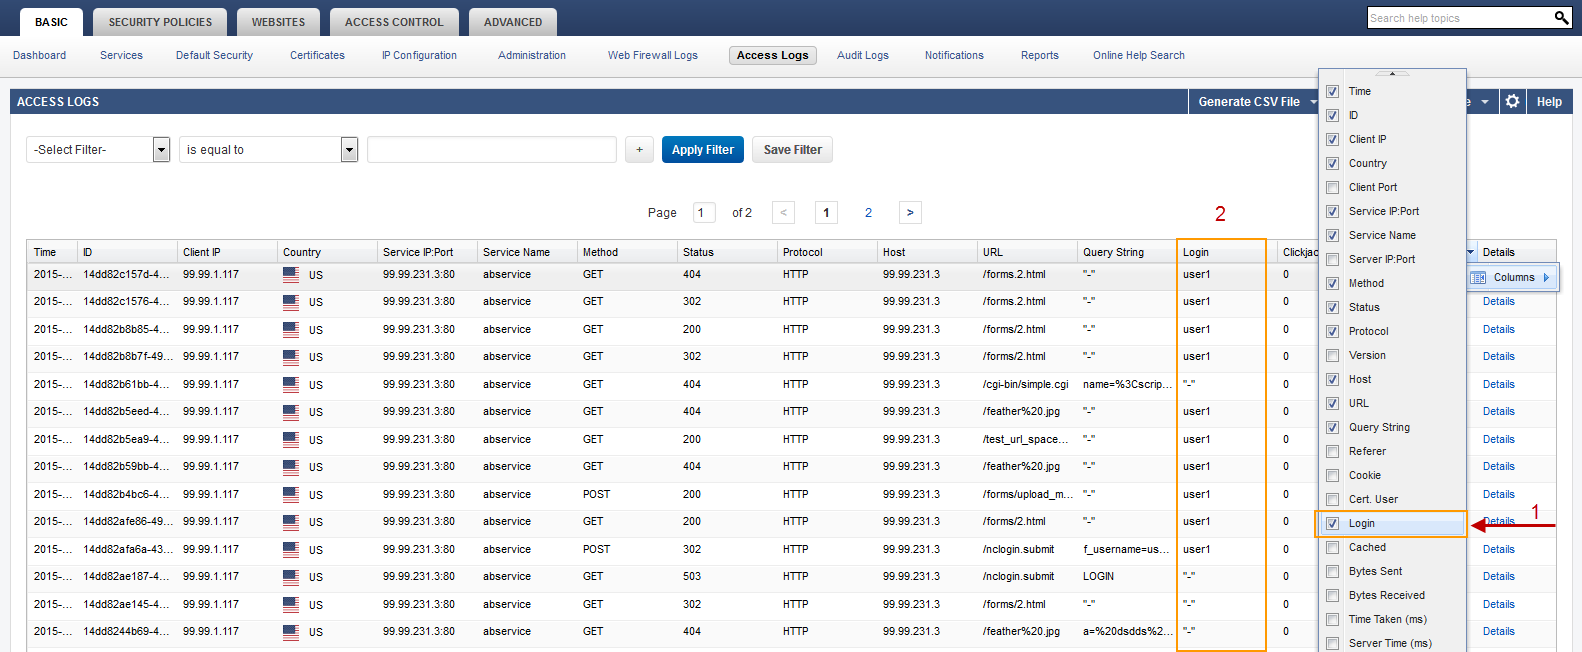
- To verify your login results, navigate to BASIC > Access Logs on your Barracuda Web Application Firewall and enable the Login column by selecting the Login checkbox under the Detail column.