

After installing and configuring the Barracuda VPN Client, you can initiate a VPN connection with the settings from a configured VPN profile.
Before You Begin
Create a VPN profile as described in How to Create VPN Profiles.
Step 1. Start the Barracuda VPN Client
The Barracuda VPN Client can be started in one of the following ways:
- Click Connect after left-clicking the icon in the system tray.
- Execute rvpn.exe. For more information, see How to Configure Remote VPN.
Step 2. Initiate a VPN Connection
- In the Barracuda VPN Client, select a VPN profile from the Profile list.
- Depending on the profile settings, enter the authentication credentials for server, license, or proxy:
- If the profile is configured for public key authentication, enter your Server Password and License Password credentials.
- If the profile is configured for simple username and password authentication, enter your Username and Password credentials.
If a server password is required, enter your Server Password credentials.
Click Connect.
To monitor the progress of your VPN connection, watch the status messages in the client window.
You can close the Barracuda VPN Client window but keep established VPN connections running in the background by clicking Close. You can establish and terminate VPN connections from the Barracuda VPN Client icon in the system tray. For more information, see How to Configure the Barracuda VPN Client for Windows.
Terminate a VPN Connection
To terminate an established VPN connection, click Disconnect in the client window. You can then establish a new VPN connection with a different VPN profile. The Barracuda VPN Client forks a background process that keeps running even if you exit the main client. When you terminate an established VPN connection, this background process is also terminated.
Viewing the Connection Status
Click Status in the left navidation menu to view properties of an established connection.
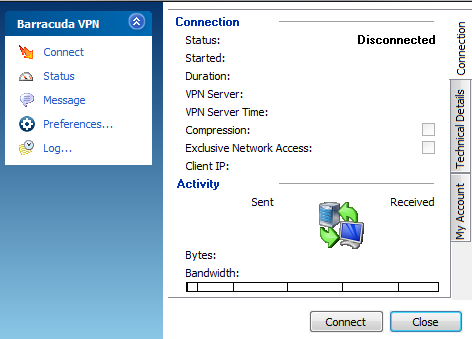
The Connection tab displays the connection details:
- Status – The status of the current connection. It can be active, initiating, or shutting down.
- Started – The start time of the current connection.
- Duration – The uptime for the current connection.
- VPN Server – The VPN server to which the client currently is connected.
- VPN Server Time – Local time on the VPN server.
Compression – Enable or disable compression.
- Exclusive Network Access – If this is enabled, only network resources available through the VPN can be accessed.
- Client IP – The client’s IP address within the VPN.
The Technical Details tab displays the following information:
- Client IP – The assigned VPN client IP address (source) and gateway IP address.
- Domain – The assigned domain.
- DNS – The assigned DNS IP address for the VPN connection
- WINS – The assigned WINS address.
- Compression – Selected if traffic between VPN server and client is compressed.
Exclusive Network Access – If Exclusive Network Access (ENA) has been activated on the VPN server, this check box is automatically selected.
- Secure Routes Section – If secured routes have been assigned to the client by the VPN server, their values will be displayed in the Network and Subnet Mask fields.
The My Account tab shows the authentication method used for the currently established connection and shows a respective status message if the VPN connection is not active. In the same window, the amount of transferred traffic and a graphical representation of the currently used bandwidth is shown.
The Message tab displays the initial welcome message that is configured on the VPN server.
The Data Integrity and Encryption section displays the following details:
Authentication Algorithm – The currently used authentication algorithm.
- Encryption Algorithm – The currently used encryption algorithm.
- Tunnel Mode – The currently used transport mode for the VPN tunnel. Can display a value of TCP, UDP or Hybrid.
To initiate or terminate a connection, use the Connect and Cancel buttons. Click Close to close the VPN client window. The VPN control window will remain open.
As long as an active connection to the VPN server is established (Barracuda Networks authentication only), a Change Server Password link enables you to change your password on the server. Open the configuration dialog, insert a new password, confirm it, and attest authenticity by inserting the current server password.