

The Barracuda Personal Firewall provides you with a few tools to test your access ruleset:
- Check for Overlapping Rules – Highlights access rules with criteria that match those of a selected access rule and helps you determine the best order for your access rules.
- Rule Tester – Tests the access ruleset with the specified connection settings. Also verifies the consistency of your access ruleset.
- Test Report – Contains settings and results that are saved from a rule test. Notifies you if any later changes to the access ruleset result in an unsuccessful connection request with the saved settings.
Check for Overlapping Rules
Because a connection request can match the criteria of multiple access rules, the order of the rules is important. To help you identify access rules with criteria that match those of a selected rule, use the overlap checker.
- Open the Rules view.
- Right-click an access rule and select Select Overlapping.
Any access rules with matching criteria are highlighted. In most cases, the overlap is a harmless outcome of using very openly defined objects, such as the InterNet object.
Rule Tester
The Rule Tester view allows testing rulesets for consistency.
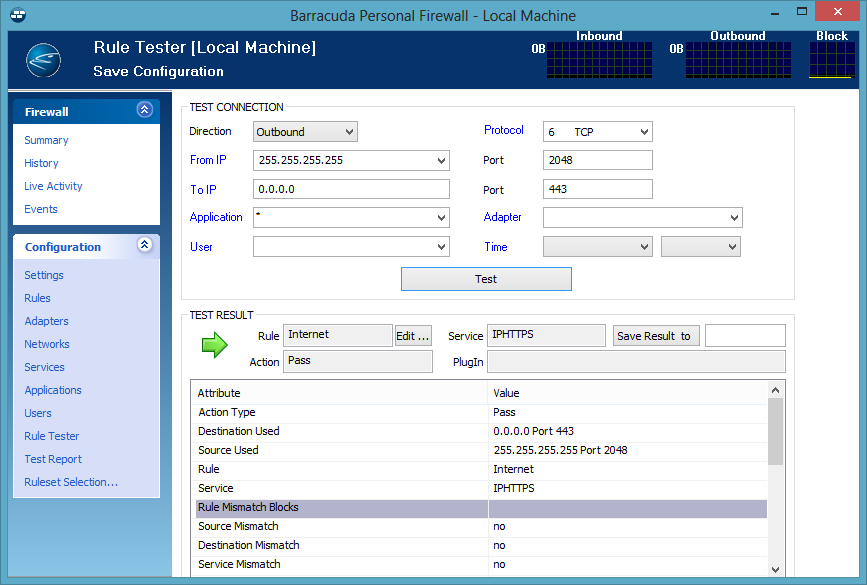
The following entities are available for rule testing:
- Direction – This is the direction of the traffic policy (either Incoming or Outgoing).
- Application – To query for an arbitrary application, leave the asterisk character (*) that is already set as default value. Click the Application link and Select Update Applications to reset the field to the default value.
- From /to IP / Port – Insert the source/destination IP address and the corresponding connection port. Click the From or To link to swap IP address and/or port information.
- Protocol – Specify which protocol to test. Click the Protocol link and select Show all Protocols to include protocols other than TCP/UDP or ICMP into the list.
- Time (optional) – Insert day of the week and time (optional). Click the Time link and select Insert current Time in order to insert current day and time.
- User (optional) – Select a user from the list (optional). Click the User link and select Update Users to clear the field.
- Adapter (optional) – Select an adapter from the list (optional). Click the Adapter link and select Update Adapters to clear the field.
Click Test to test the connection and display the test result in the section below.
The following information is shown in the test result:
- Test Status Icon / Action – A connection attempt with the given values can either have failed or have been successful if a rule is applicable. A failed connection attempt will be indicated by the - symbol and the Block Action field. A successful connection attempt will be indicated by the green arrow symbol and the Pass Action field.
- Rule – The applicable rule responsible for the rule test result. Click Edit … to open and modify the corresponding rule. If the connection attempt has been blocked because no rule has applied, the field will display
. - Service – The applicable Service Object.
- PlugIn – If applicable, the name of the plugin that has been employed in the connection.
- Save Result to – Insert the report name and click Save Result to to save the test result. The output of the connection test is written to the Test Reports view.
- Attribute / Value listing – This listing displays attributes of the tested connection in detail.
Test Reports
Test reports are saved first-come first-served. Test results with Pass are indicated by a green icon; test results with Blocked are indicated by a red icon.
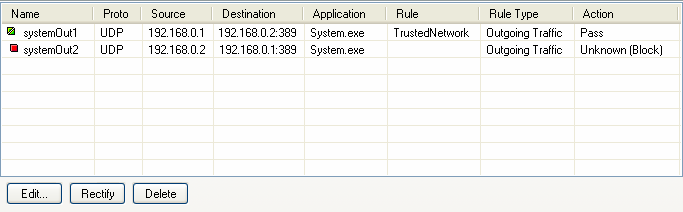
Changing any parameter in any configuration area that influences the result of a test report leads to a status icon change in the overview window. Green icons will become red. To apply the new conditions to an existing test report, select the data set in the overview window of the Test Reports window and click Rectify.
Select a report and click Edit… to open the test result in the Rule Tester window. You may now use the report as a template for further connection tests. Or, select a report and click Delete to delete the report from the Test Report window.