

Applicable Products
These instructions apply to the following products:
- Barracuda Intronis Backup - MSP
About Restoring Exchange Information Store Backups
If you need to recover from Exchange mailbox database corruption, you can use an Exchange Information Store backup to do so. Before you try to restore, consider some prerequisites which must be met in order for the restore to be successful:
- You will need free disk space equal to at least twice the size of the mailbox database you plan to restore (half of this is for temporary files and the other half is the restored copy of the mailbox database).
- If you want to restore back into production, you will have to restore back to an Exchange server on the same domain as the original server.
- You may be able to restore to a different server than the original, but it requires some preparation.
- If you plan to restore to a recovery information store, you will need to create it first.
Once you have verified these requirements are met, you can begin the restore.
Restoring an Information Store
- From the ECHOplatform ribbon bar, select the Manage tab.
- In the Manage screen, navigate to the client account and expand it.
- Click on the computer ID hyper-link.
- Select the Restore tab.
- Click the Restore icon, next to Exchange Info Store.
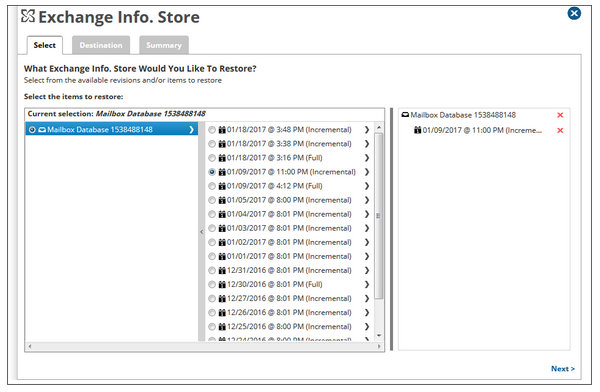
- Select which mailbox database and revision will be restored.
Click on the arrow to the right of the Exchange mailbox database name to see the list of revisions available to restore. Check the box next to the revision you want to restore. If you want to restore specific files (just the database file or transaction logs) click on the arrow to the right of the revision name to expand that list.
Click Next when you have selected the revision or files you want.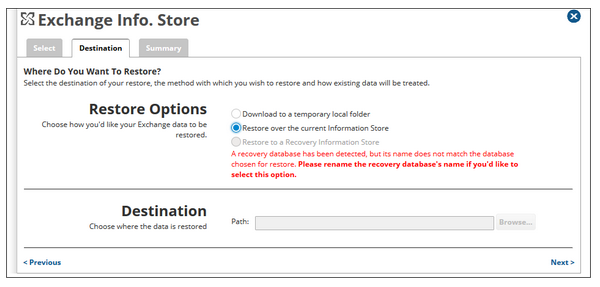
- Pick the method you would like to use and specify a path to restore to (if you choose Download to a temporary local folder). More information about the different restore methods can be found in the section below.
Then, click Next to see a summary of the restore job or click Restore to start the restore immediately.
Restore Methods
There are three different Exchange Information Store restore methods. Determining which one to use comes down to picking the appropriate method for the goal of the restore. Restoring for the purposes of disaster recovery usually leads to restoring over the current information store while restoring to a temporary folder or to a recovery information store is better suited for retrieval purposes.
- Download to a temporary local folder - This option will download the Exchange files to a folder you choose. If you want to restore a full backup by this method, select the revision and restore the files. If you want to restore an incremental backup, you will need to restore the files from the most recent full backup through to that incremental revision. For example, in the window from step (4), if you wanted to restore the information store to 3/21/2016, you would need to restore the files from the full backup on 3/19/2016 and the files from the incremental backups on 3/20/2016 and 3/21/2016; each revision has to be restored separately.
- Restore over the current Information Store - When you select this method, you will overwrite the information store currently on the Exchange server with the one you choose. This method will replace the current information store so be careful when restoring this way. You can pick either a full or an incremental backup to restore when using this method.
- Restore to a Recovery Information Store - If you choose to restore to a recovery information store, this will allow you restore to a "sandbox". The recovery information store can be present alongside the production information store which allows you to transfer data between the two for restores of entire mailboxes or bulk messages. For this option to work, you will need to have created a recovery information store before running the restore (otherwise this option is grayed-out). You can pick either a full or an incremental backup to restore when using this method.
Creating a Recovery Information Store
The process for creating a recovery information store is relatively simple with one caveat. When creating the recovery mailbox database, the (.edb) file must have the same name as the (.edb) file you intend to restore.
If the name of our Exchange database file was "mailstore1.edb" then the command to create the recovery mailbox database should be the following (from the example here):
New-MailboxDatabase -Recovery -Name RDB -Server MBX1 -EdbFilePath "C:\Recovery\RDB\MAILSTORE1.EDB" -LogFolderPath "C:\Recovery\RDB"
...where -Name sets the name of the recovery mailbox database (this can be anything) and -Server specifies the Exchange server you are adding the recovery mailbox database to. In this example the name given to the recovery database is "RDB" and the Exchange server's name is "MBX1."