

Use this article to deploy the Barracuda Cloud Archiving Service component of Advanced Email Security and Compliance for G Suite in your environment.
Step 1. Activate the Service
- Log into https://login.barracudanetworks.com/ using your Barracuda Cloud Control account credentials
- Navigate to Home > Admin > Essentials.
- Click Enter Linking Code and Serial Number to enter this information and activate your subscription.
Step 2. Add Users to Your Barracuda Cloud Control Account
Add users through LDAP authentication and associate a role and whose mail can be viewed with an LDAP user or group, or manually configure and assign roles to local accounts in the web interface.
Active Directory Configuration
Add a New LDAP Directory
Log into https://login.barracudanetworks.com/ as the account administrator, and go to Home > Admin > Directories.
- Click the Add Directory button.
Select LDAP Active Directory.
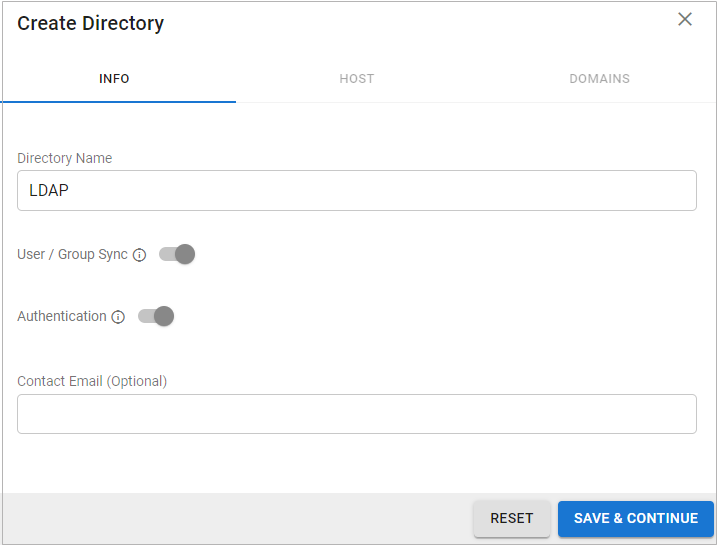
- On the INFO tab, specify a new Directory Name.
Activate the Authentication option to have users authenticate using their LDAP credentials. If you disable this option, users authenticate with Barracuda Cloud Control.
- Click SAVE AND CONTINUE.
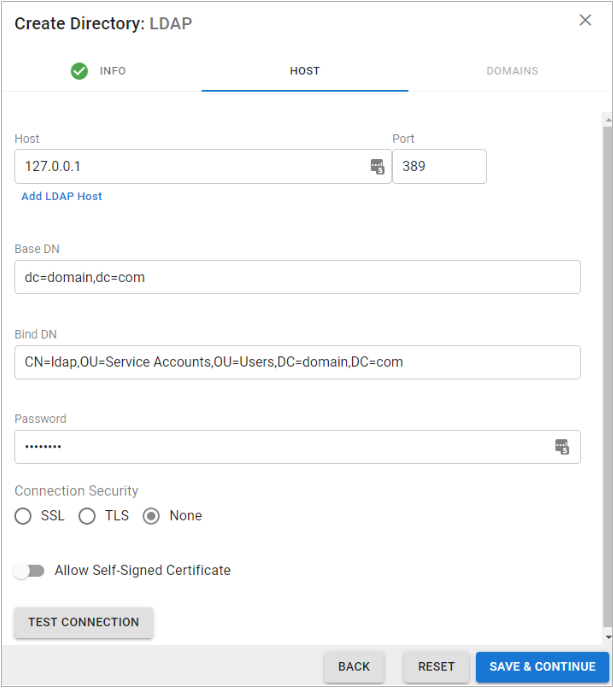
- On the HOST tab, specify the following for the LDAP host:
- LDAP Host IP address
- LDAP Host Port – Use Port 389 for LDAP and LDAPTLS or Port 636 for LDAPS.
- Base Domain Name (DN) – Any user or group that exists with the search base that will sync to Barracuda Networks. For example,
DC=domain,DC=com. - Bind DN – Enter the bind domain name for a service account with read permissions to the active directory.
- Password – Password associated with the service account.
- Connection Security – Select SSL, TLS, or None. For more information, see New Requirements for LDAP Authentication.
- (Optional) To add additional servers, click Add LDAP Host.
- If your LDAP server uses a self-signed certificate, toggle on the Allow Self-Signed Certificate setting.
- Click TEST CONNECTION to check connectivity to the host. If the connection fails, verify your settings are correct and that you have allowed the Barracuda Networks IP in your firewall. Contact Barracuda Networks Technical Support for additional troubleshooting.
- If the connection succeeds, it displays as Connected. Click SAVE AND CONTINUE.
- On the DOMAINS tab, add the domains associated with your users.
- For each domain that you add, click Verify and following the instructions to verify the domain.
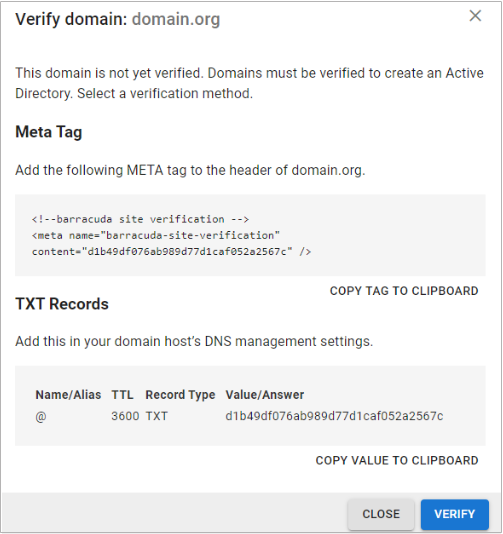
- After each domain is verified, you can sync your users and groups to the Barracuda Cloud Control.
Manually Add Local Accounts (Optional)
Alternatively, you can manually add local accounts that reside only on the Barracuda Cloud Archiving Service.
- Log into the the Barracuda Cloud Archiving Service, and go to Users > User Add/Update.
- Enter the user's Email Address and the User Display Name.
- Enter all aliases associated with the entered email address, one entry per line.
- Enter the account password and select the user role for the account.
- If you select the user role Auditor enter the following additional details:
- Enter a domain for which the auditor can view messages and other Outlook items, and click Add. Any messages that includes an email address in the listed domains in either the From, To, or CC/Bcc areas, or any items that belong to a user in the specified domains, display in search results. To allow the auditor to view all items from all domains, leave this field blank.
- In the Saved Search drop-down menu, select a defined Saved-Search to automatically apply to all searches performed by this auditor. Note that the parameters in the Saved Search take precedence over any domain limitations that may be specified above, as well as over any attempts by the auditor to Search As any other account.
Associate a Role
The following roles are available in the Barracuda Cloud Archiving Service:
- User – Able only to view messages accessible to the account, either because the username for the account is also that of the sender or recipient of a message, or because it has been given explicit access to view an email address via Alias Linking.
- Auditor – Able to create and activate policies, and view, search, and export any messages to/from the domains to which they have access. Additionally, Auditors can save and name an Advanced search for re-execution at a later time from the Saved Searches tab. To create a Domain Auditor (an auditor with access to only a subset of the domains on your Barracuda Cloud Archiving Service), set the role to Auditor and specify at least one domain. If no domains are specified, then all messages in the entire Barracuda Cloud Archiving Service are accessible. No auditor account has access to any system or network configuration information on the Barracuda Cloud Archiving Service.
- Admin – Able to view all items from any user, not just those listed for the account. Also able to create and activate policies, and can make other system or network changes.
To associate a role:
Log into the Barracuda Cloud Archiving Service, and go to Users > LDAP User Add/Update.
In the LDAP User/Group field, enter the LDAP User or Group name to which the permissions apply.
- Select the Role for the specified LDAP user or group account:
- User Role – Specify mailbox addresses to include or exclude from the LDAP account:
Include these Addresses – Enter a mailbox address that you wish to make available to the specified LDAP account, and then click Add.
Exclude these Addresses – Enter a mailbox address that you wish to hide from the specified LDAP account, and then click Add.
Auditor Role – Configure the desired permissions:
Domains – Enter a domain for which the auditor can view mail, and then click Add.
Saved Search – Define Saved Searches on the Basic > Search page, and then select the desired Saved Search from the drop-down menu to filter the auditor's search results.
Exclude these addresses – Enter a mailbox address that you want to hide from the specified LDAP account, and then click Add.
Admin Role – Specify mailbox addresses that you want to hide from the specified LDAP account, and then click Add.
- User Role – Specify mailbox addresses to include or exclude from the LDAP account:
Click Save.
For end-user authentication, refer to How to Set Up LDAP Groups for End-User Authentication.
Step 3. Obtain Your Journaling Address
- Log into the Barracuda Cloud Archiving Service, and go to Mail Sources > SMTP Journaling.
- Verify your journaling address.
Step 4. Configure G Suite
- G Suite Enterprise – If you are using G Suite Enterprise, use the steps in the section G Suite Enterprise Configuration below
- G Suite; non-Enterprise version – If you are using a version of G Suite that is not G Suite Enterprise, use the steps in the section G Suite Configuration below.
G Suite Enterprise Configuration
Use the following steps to configure G Suite Enterprise. If you are using a different version of G Suite, use the steps in the section that follows, G Suite Configuration.
- Log into your Google Admin console at https://admin.google.com.
- From the Home page, go to Apps > Google Workspace > Gmail.
- Scroll to the bottom of the page, and click Routing.
- Under Third-party email archiving section, click Configure.
- Enter a unique name to identify the setting. For example, "Barracuda Cloud Archiving".
- In the Send journal messages to this email address field, enter your journaling address from the Barracuda Cloud Archiving Service Mail Sources > SMTP Journaling page:
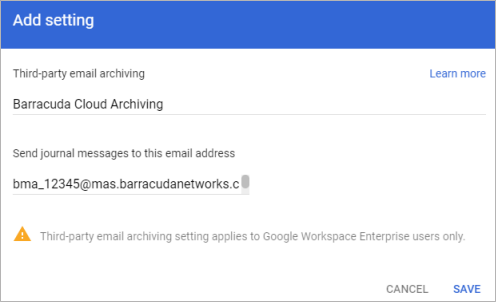
- Click Save.
G Suite Configuration
Use the following steps to configure G Suite. If you are using G Suite Enterprise, use the steps in the previous section, G Suite Enterprise Configuration.
- Log into your Google Admin console at https://admin.google.com.
- From the Home page, go to Apps > Google Workspace > Gmail.
- Scroll to the bottom of the page, and click Routing.
- Under Routing section, click Configure or Add Another Rule.
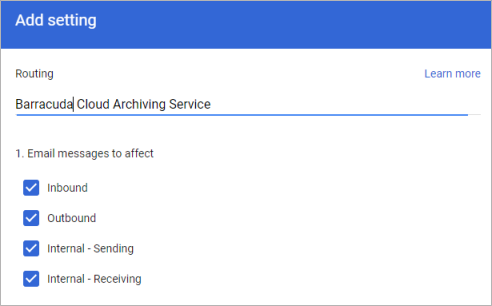
- Enter a unique name to identify the setting, and select all check boxes under Messages to affect:
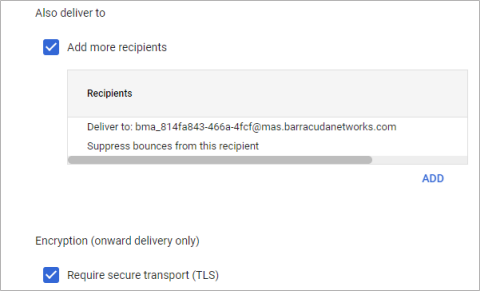
- In the Also deliver to section, click Add more recipients, and click Add.
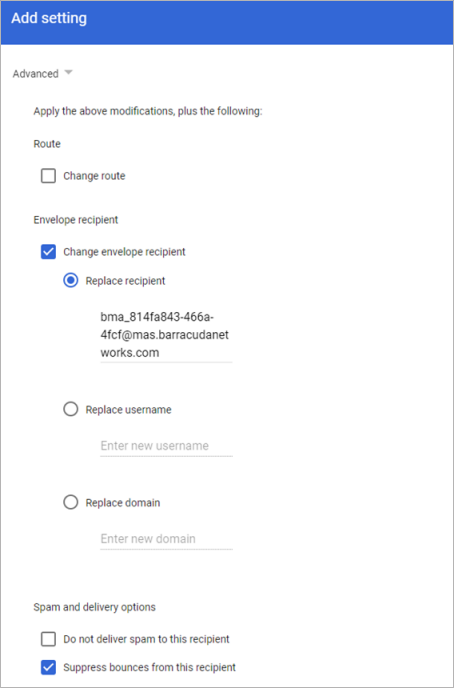
- Under Recipients, select Advanced from the drop-down menu.
- In the Envelope recipient section, select Change envelope recipient.
- In the Replace recipient field, enter the journaling address from the Barracuda Cloud Archiving Service Mail Sources > SMTP Journaling page.
- Clear Do not deliver spam to this recipient, and select Suppress bounces from this recipient:
- Click Save. Select Require secure transport (TLS):
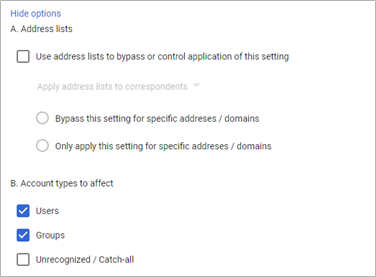
- Toward the bottom, click Show options. Under Account types to affect, select Users and Groups.
- Click Save.