

An Office 365 Exchange Online service account provides Exchange Server directory permissions to grant the Barracuda Cloud Archiving Service read access to all mailboxes.
Requirements
- Microsoft .NET Framework 4.5 or 4.5.1 and either the Windows Management Framework 3.0 or the Windows Management Framework 4.0.
- Verify the service account has the following:
- A mailbox that is not hidden in the Global Address list.
- A license that supports Outlook (i.e., not a kiosk license).
- Enable RPC over HTTP (RoH) for the mailbox. See also How to Enable RPC over HTTP Connectivity.
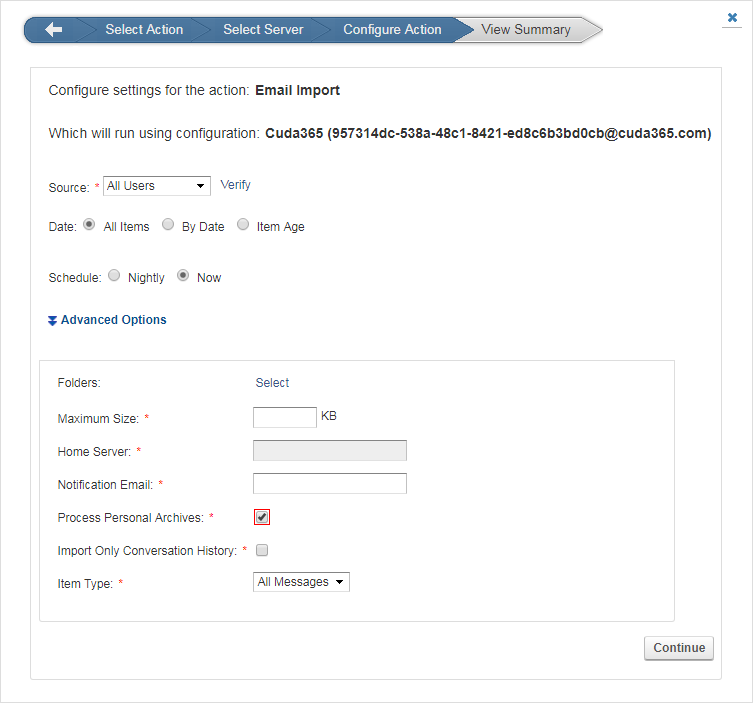
To import archive mailbox/personal archives, click Advanced Options during configuration, and select Process Personal Archives :
To import from Exchange Online using EWS, see How to Configure Microsoft Exchange Online Email Import Using EWS . If you are not using EWS, use the following instructions to import from Exchange Online.
Step 1. Connect to Office 365 Exchange Online
- Install Exchange Online module.
- If you have already installed Exchange Online module, proceed to the next step.
- To install Exchange Online module, open Windows PowerShell as an administrator and enter the following command:
Install-Module -Name ExchangeOnlineManagement
Connect to Exchange Online Powershell and log in with your Office 365 administrator account using the following command:
Connect-ExchangeOnlineAfter you connect to Exchange Online PowerShell, enter the following command:
Get-Mailbox -ResultSize unlimited | Add-MailboxPermission -User <ServiceAccount@domain.com> -AccessRights fullaccess -InheritanceType all -Automapping $false
Step 2. Import from Office 365 Exchange Online
Automatically Discover Settings
- Log into the Barracuda Cloud Archiving Service as the admin, and go to Mail Sources > Exchange Integration.
- Click Start New Action. In the Select Action page, click Email Import.
- In the Select Server page, click Add New Server.
- In the Add New Server dialog box, enter a Configuration Name, the service account email address and password.
- Click Autodiscover.
If autodiscover is unable to identify your settings, use the steps in the following section, Manually Configure Settings.
Manually Configure Settings
Use the steps in this section only if autodiscover is unable to identify your settings as described above in the section Automatically Discover Settings.
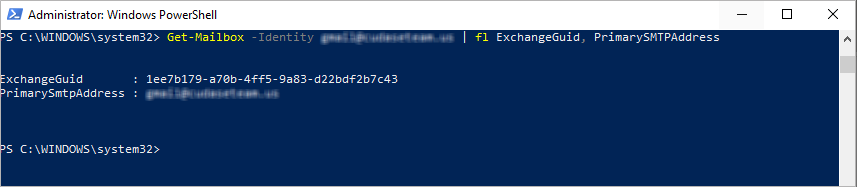
Step 1. Manually Obtain Exchange Hostname Using PowerShell
Open Windows PowerShell, and connect to Office 365 Exchange Online.
Enter the following command, and then press Enter:
Get-Mailbox -Identity <username for service account> | Format-List ExchangeGuid, PrimarySMTPAddress- To determine the Exchange Hostname, combine the
ExchangeGuidwith the domain portion of thePrimarySMTPAddressto form ExchangeGuid@domain.com.
- To close out the remote PowerShell session, enter the following command, and then press Enter:
Disconnect-ExchangeOnline
Step 2. Manually Configure Server Settings for Email Import
Log into the Barracuda Cloud Archiving Service as the admin, and go to Mail Sources > Exchange Integration.
- Click Start New Action. In the Select Action page, click Email Import.
- In the Select Server page, click Add New Server.
- In the Add New Server dialog, click Configure Manually; enter the Exchange details:
- Configuration Name – Enter a name to identify the configuration.
- Exchange Hostname – Enter the Exchange hostname from Step 1 Manually Obtain Exchange Hostname Using PowerShell.
- Username – Enter the service account username.
- Password – Enter the password associated with the username.
- Exchange 2013 – Select Yes.
- Advanced Options – In the Proxy Server field type
outlook.office365.comand leave the Global Catalog Server field blank.
- Click Save to add your configuration and close the dialog box.
In the Configure Action page, click Continue.
In the View Summary page, select All Users from the Source drop-down menu.
Specify the desired Date and Schedule settings. Click Continue.
- Verify the configuration settings in the View Summary page, and then click Submit to add the Email Import to the Scheduled Actions table.