

Before connecting for the first time, you need at least one working VPN profile. Upon initial connection or if no working VPN profile for automated connections has yet been defined, the Barracuda VPN Client for Windows appears with the default profile’s connect dialog. Instead of creating a new profile, you can also edit the default profile. You can create multiple profiles for several users with individual certificates. The VPN Client for Windows also offers the option to import VPN profiles created in Barracuda Firewall Admin.
Before You Begin
- For successful certificate authentication, both client and root certificates must be available. The VPN Client for Windows supports the certificate types DER-encoded binary x.509, PKCS #12, and PEM-encoded binary x.509. You can also export certificates either to a text file or to the clipboard for further use elsewhere.
- Barracuda License Authentication requires a valid certificate file
(*.lic). This certificate file must be saved locally on the client system using it. For special characters in user credentials to work, the codepage must be configured to support UTF-8 on the Barracuda CloudGen Firewall. For more information, see Step 1 in How to Configure Offline Firewall Authentication in the CloudGen Firewall documentation.
Create a VPN Profile
Configure a VPN profile for every VPN server you might want to access. In this way, you can use the client’s Direct Access functionality (see How to Configure the Barracuda VPN Client for Windows) that lets you keep your VPN connection automatically up in the background via different VPN gateways.
- Launch the VPN Client for Windows by left-clicking the Barracuda Network Access Client icon in the system tray.
- Connect using your administrative credentials. The client shows the default profile’s connect dialog. VPN profiles can be chosen using the profile drop-down menu. Click Connect to initiate a connection using the chosen profile.
In the upper-left menu of the Barracuda Network Access Client window, click the VPN tab. The VPN control window opens.
Select New Profile.
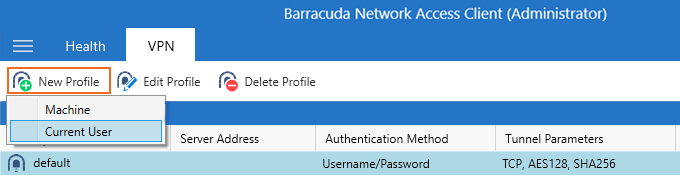
- Select Current User. The Create new Current User VPN Profile window opens. If you want to create a system profile, select Machine.
- In the General tab, enter a Description of the connection entry. This name will be displayed as profile name in the connection dialog window.
- In the Server Address field, enter the host names or IP addresses of the VPN server. Separate multiple entries using a semicolon (';').
- Select the Authentication Method required by the VPN server. The following authentication methods are supported:
- Username/Password
- X.509
- Username/Password + X.509
- Barracuda License
- When using Single Sign-On for connection establishment, enable the option Connect with Windows credentials. For more information, see How to Configure the Barracuda VPN Client for Windows.
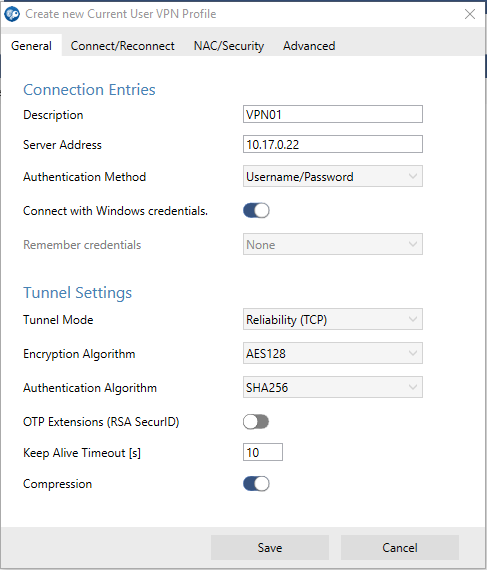
- Click Save.
The newly created VPN profile can now be chosen as a preconfigured profile from the VPN Client dialog. You can later edit the settings at any time.
Profile Settings
The profile configuration is done via the Connection Entries section in the General tab. To edit and modify connection entries and advanced VPN profile settings, select the profile in the list, right-click it, and select Edit.
General Tab
- Tunnel Mode – The protocol to be used for tunnel traffic. The available options depend on the chosen proxy type.
- Reliability (TCP) – Uses TCP for tunneling. This setting is required if the gateway is configured to expect the client connection on port 443, or if the connection should be established via HTTP proxy.
- Response (UDP) – (default) Uses UDP for tunneling for increased performance.
Hybrid (UDP + TCP) – Uses a combination of UDP and TCP. TCP traffic is tunneled via UDP and UDP user traffic is tunneled via TCP.
Optimized (UDP + TCP) – Uses a performance-optimized combination of UDP and TCP. All user traffic is tunneled as UDP (as in UDP mode) and VPN session information is sent through TCP for increased reliability.
- Key Agreement Protocol – The algorithm to be used for key establishment. Default: P-256.
- Encryption Algorithm – The algorithm to be used for encryption. Default: AES-128-CBC.
- Authentication Algorithm – The algorithm to be used for authenticating to the VPN server. Default: SHA256.
- One-Time Password (OTP) Mode – Enables / disables One-Time Password (OTP) extensions.
- On (Dynamic) – Legacy OTP mode (i.e., used for RSA ACE, not supporting MSAD + OTP).
- On (Static) – If selected, the user can enter the OTP in advance, before connecting. This mode supports multiple credentials. The additional password input field maps to the Secondary Authentication Scheme as specified in Firewall Admin. For more information, see How to Configure Multi-Factor Authentication Using Time-based One-time Password (TOTP).
- Off (Transparent) – Select this option for OTP environments that are fully transparent to VPN, such as Azure MFA with Approve/Decline, SMS Passcode, etc.
- Keep Alive Timeout [s] – The time value in seconds to keep an idle VPN tunnel alive. Default: 10.
Compression – Enabled (default) triggers the Barracuda VPN Client to request compressed traffic in order to save bandwidth.
Connect/Reconnect Tab
- Server and Alternate Port Probing – Enables overflow from port 691 to 443 if port 691 is blocked.
- Determine fastest VPN Server – (recommended) Activate automatic selection of the fastest VPN server by measuring the roundtrip times of all available servers prior to connecting if more than one server IP address has been configured in the profile.
- Connect Timeout [s] – Timeout period in seconds that will be used for reconnection attempts to the given profile. The lower this value, the faster the connection is established to the fallback profile, if defined. Recommended and default value: 10.
- Retry Timeout [s] – Timeout period in seconds that will be used for reconnection attempts to the given profile. The lower this value, the faster the connection is established to the fallback profile, if defined. Recommended and default value: 60.
- Maximum Reconnect Attempts – Maximum number of reconnect attempts before terminating a connection. Default: 3.
- Fast Reconnect – With this option enabled (recommended), reconnection is performed using a token instead of prompting the user for login credentials. Fast Reconnect is also to be considered in conjunction with one-time passwords.
- Fallback Profile – Fallback profile definitions. The fallback profiles will be tried next if a connection to a certain profile cannot be established.
- Connect via HTTP Proxy – Select whether a proxy should be used. Default: disabled.
- Proxy Address and Port – IP address and port for the proxy. If HTTP Proxy is used, the system’s proxy server is automatically set as default. If not, the value is by default empty.
- Simulate SSL – Enable when using a proxy server that requires an SSL handshake. Default: disabled.
NAC/Security Tab
- Network Access Control Mode
- Off – (default) disabled.
- On – If enabled, the health state will be validated via the Access Control Service before a connection is established.
- On (Interception) – If enabled, the health state will be validated while a VPN connection is initiated. If disabled, the health check is delayed until a VPN connection is established.
- Terminate VPN if unhealthy – A VPN connection will be terminated as soon as the health check results in unhealthy state.
- Access Control Timeout [s] – Timespan to wait for the health check. Default: 60.
- Allow ENA – Allows or blocks ENA (Exclusive Network Access) connections. Default: enabled. This is required in order to successfully establish a VPN connection between a server forcing ENA and a client. Otherwise, no connection is possible. If the VPN service to connect to is executed on a Barracuda CloudGen Firewall, an ENA connection can only be established with clients running the Barracuda Personal Firewall.
- Allow Offline Ruleset – Enable the client to receive and use offline firewall rulesets from the VPN server. Offline rulesets are effective whenever no VPN connection is active. Default: enabled.
Advanced Tab
Start Script / Stop Script – Scripts to be started automatically upon connecting or disconnecting (e.g., to automatically modify Internet Explorer settings).
Execute Start Script / Stop Script as SYSTEM – Execute start script / stop script as SYSTEM.
- Disconnect when user logs off – The behavior expected when logging off from Windows (Start > Log Off). If enabled, the VPN connection is terminated upon performing a system logout. If disabled, the VPN connection remains active.
- Server Certificate Validation Mode
- Off – Always trust the certificate offered by the server and do not show a warning to the user if it changes.
- On – (default) The certificate is checked against the Trusted Root Certificate Authorities and the server’s hostname (CN, SubAltName) gets verified. If the certificate is not trusted, a warning dialog will appear, but connecting is still allowed after confirming the dialog.
- Enforced – The certificate is checked against the Trusted Root Certificate Authorities and the server’s hostname (CN, SubAltName) gets verified. If the certificate is not trusted, the connecting process gets aborted with no warning. Non-admins will not be able to connect to any untrusted servers with that option.
- Enable Active Directory Probing – If enabled (default: disabled), VPN connections will be terminated as soon as a Microsoft Active Directory service is detected. This can be used to prevent the client from using a VPN connection while in the office network.
- Domain Controller Auto-Discovery – Enable Domain Controller auto-discovery when using Active Directory probing.
- Active Directory Probing Hosts – Add one or more IP addresses of known Microsoft Active Directory servers. Separate several entries using semicolon characters (e.g.: 1.2.3.4;2.3.1.4;1.3.4.2). Storing known MSAD servers here accelerates the process of detecting MSAD services.
- Probing Timeout [s] – Timespan in seconds to wait for probing response. Default: 3.
How to Import a Profile from Barracuda Firewall Admin
To import VPN profiles that were previously created in Barracuda Firewall Admin, perform the following steps:
- Create a VPN profile within Barracuda Firewall Admin and save it locally.
- Locate the saved *.vpn file in Windows Explorer and double-click it.
The profile will now be imported into the Barracuda VPN Client.