

The following steps walk you through the process of deploying a Barracuda Backup appliance. Alternatively, you can download and follow the quick start guide Barracuda Backup Quick Start Guide.
Create a Barracuda Cloud Control Account
Before you can connect your Barracuda Backup appliance to Barracuda Cloud Control, you must first create an account:
- If you do not have an account, go to https://login.barracudanetworks.com/ and click Create a user.
- Enter your name, email address, and company name, and specify if this is a partner account. Click Create User.
- Follow the instructions emailed to the entered email address to log in and create your Barracuda Cloud Control account.
- After submitting your new account information, the Account page displays your account name, associated privileges, and username.
Verify Equipment
Verify that you have the necessary equipment:
- Barracuda Backup appliance (check that you have received the correct model) and AC power cable (included)
- Barracuda Backup appliance serial number and linking code (available on both the side of the Barracuda Backup appliance and the Barracuda Backup Quick Start Guide included with the appliance)
- Connectivity and access information for all data sources you want to back up
- VGA Monitor (Models 290-1191)
- Console cable is needed for the 190 model
- USB Keyboard (recommended)
Optionally, PS2 keyboard input is available on models 290-490 - For Ethernet models, an Ethernet connection is required*
- For LC Fiber models, an LC SFP or SFP+ connection is required*
*Cabling differs based on the appliance model. For more information, refer to Barracuda Backup Hardware Specifications.
Activate the Barracuda Backup Appliance
To activate your appliance:
- Log in to https://login.barracuda.com. If you do not have an account, follow the instructions in the section Create a Barracuda Cloud Control Account.
- Click Backup in the left pane, and go to Admin > Activate Barracuda Backup.
- Enter the Serial Number and Linking Code from the sticker on the back of the Quick Start Guide included with your appliance, and click Next.
- The wizard launches. In the Your Info page, enter your contact information, and click Continue.
- In the Device Info page, enter a Device Name to represent the device in the UI.
- Select the Time Zone where the device will be physically located.
Enter the geographical location of the device, select whether to Automatically update device firmware after activation, and click Continue.
- Read and accept the Terms and Conditions, and click Done.
Once your device is linked, click Go to Dashboard.
Physically Install the Appliance
Fasten the appliance to a 19-inch rack or place in a stable location.
- Connect an Ethernet cable from your network switch to the Ethernet port on the back panel of the appliance; connect any additional cables as necessary.
- Connect the power cord, monitor, and keyboard.
Press the Power button on the front panel to turn on the appliance.
Model 190
Note that the model 190 does not include a VGA port. If you know the IP address assigned to the appliance via DHCP, you can use a web browser to log into the appliance locally and change the IP address settings on the Device Information page.
Alternatively, to specify a static IP, use a console cable (USB to RJ45 recommended) and terminal application/emulator to open the console administration interface.
In this example, PuTTY is used as the terminal emulator. Any similar terminal application will work. These set up instructions uses Windows. After installation:
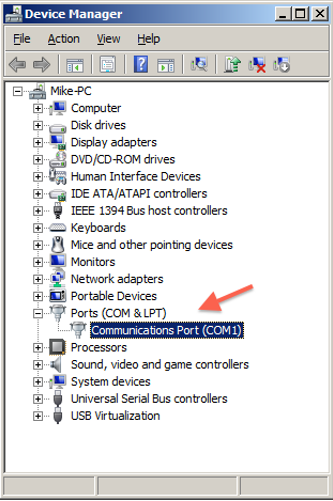
Plug in your USB to Serial/RJ45 adapter, and determine its COM port number by opening the Windows Device Manager (a driver must have previously been installed for the adapter).
Go to Start > Control Panel > Device Manager or right-click My Computer, and select Properties > Device Manager.
Expand Ports (COM & LPT).
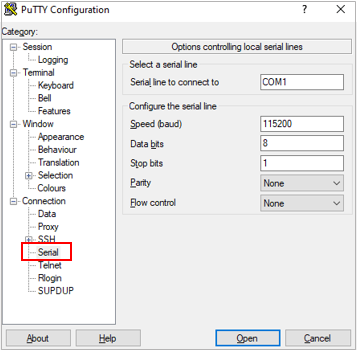
- Open PuTTY. Select the Connection > Serial category. Ensure the following settings are correct:
- Serial Line: COM1
- Speed (baud): 115200
- Data bits: 8
- Stop bits: 1
- Parity: None
- Flow control: None
Select the Session category, and click the Serial radio button for the Connection type.
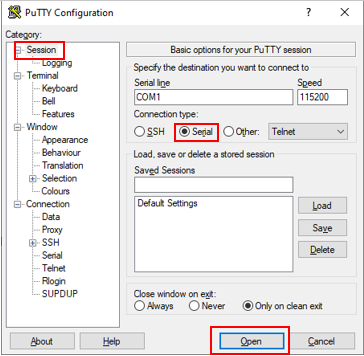
To save this session, enter a name under Saved Sessions and click Save. This will ensure that you have quick access to your commonly used sessions. Settings are saved within PuTTY so copying the application to a different machine will also copy your saved sessions.
Click Open to start a new serial session.
Once a connection is made, you will be prompted for the username and password:
Username: admin
Password: Appliance serial number (numeric value only)Use keyboard arrows and commands to navigate the Barracuda Backup console interface. For more on the console interface, see Barracuda Console.
Open Firewall Ports
If your Barracuda Backup appliance is located behind a corporate firewall or web filtering service, open the following ports to ensure proper operation:
| Port | Direction | TCP | UDP | Usage |
|---|---|---|---|---|
| 22 | Out | Yes | Yes | Technical Support Services; see Technical Support and Required Outbound Connections for Barracuda Networks Appliances. |
| 80 | Out | Yes | Yes | Communication |
| 443 | Out | Yes | Yes | Communication |
| 1194 | Out | Yes | Yes | Communication |
| 5120 | Out | Yes | Yes | Barracuda Backup Agent |
| 5121-5129* | Out | Yes | Yes | Replicate data to Barracuda Cloud Storage |
*Barracuda Backup uses these ports to securely transfer data over the Internet to the offsite storage location. Contact Barracuda Networks Technical Support to restrict outbound network traffic on these ports to only reach Barracuda Networks. | ||||
Enter Encryption Key (Barracuda Encrypted Backup Appliance Only)
- To access the configuration menu, log into the Barracuda Console and enter admin for the username. For the password:
If your appliance serial number is higher than 1 311431, then the default administrator password is the numeric portion of the serial number. If your serial number is 1311431 or lower, then the default administrator password is admin. For help finding the serial number of your appliance, see Serial Number for Hardware and Virtual Appliances. - Use the arrow keys to highlight Disk Encryption in the left pane.
- Press Enter to switch from read mode to edit mode.
Use the arrow keys to highlight the Change Encryption Key section in the right pane.
Type a new encryption key that meets the password requirements listed on-screen in the Enter New Key and Confirm New Key fields.
Optionally, type a new power-on password in the Enter Password and Confirm Password fields.
Navigate to Save, and press Enter. The confirmation screen displays.
Press Enter to continue and return to the Barracuda Console.
In the System Configuration screen, use the down arrow to navigate to and select Exit, and press Enter.
Configure IP Address and Network Settings
By default, the Barracuda Backup appliance is configured to obtain an IP address on your network using DHCP. If you want to assign it a static IP address instead, you can configure it using the console administration interface.
To configure the Barracuda Backup appliance to use a static IP address:
- Connect a monitor and keyboard to the Barracuda Backup appliance.
- Use your Arrow keys to highlight the TCP/IP Configuration field.
Press Enter to access the right pane.
For appliance models that contain both the 10GB and fiber (SFP+) interfaces, including models 791, 891, 895b, 991, 995b, 1091, and 1191, choose the interface to use by using the arrow keys to select fiber or copper. The default or currently implemented interface is reported as the Current mode. To switch the interface, reboot the appliance.

- Use the arrow keys to select and enter the IP Address, and then press Enter to move to the next option.
Enter the remaining settings as appropriate for your network.
Use the arrow keys to navigate to Save, and press Enter.
In the Network Status section, Local and Internet should display as Up while Cloud displays as DOWN until the appliance is linked to an account later in the installation process.
For additional information, refer to the article Barracuda Console.
Verify Connection to Barracuda Networks
Once you log in to the web interface, the Barracuda Backup appliance you have just installed, powered on, and linked, should be listed in the left pane with a green indicator ( ) to the left of its name. The Dashboard page displays a green light next to the appliance name indicating it is successfully linked to your account. If the indicator light is not green, verify network settings and appliance connectivity, or contact Barracuda Networks Technical Support for additional direction.
Secure Barracuda Encrypted Backup Access (Barracuda Encrypted Backup Appliance Only)
Use the Admin > Users page to assign user roles and set IP login restrictions. Assign the Account Administrator role only to users who must have full access to all appliances on the account. For an additional level of security when logging in to Barracuda Cloud Control, you can set up multi-factor authentication.
Enter Server Name and Location
In the System > Barracuda Backup Appliance Settings page, enter a name for your Barracuda Backup appliance, the associated time zone, and server location.
Define Display Groups
If you have multiple Barracuda Backup appliances, you can manage them through display groups:
- Log in to Barracuda Backup, and go to the Admin > Display Groups page.
- All display groups active on your account display in the Current Display Groups section.
- To add a new display group, enter a name for the group of devices, and then click Add. For example, if you want to group all Barracuda Backup Servers by location, you might create groups by geographic location: Engineering - Asia, Engineering - US, Engineering - Europe.
- The display group name appears in the Current Display Groups section.
To remove a display group, click Remove to the right of the group name you want to remove; click OK to remove the group.
Add a Barracuda Backup Appliance to a Group
Once you create display groups, you can add a Barracuda Backup appliance to the group using the following steps:
- In the left pane, select the desired Barracuda Backup, and go to the System > Barracuda Backup Appliance Settings page.
- In the Backup Appliance Display Group section, select the desired display group name from the Current Display Group drop-down menu.
- To add or remove display groups, click Manage your display groups; the Admin > Display Groups page displays.
- Click Save.