

The following sections walk you through the process of deploying a Barracuda Backup Virtual (Vx) appliance.
System Platform Requirements
Barracuda Networks provides the following types of virtual images for the Barracuda Backup Vx deployment.
Table 1. System Platform Requirements
| Image Type | Platform | Version |
|---|---|---|
| OVF | VMware | See Virtual Infrastructure for supported versions. |
| VHD | Microsoft Hyper-V | See Virtual Infrastructure for supported versions. |
System Resource Requirements
The most common mistake when designing an environment for Barracuda Backup Vx is to size only for capacity as opposed to sizing for capacity and performance. Tasks such as backup, offsite replication, data restoration, and purging can use a significant amount of system resources. When considering a Barracuda Backup virtual deployment, it is best to consider the use cases of the Backup Vx in addition to needed storage.
Table 2. vCPU Recommendations
| Backup Volume | Minimum Recommended vCPUs | High Performance Recommended vCPUs |
|---|---|---|
| 0-2 TB | 1 vCPU | 2 vCPUs |
| 2-6 TB | 2 vCPUs | 4 vCPUs |
| 6-16 TB | 4 vCPUs | 8 vCPUs |
| 16-32 TB | 8 vCPUs | 16 vCPUs |
| 32-100 TB | 16 vCPUs | 32+ vCPUs |
Table 3. RAM Recommendations
| Backup Volume | Minimum Recommended RAM | High Performance Recommended RAM |
|---|---|---|
| 0-1TB | 2 GB | 4 GB |
| 1-4 TB | 4 GB | 8 GB |
| 4-12 TB | 8 GB | 16 GB |
| 12-16 TB | 16 GB | 32 GB |
| 16-24 TB | 32 GB | 64 GB |
| 24-48 TB | 64 GB | 128 GB |
| 48-100 TB | 128 GB | 256+GB |
Storage Recommendations
- Any storage infrastructure consisting of Local/Direct-Attached, SAN, and NAS
- Storage with inadequate throughput, read, and write speeds will suffer
- Servers with software RAID, slow NAS, and low-RPM drives will yield poor performance
VMware vSphere Deployment
To deploy Barracuda Backup Vx in VMware vSphere:
- Go to https://barracuda.com, and select Backup from the Products drop-down menu.
- Click Models/Editions, and select Virtual from the Deployment options drop-down menu.
- Click Free Eval Unit or Purchase, fill out the form, and submit your request.
- An email is sent to the specified email address.
Follow the instructions in the email to download and extract the Barracuda Backup Vx .zip archive to a location accessible from a machine running vSphere.
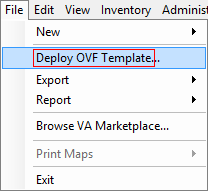
- Launch vSphere Client, and from the File menu, click Deploy OVF Template:
- The vSphere Client launches the Deploy OVF Template wizard.
- Click Browse, navigate to the extracted folder, and locate the Barracuda Backup Vx .ovf file (for example, BarracudaBackupService-vm4.2.4-fw6.2.00.10159-20150807-5x.ovf):
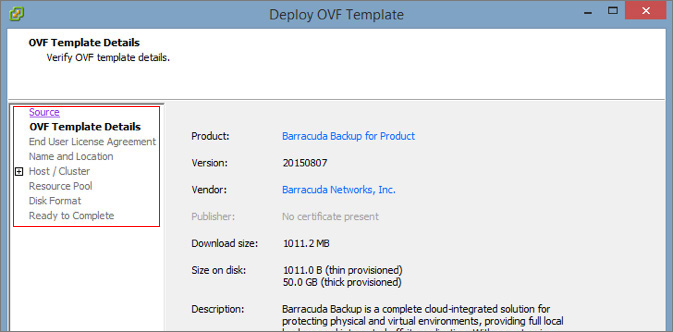
- Click Next. In the wizard, complete the following:
- Review appliance information and the ESX version
- Name the appliance and define a location where the virtual machine is to be created
- Select the datastore where the VMDK file is to be stored; a dedicated disk store is recommended
Select the disk format as Thick Provisioned Lazy Zeroed
- Review your settings, and click Finish to deploy the appliance.
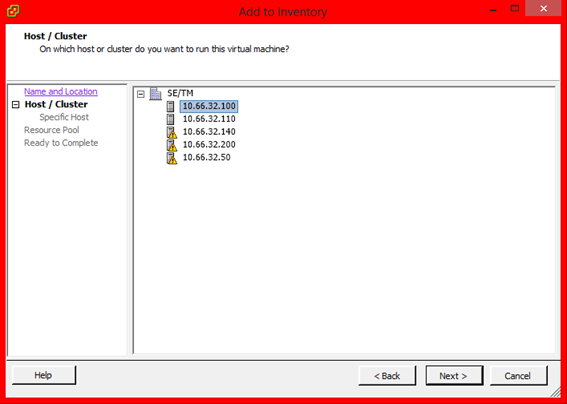
After deployment is complete, locate the appliance within the appropriate data center, host, or resource pool.
Allocate Additional Resources
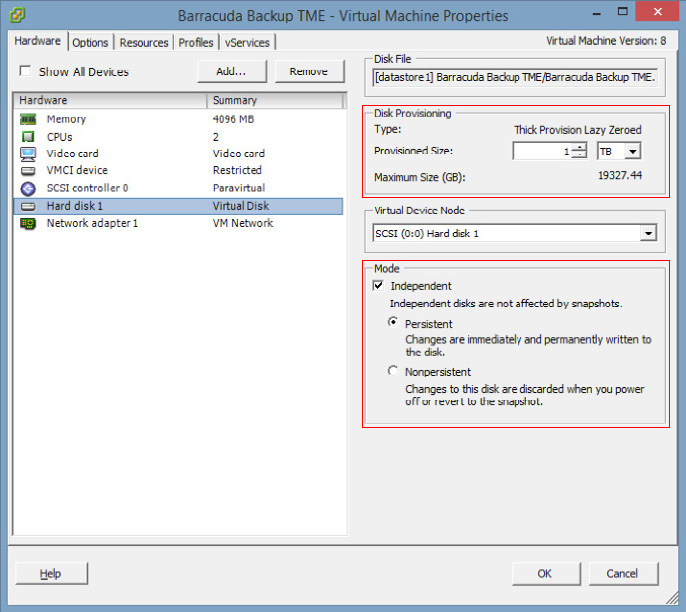
- With the Barracuda virtual appliance powered off, right-click the appliance, and click Edit Settings.
Edit the CPU, Memory, and Hard disk 1 Provisioned Size settings based on the recommendations in Tables 1 and 2 above.
- Click OK. Once the hardware settings are defined, power on the virtual appliance. The appliance is prepared for use; this may take several minutes.
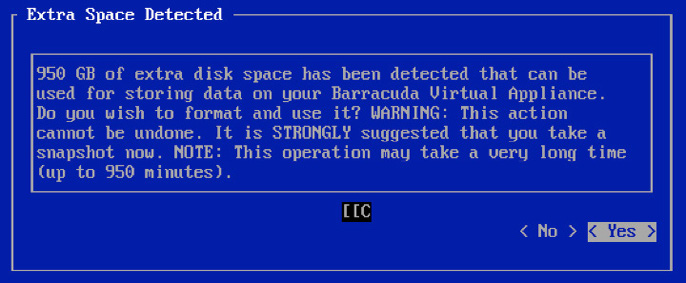
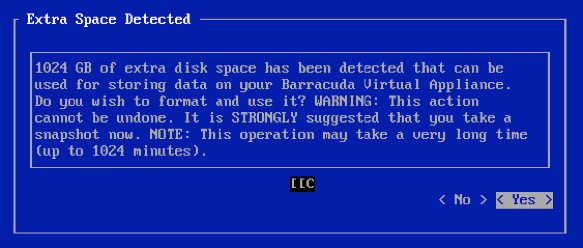
- Using your keyboard arrows, select Yes to format and partition the additional disk space provisioned above in Step 2:
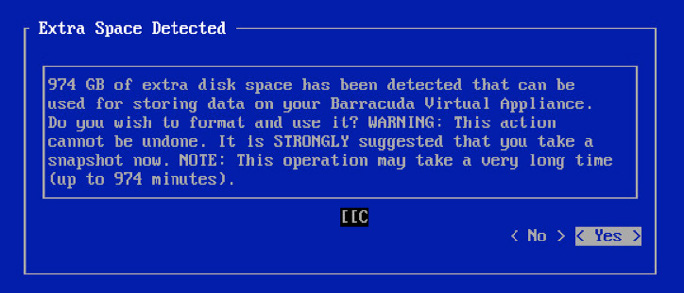
- The Barracuda Backup Vx expands and formats its partition space. Once formatting is complete, the appliance reboots:
Microsoft Hyper-V Deployment
To deploy a Barracuda Backup Vx in VMware vSphere:
Go to https://barracuda.com, and select Backup from the Products drop-down menu.
- Click Models/Editions, and select Virtual from the Deployment options drop-down menu.
- Click Free Eval Unit or Purchase, fill out the form, and submit your request.
- An email is sent to the specified email address.
- Follow the instructions in the email to download and expand the Barracuda Backup Vx .zip archive to a location accessible from a machine running Hyper-V.
Navigate to and expand the Barracuda Backup Vx .zip folder.
Launch the WinServerSetup.bat file located in the extracted folder. This batch file corrects a compatibility issue and takes less than a minute to run.
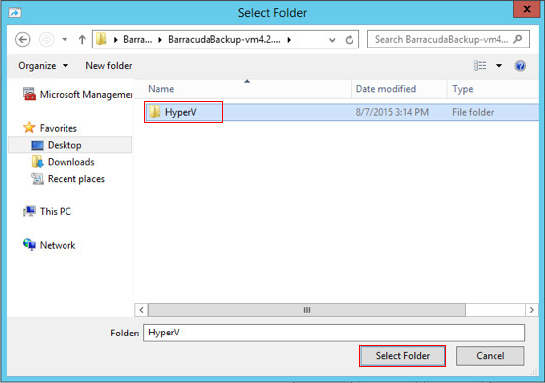
In Hyper-V Manager, right-click the VM host, select Import Virtual Machine, and click Next.
- Navigate to and select the HyperV folder from the extracted .zip archive, click Select Folder:
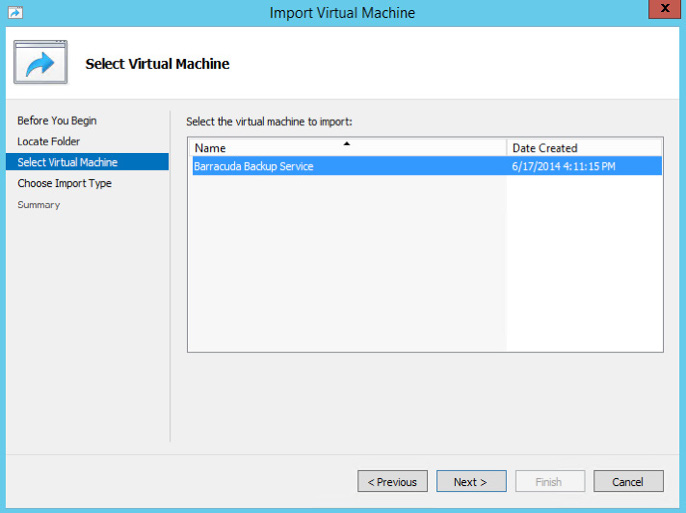
- Click Next. On the Select Virtual Machine page, click on the virtual machine to import:
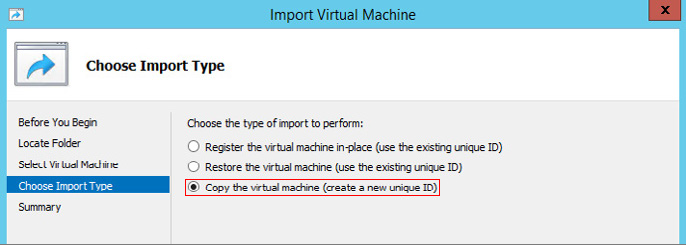
- Click Next. Select Copy the virtual machine (created a new unique ID):
- Click Next. Select whether to use the default location for configuration files, storage, and network settings for the VHD, or define custom settings. Click Next.
- On the Summary page, verify that all the settings are correct:
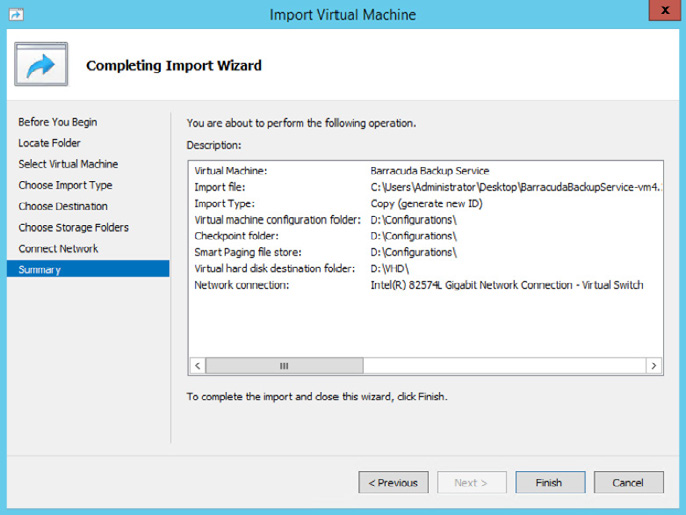
- Click Finish.
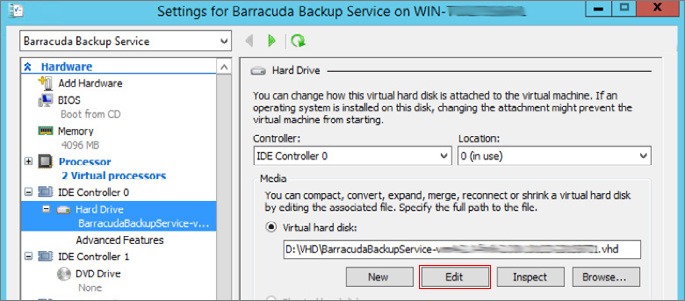
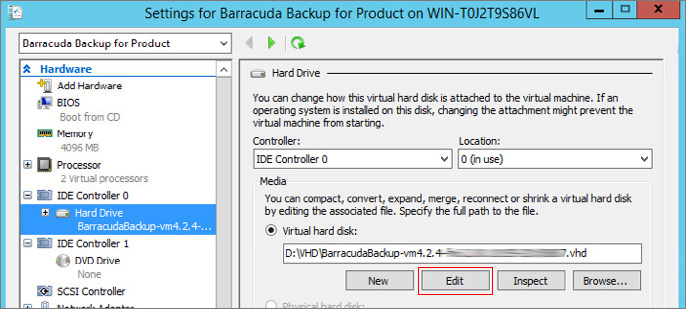
- Right-click the Barracuda Backup Vx, and click Settings. Define the Memory and Processor settings based on the recommendations in Tables 1 and 2 above:
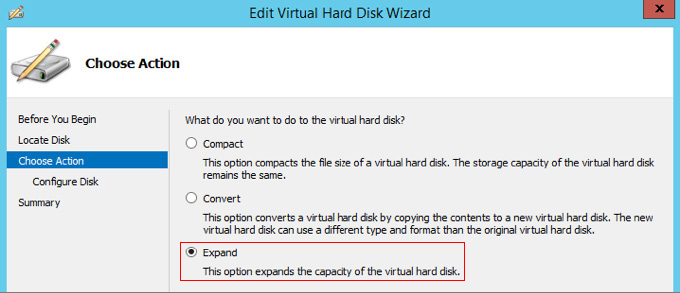
- Click Hard Drive under Virtual hard disk, and click Edit:
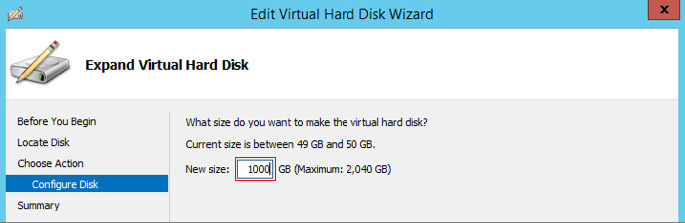
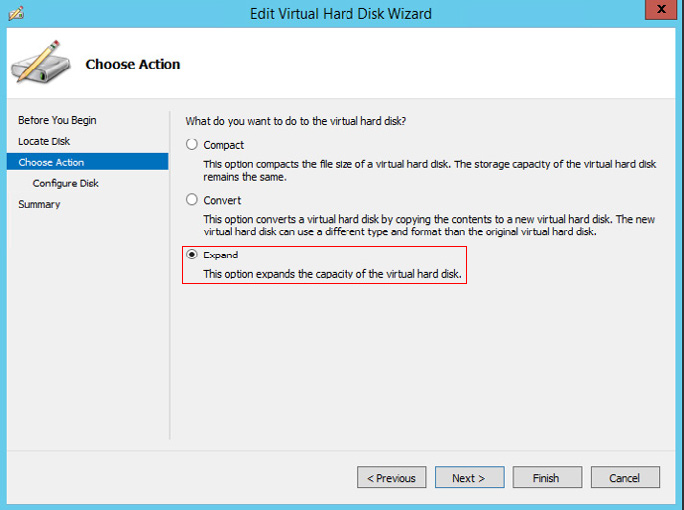
- Click Next. Select the Expand action:
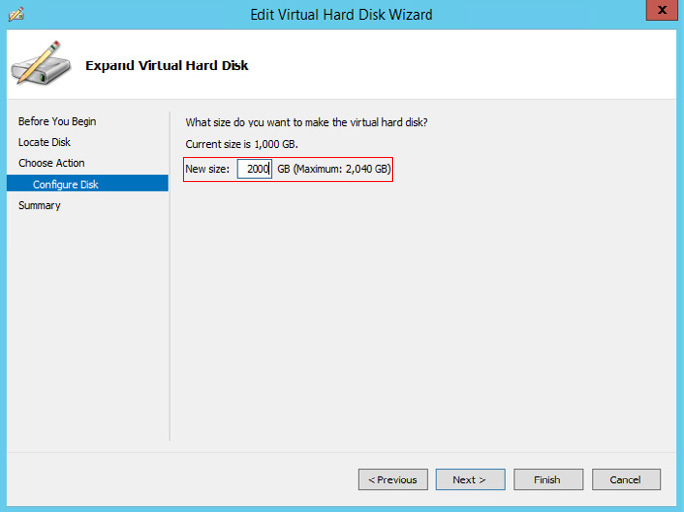
- Click Next. Specify the virtual hard disk size:
- Click Next, and click Finish.
- In the VM Settings window, click Apply:
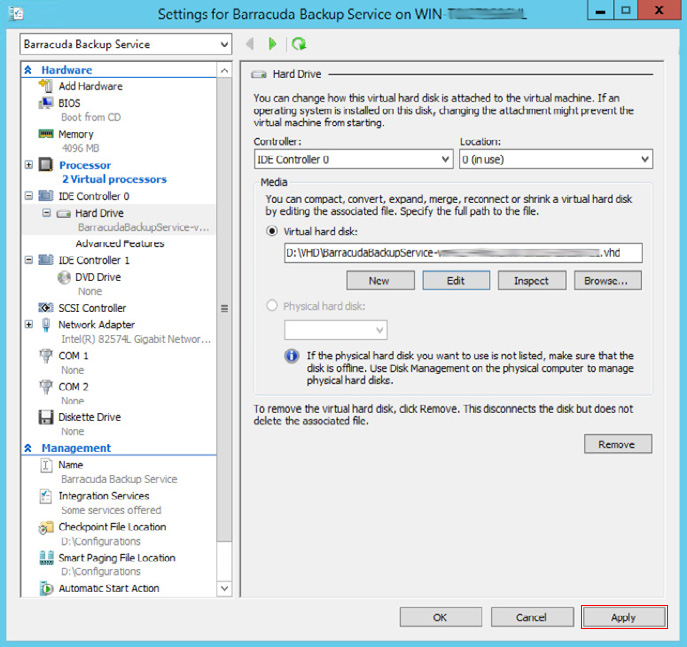
- Click Hard Drive under Virtual hard disk, and click Edit:
- Click OK to finish editing the VM.
- Power on the virtual appliance. The appliance is prepared for use; this may take several minutes.
- Using your keyboard arrows, select Yes to format and partition the additional disk space provisioned above in Step 9:
- The Barracuda Backup Vx expands and formats its partition space. Once formatting is complete, the appliance reboots:
Configure and Provision the Barracuda Backup Vx
If you did not recieve your Barracuda Vx license token via email or from the website when you downloaded the Barracuda Backup Vx package, request an evaluation on the Barracuda website at https://www.barracuda.com/purchase/evaluation or purchase one from https://www.barracuda.com/purchase/index. The license token looks similar to the following: 01234-56789-ACEFG.
In your hypervisor client, start the virtual appliance and allow it to boot up, then complete the following steps:
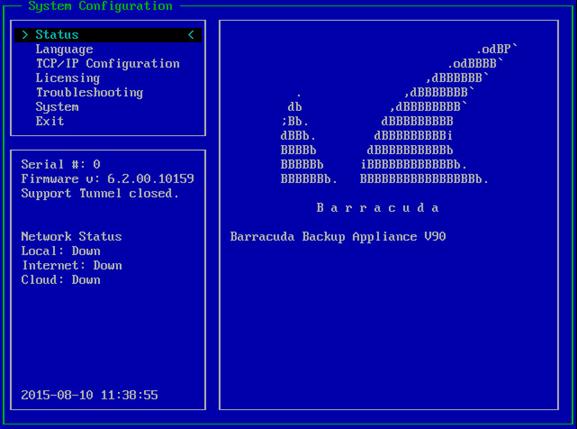
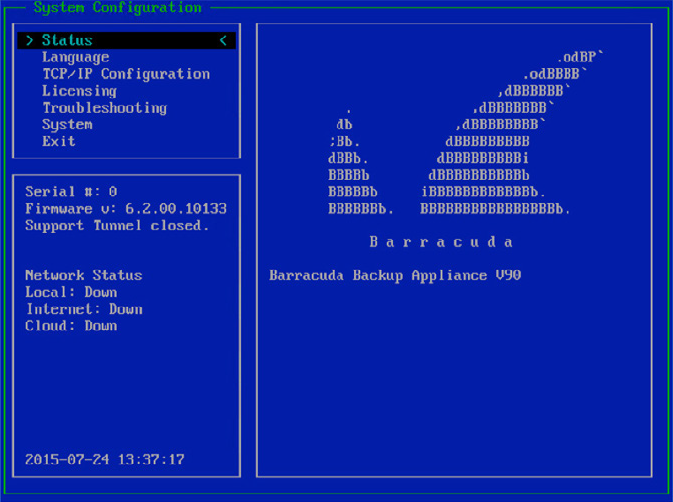
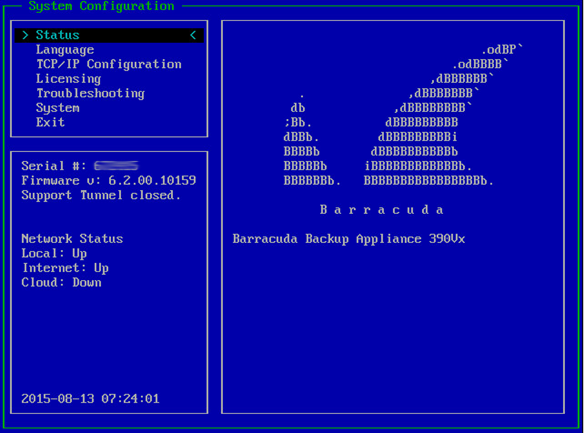
- From the console, log in as admin with the password admin (if prompted).
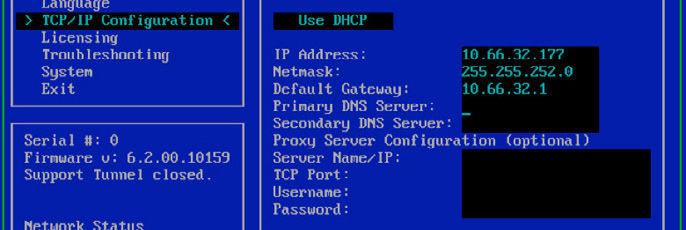
- Use your keyboard arrows to select TCP/IP Configuration, enter your network settings, and then select Save:
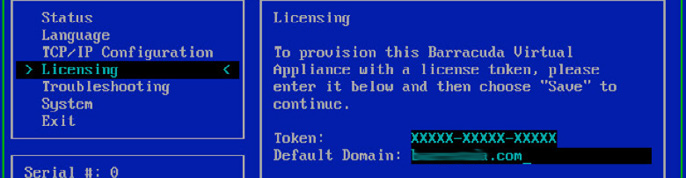
- Use your keyboard arrows to select Licensing, enter your Barracuda license token, and then select Save:
- Type YES, and press Enter to apply the license and provision the virtual machine (VM):
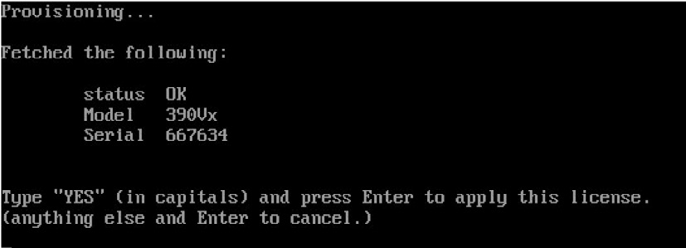
- Allow the provisioning to complete; this may take several minutes.
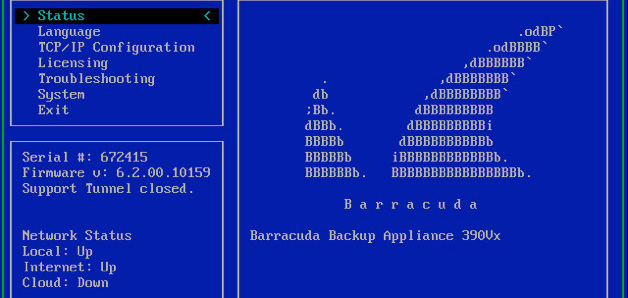
- Once the license is installed, press Enter to reboot the VM.
- After the VM reboots, log in with username admin and password, which is either:
- The numeric part of the serial number if your Vx preboot version is 4.6.1 or higher. To find the preboot version, check the name of downloaded Vx image (zip file) which is something like
BarracudaEmailSecurityGateway-p2-vm4.6.1-fw8.1.0.003-20200113-esx-vbox.zip. The text between "vm" and "-fw" in the filename is the preboot version. In this example, it is 4.6.1. The serial number of your Vx is in your invoice and in your VM Setup email. - The word "admin" if your Vx preboot version is below 4.6.1.
For help finding the serial number of your virtual appliance, see Serial Number for Hardware and Virtual Appliances.
- The numeric part of the serial number if your Vx preboot version is 4.6.1 or higher. To find the preboot version, check the name of downloaded Vx image (zip file) which is something like
- Verify both Local and Internet values are Up; Cloud changes to Up once the appliance is linked in the next step:
Activate the Barracuda Backup Vx
To activate your virtual appliance,
- Log into https://login.barracudanetworks.com. If you do not have an account, click Create a User, follow the account creation instructions, and log in.
- Click Backup in the left pane. If this is your first time activating a Barracuda Backup appliance, click Start Backup Setup; otherwise, go to Admin > Activate Barracuda Backup.
- Enter the Serial number and the Linking code from the sticker on the back of the Quick Start Guide, and click Next.
The wizard launches. In the Your Info page, enter your contact information, and click Continue.
In the Device Info page, enter a Device Name to represent the device in the UI. If you previously defined display groups, select the Display Group to which to add the device to from the drop-down menu.
Select the Time Zone from the drop-down menu.
In the Enter device location section, enter the geographical location.
Select whether to Automatically update device firmware after activation, and click Continue.
- The Terms of Service page displays. Read the Terms and Conditions, and click I have read and agree to complete the linking process. Click Done.
Once your device is linked, click Go to Dashboard.
How to Expand Barracuda Backup Vx Capacity
This section describes how to scale capacity.
Expand Barracuda Backup Vx Capacity for VMware
- With the Barracuda virtual appliance powered off, right-click the appliance, and click Edit Settings.
- In the Hardware tab, click Hard disk 1.
Change the Provisioned Size to the desired capacity:

- Increase the amount of Memory or the number of CPUs to match the new disk capacity; refer to the tables in the System Resource Requirements section of this article for minimum recommendations.
- Click OK to configure the VM.
- Power on the VM. The additional disk space is detected; select Yes to format and use it:
- The additional disk space is formatted and the disk resized; this may take several minutes.
- Once formatting and resizing is complete, the appliance reboots:
Expand Barracuda Backup Vx Capacity for Hyper-V
- With the Barracuda virtual appliance powered off, right-click the appliance, and click Settings.
- In the Hardware section, click Hard Drive.
Under Virtual hard disk, click Edit:
- Click Next. Choose Expand as the action:
- Click Next. Specify the new disk size:
- Click Next , and click Finish .
Increase the amount of Memory or the number of CPUs to match the new disk capacity; refer to the tables in the System Resource Requirements section of this article for minimum recommendations .
- Click OK to reconfigure the VM.
- Power on the VM. The additional disk space is detected; select Yes to format and use it.
- The additional disk space is formatted and the disk resized; this may take several minutes.
- Once formatting and resizing is complete, the appliance reboots:
How to Set Up a Barracuda Receiver Vx
Barracuda Backup Vx includes one-way basic software replication to a Barracuda Receiver Vx. A single Barracuda Receiver Vx license is included with each Barracuda Backup Vx subscription for one-way replication.
You can use the Barracuda Receiver Vx as a replication target and for restores. With a Receiver Vx subscription, you can pair a physical appliance and a Barracuda Receiver Vx, one-to-one. Additionally, it can be used for site-to-site replication or in conjunction with Barracuda Cloud Storage for multiple offsite copies.
To generate a license, link to your account, and provision the Barracuda Receiver Vx:
Log in to Barracuda Backup, go to the Backup > Replication page, and click Add Target.
- In the Site-to-Site Replication section, click Activate:

- The confirmation dialog box displays:
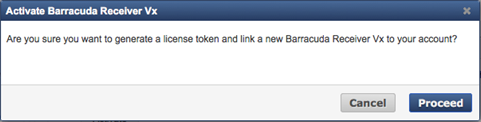
- Click Proceed to activate and link the Barracuda Receiver Vx to your account. The license token displays on-screen.
- Use the license token to provision your Barracuda Receiver Vx using the same virtual image used to deploy the Barracuda Backup Vx:
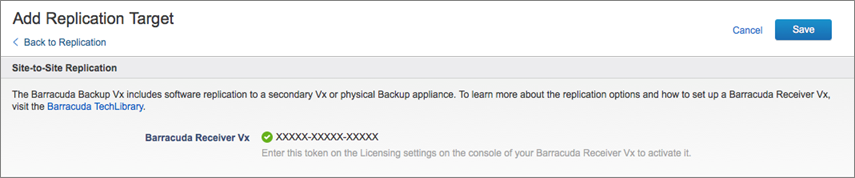
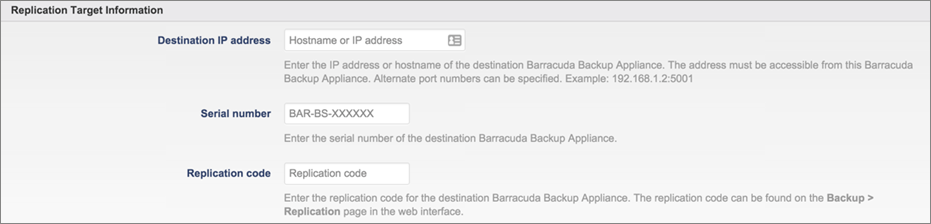
- After provisioning the Barracuda Receiver Vx and booting the system, configure replication settings on the Backup > Replication > Add Target page using the destination IP address, serial number, and replication code. This information is located on the Barracuda Receiver Vx Replication page:
- The Barracuda Backup Vx is now ready to replicate data.
Barracuda Backup Vx Replication Options
The Barracuda Backup Vx appliance can replicate data to Barracuda Cloud Storage for offsite disaster recovery or site-to-site for basic software replication to a virtual or physical Barracuda Backup appliance.
Table 1. Barracuda Backup Vx Replication Options
| Replication Target | Direction | Type |
|---|---|---|
| Barracuda Cloud Storage | One way | Site-to-cloud |
| Barracuda Backup Appliance | One way | Site-to-site |
| Barracuda Backup Vx | Bidirectional | Site-to-site |
| Barracuda Receiver Vx | One way | Site-to-site |
Barracuda Cloud Storage
No additional configuration is necessary to set up Barracuda Cloud Storage. Each Barracuda Backup Vx is preconfigured with Barracuda Cloud Storage as a target within Backup > Replication and is enabled by default for users who have either purchased or are evaluating the service:

Data replicated to Barracuda Cloud is stored encrypted on geographic and locally redundant storage with billing applied against the amount of storage hosted offsite, after deduplication and compression. Leverage Barracuda Networks' scalable cloud architecture to avoid the complexity and risk of allocating and managing offsite storage sites. Contact your Barracuda Networks partner or Barracuda sales representative for more information.
Barracuda Backup Appliance
You can configure the Barracuda Backup Vx appliance to replicate one-way to a Barracuda Backup appliance, model 490 and above, for site-to-site replication.
Use this option in multi-site environments with mixed physical and virtual Barracuda Backup appliances or in an environment with a physical Barracuda Backup appliance and two or more locations. Ensure that the Barracuda Backup appliances have suitable storage and are sized appropriately to host data being replicated to it as well as the data locally backed up to the appliance.
Barracuda Backup Vx
You can configure the Barracuda Backup Vx appliance to replicate bidirectionally to another Barracuda Backup Vx or to a Barracuda Backup appliance.
Use this option in environments where two or more sites host primary backed up data, and where site-to-site replication is preferred. This is the recommended method for site-to-site replication for the Barracuda Backup Vx as the virtual appliance storage can be scaled to meet storage demands over time.
Each Barracuda Backup Vx can be set up as a replication target for one-to-one replication between virtual appliances or to a physical device as a replication pair. Note that many-to-one replication is not available with the Barracuda Backup Vx appliance.
For optimum performance, ensure that the appliance at each location is set up with the minimum system requirements as described in the tables in the System Resource Requirements section of this article. See Configure an Offsite Replication Destination for details on setting up a site-to-site replication target.
Barracuda Receiver Vx
The Barracuda Receiver Vx is included with the Barracuda Backup Vx subscription for basic software replication and can be set up as a replication target and can perform restores. With a Receiver Vx subscription, you can pair a physical appliance and a Barracuda Receiver Vx, one-to-one.
Use this option in environments where an offsite location can host the virtual appliance as a storage target but does not have primary data to back up, or in environments where you want to replicate the Barracuda Backup Vx within the same site. You can use the Barracuda Receiver Vx in conjunction with Barracuda Cloud Storage for two offsite copies. The Barracuda Receiver Vx has the same benefits as the Barracuda Backup Vx. You can add the Barracuda Receiver Vx to a physical appliance.
How to Migrate a Barracuda Backup Vx to New Storage
Use the steps in this section to migrate a Barracuda Backup vx to new storage.
Step 1. Shut Down the Barracuda Backup Vx
Select the manner in which to shut down the server.
Local User Interface
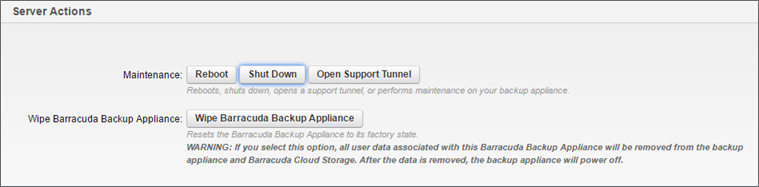
- Log into the local user interface, and click System > Device Information.
- Scroll down to Server Actions, and click Shut Down:
Local Console
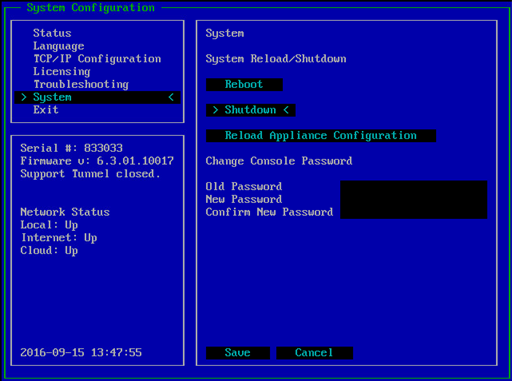
- Log into the local console.
- Arrow down to System, and press Enter.
- Arrow down to Shutdown, and press Enter.
- When prompted, type: YES
Step 2. Migrate the Barracuda Backup Vx to New Location
Select the manner in which to migrate the VM.
Migrate via Storage vMotion
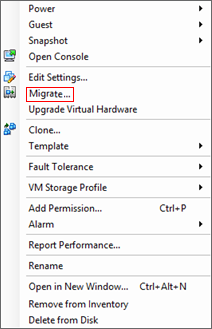
- Log into VMware via vSphere or the web client, and locate the Barracuda Backup virtual machine (VM).
- Right-click the VM, and click Migrate:
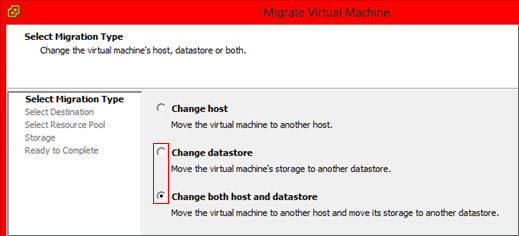
- In the Select Migration Type page, select Change datastore or Change both host and datastore:
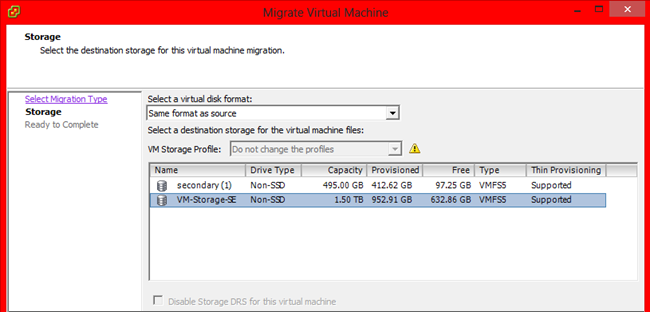
- Click Next. In the Storage page, select storage/datastore:
- Click Next. Verify the configuration, and click Finish.
- The Status indicator displays the relocation progress:

- Allow the relocation to complete.
Manually Migrate the VM
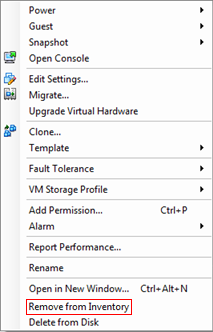
Log into VMware via vSphere or the web client, and locate the Barracuda Backup VM.
- Right-click the VM, and click Remove from inventory:
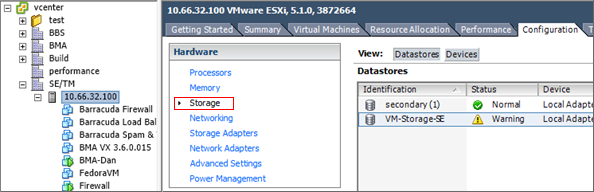
- Click on the host. Click the Configuration tab, and click Storage:
- Right-click the Datastore, click Browse datastore.
Right-click the VM folder, and click Move to:
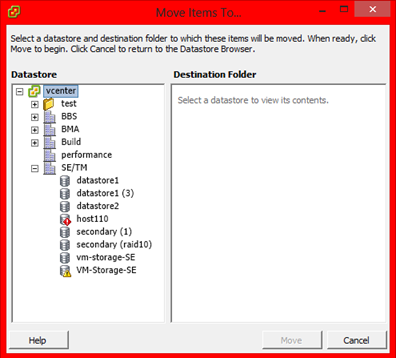
- Select the datastore where you want to move the VM folder, and click Move.
- Right-click the new datastore, click Browse Datastore, and open the VM folder:
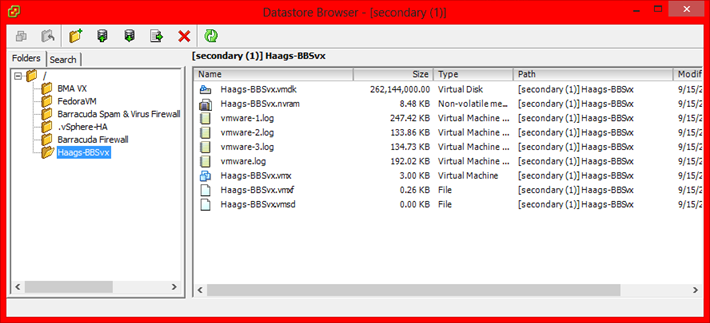
- Right-click the .vmx file in the VM folder, click Add to Inventory, and select a host:
- Click Next, and then click Finish.
The VM is now ready to restart.