

Use the following steps to restore a Hyper-V virtual machine (VM) either back to the original location or an alternate location:
- Log into the Barracuda Backup cloud or local interface.
- Go to the Restore > Restore Browser page.
- Expand the Hyper-V data source until you have found the VM you want to restore.
- Click Restore to the right of the revision to restore.
- In the Restore dialog box, select the following options:
- Restore to – select where the VM is to be restored
- Method:
- Restore normally – Restores and registers the VM using the same file path it was backed up with. For the restore to complete successfully, the original VM cannot be present and the restore will not overwrite the existing VM. If the original VM does exist, changing the name of the original VM avoids this conflict.
- Restore to an alternate location – Restores the VM to a different file path that you specify in the associated field. For the restore to complete successfully, the original VM cannot be present and the restore will not overwrite the existing VM. If the original VM does exist, changing the name of the original VM avoids this conflict.
- Restore to file system – Restores the VM as a flat file that you can later import into Hyper-V. This method does not recreate the VM in the Hyper-V environment but restores the virtual disks used to recreate the VM.
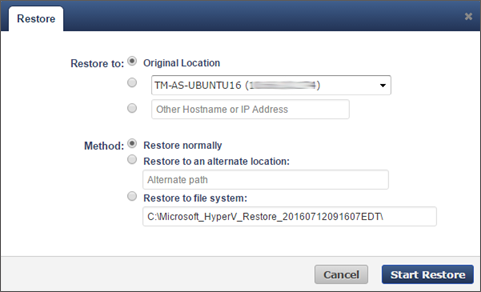
- Click Start Restore.
To view to progress of the restore, go to the Reports > Restore page.