

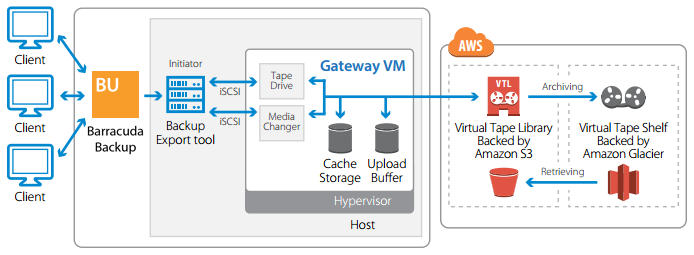
There are three types of AWS Storage Gateway; the Barracuda Backup Export Tool supports the Storage Gateway-VTL. With Gateway-VTL you have a limitless collection of virtual tapes. Each virtual tape can be stored in a VTL backed by Amazon S3 or a Virtual Tape Shelf (VTS) backed by Amazon Glacier. The VTL exposes an industry standard iSCSI interface which provides the Backup Export Tool online access to the virtual tapes. When you no longer require immediate or frequent access to data contained on a virtual tape, use the Backup Export Tool to move it from its VTL to your VTS to further reduce your storage costs.
AWS Storage Gateway-VTL with the Backup Export Tool is designed for customers using Barracuda Backup that want to offload certain data sets from their Barracuda Backup appliance for the purpose of:
- Long-term retention without using up valuable disk space on the Barracuda Backup appliance;
- Exporting data which is inefficiently deduplicated and compressed instead of keeping numerous historical revisions on the Barracuda Backup appliance; and/or
- Exporting data for the purpose of freeing up disk space on the local Barracuda Backup appliance to ensure a longer life cycle.
Figure 1 illustrates a typical environment using Barracuda Backup, the Backup Export Tool, and AWS Storage Gateway-VTL.
Figure 1. Barracuda Backup and AWS Storage Gateway-VTL Architecture.
Infrastructure
The AWS Storage Gateway’s software appliance is available for download as a virtual machine (VM) image that you install on a host in your datacenter. Once you install your gateway and associated it with your AWS Account through Amazon’s activation process, you can use the AWS Management Console to create either Gateway-Cached or Gateway-Stored storage volumes or Gateway-VTL virtual tape libraries that you can mount as iSCSI devices using your on-premises applications.
Gateway-VTL enables you to seamlessly replace your physical tape infrastructure with a virtual tape infrastructure. Each Gateway-VTL presents Backup Export Tool with an industry-standard iSCSI-based VTL consisting of a virtual media changer and tape drives. Create virtual tapes in your VTL using the AWS Management Console. Each VTL can hold up to 1,500 virtual tapes with a maximum aggregate capacity of 1 PB. Virtual tapes are discovered by the Backup Export Tool using its standard media inventory procedure. Virtual tapes in your VTL are available for immediate access and are backed by Amazon S3. The Backup Export Tool can read data from or write data to virtual tapes by mounting them to virtual tape drives using the virtual media changer.
Hardware and Software Requirements
The AWS Storage Gateway VM must be either installed on a host in your datacenter running supported versions of VMware ESXi or Microsoft Hyper-V, or as an AMI running on an EC2 instance. The gateway VM must be deployed with a minimum set of hardware resources. The AWS Storage Gateway currently supports Microsoft Windows, Red Hat Enterprise Linux, and VMware ESXi, iSCSI initiators. For additional information, refer to the AWS Storage Gateway User Guide.
Long Term Retention
For cost-effective long term retention of data requiring infrequent access, you can use the Backup Export Tool to move virtual tapes from one or more of your VTLs to your VTS backed by Amazon Glacier. Your VTS is automatically created when you activate your first Gateway-VTL. Store virtual tapes that need to be accessed frequently in a VTL. Data that does not need to be retrieved frequently can be archived to your VTS. Access to virtual tapes in your VTL is immediate while virtual tapes in your VTS must be retrieved and loaded into a VTL before it can be accessed. You can retrieve virtual tapes from your VTS using the AWS Management Console. Virtual tapes retrieved from your VTS take approximately 24 hours before they are automatically loaded into your VTL.
Restore Data
You can retrieve a virtual tape using the AWS Management Console. First select the virtual tape, then choose the VTL into which you want to load the virtual tape. It takes about 24 hours for the retrieved virtual tape to be available in the selected VTL. Once the virtual tape is available in the VTL, use the Backup Export Tool to make use of the virtual tape to restore data.
Performance
As the Gateway-VTL sits between your application, AWS, and underlying on-premises storage, the performance you experience is dependent upon a number of factors including the speed and configuration of your underlying local disks, provisioned host processor and memory, network bandwidth between your iSCSI initiator and gateway VM, the amount of local storage allocated to the gateway VM, and the bandwidth between the gateway VM and AWS. For Gateway-VTL, to provide predictable write performance to the Backup Export Tool, it is important that you allocate enough local cache disk storage to durably buffer data uploaded to AWS. For additional information, refer to the AWS Storage Gateway User Guide for guidance on sizing cache. Amazon recommends configuring your disks in a redundant array of independent disks (RAID) configuration to improve performance and to protect against disk failures.
Security
The AWS Storage Gateway encrypts all data in-transit to and from AWS via SSL. All volume and snapshot data stored in AWS using Gateway-Stored Volumes and Gateway-Cached Volumes, and all virtual tape data stored in AWS using Gateway-VTL, is encrypted at rest using Advanced Encryption Standard (AES) 256, a secure symmetric-key encryption standard using 256-bit encryption keys. Additionally, the Backup Export Tool has optional built-in encryption and compression features.
Storage
Table 1. Storage.
| Feature | Description |
|---|---|
| Replication | Support for the AWS Storage Gateway-VTL does not replace replication to either Barracuda Cloud Storage or another Barracuda Backup appliance. Replication to the Barracuda Cloud or to another Barracuda Backup appliance is a full disaster recovery solution while AWS Storage Gateway-VTL is designed for long-term archiving. Additionally, unlike replication to the Barracuda Cloud or a Barracuda Backup appliances, the Backup Export Tool does not support System State data export or bare metal recovery. |
| Data Reduction | The AWS Storage Gateway performs compression of data in transit and at rest, which can reduce both data transfer and storage charges. All data transfer between the AWS Storage Gateway VM and AWS, and all data stored in AWS, is compressed. In addition, the AWS Storage Gateway VM only uploads data that has changed, minimizing the amount of transferred data. |
| Bandwidth Throttling | Use the AWS Management Console to restrict the bandwidth between your gateway and AWS based on the selected rate. You can specify individual rates for inbound and outbound traffic. |
| Data Storage on a Virtual Tape | When creating a virtual tape, select from the following sizes: 100 GB, 200 GB, 400 GB, 800 GB, 1.5 TB, and 2.5 TB |
| Data Storage in VTL | Each VTL can store up to 1500 virtual tapes with a maximum aggregate capacity of 1 PB. |
| Data Storage on a VTS | There is no limit to the amount of data you can store on a VTS. |
Access Data
The virtual tape containing your data must be stored in a VTL before you can access it, however, access to the virtual tapes is instantaneous. If the virtual tape containing your data is in your VTS, you must first retrieve the virtual tape from your VTS. You can retrieve the virtual tape using the AWS Management Console. First select the virtual tape, then choose the VTL into which you want to load the virtual tape. It takes about 24 hours for the retrieved virtual tape to be available in the selected Virtual Tape Library. Once the virtual tape is available in the Virtual Tape Library, you can use the Backup Export Tool to make use of the virtual tape to restore data.
Get Started with AWS Storage Gateway
To sign up for the AWS Storage Gateway, go to the AWS Storage Gateway detail page, and create an account or log in with an existing account. Once logged in, you can begin the AWS Storage Gateway sign-up process. After you sign up, you can begin setting up and activating your gateway by visiting the AWS Management Console. For details, refer to the Amazon Web Services article Getting Started with AWS Storage Gateway.
Billing
The Backup Export Tool is free to all Barracuda Backup customers, and Barracuda Networks does not charge a fee to use the Amazon Storage Gateway. Amazon charges for the Storage Gateway and the cost to store data in their cloud, and $125/per activated virtual gateway per month.
- You are billed a monthly fee for each of gateway; this fee is prorated daily. Billing for a gateway begins upon activation and continues until you delete the gateway from the AWS Management Console or via the API.
- You are billed for the virtual tape data you store in AWS. This fee is prorated daily. You are only billed for the portion of virtual tape capacity that you use, not for the size of the virtual tape you create.
- You are billed for Internet data transfer for each GB downloaded from AWS to your gateway. All data transfer for uploading to AWS is free.
- You are charged for the peak concurrent data retrieval in a month.
Table 2. Cost to Store Data in AWS.
| VTS Storage | $0.007 per GB per month of data stored |
| VTL Storage | $0.030 per GB per month of data stored |
| VTS Retrieval | $0.30 per GB(1) |
| Virtual Tape Deletion | Free(2) |
Notes: (1)Pay only for the highest peak concurrent data retrieval in a month. (2)There are no charges for deleting virtual tapes from your VTL and VTSf. However, there is a pro-rated charge of $0.021 per gigabyte for virtual tapes deleted prior to 90 days from your VTS. | |
For additional storage pricing, refer to the AWS Storage Gateway Pricing.
Concurrent Data Retrieval Charges
Concurrent data retrieval is calculated when a retrieval from VTS is initiated. The concurrent data retrieval is the sum of the size of all virtual tape retrievals initiated concurrently or concurrently in progress. If the concurrent data retrieval is more than any prior concurrent data retrieval in the month you are charged for the difference between this new monthly peak and the prior monthly peak. If the concurrent data retrieval is less than or equal to any prior concurrent data retrieval in the month, the retrieval is free.
- Example 1 – You initiate retrieval of a 100 GB virtual tape from your VTS in US East (Northern Virginia) Region. This is the first retrieval of the month. The prior peak concurrent data retrieval for the month was 0 GB. When the retrieval is initiated the concurrent data retrieved is 100 GB. 100 GB is your new monthly peak concurrent data retrieval. The charge for the retrieval is the difference between the prior and the new peak concurrent data retrieval, that is, (100 GB – 0 GB) x $0.30/GB = $30.00.
- Example 2 – You initiate retrieval of one virtual tape containing 500 GB of data from your VTS in US East (Northern Virginia) Region. This is the first retrieval of the month. The prior peak concurrent data retrieval for the month was 0 GB. When the retrieval is initiated the concurrent data retrieved is 500 GB. 500 GB is your new monthly peak concurrent data retrieval. You are charged the difference between the prior and new peak concurrent data retrieval, that is, (500 GB - 0 GB) x $0.30 / GB = $150. Twelve hours after initiating the retrieval of the 500 GB virtual tape you initiate retrieval of a virtual tape containing 600 GB of data. When the second retrieval is initiated you have two virtual tape retrievals concurrently in progress as any virtual tape retrieval takes about 24 hours to complete. The concurrent data retrieved is 500 GB + 600 GB = 1100 GB. The new peak concurrent data retrieval for the month is 1100 GB and you are now charged the difference between the new peak concurrent data retrieval and the existing peak concurrent data retrieval, that is, (1100 GB-500 GB) x $0.30 = $180.
- Example 3 – You initiate retrieval of one 500 GB virtual tape from the VTS in US East (Northern Virginia) Region. This is the first retrieval of the month. The prior peak concurrent data retrieval for the month was 0 GB. When the retrieval is initiated the concurrent data retrieved is 500 GB which is your new peak concurrent data retrieved. The charge for the retrieval is the difference between the prior and the new peak concurrent data retrieval, that is, (500 GB – 0 GB) x $0.30/GB = $150.00. The next day, you initiate a retrieval of one 500 GB virtual tape after the first tape retrieval is complete. Because 500 GB is equal to the prior peak concurrent data retrieval of 500 GB, the second retrieval is free.
Data Charges for Deleting Data
VTS is designed for use cases where data is retained for months, years, or decades. Deleting virtual tapes from a VTS is free if the virtual tape being deleted has been stored for three months or longer. If a virtual tape is deleted within three months of being archived, you are charged an early deletion fee. If you delete data from your VTS that is less than three months old, in the US East (Northern Virginia) Region, you are charged a prorated early deletion fee of $0.03 per GB deleted within three months. For example, if you delete 1 virtual tape containing 1 GB of data 1 month after uploading it, you are charged a $0.02 early deletion fee. If, instead you delete the same virtual tape after 2 months, you would be charged a $0.01 early deletion fee.
Configure the Backup Export Tool to Work with VTL Devices
After you connect the VTL devices to the Windows client where the Backup Export Tool is installed, open the Backup Export Tool to recognize your devices. For information about how to connect VTL devices to the Windows client, see Step 4: Connect Your Gateway-VTL Devices to Your Windows Client in the Amazon Web Services User Guide.
By default, the Backup Export Tool detects and recognizes the gateway-VTL devices.
To discover the VTL devices:
- Open the Backup Export Tool Administrator on your Windows client. If this is the first time you are opening the Backup Export Tool, once you connect the gateway-VTL devices to your Windows client, the Backup Export Tool automatically recognizes the gateway-VTL devices.
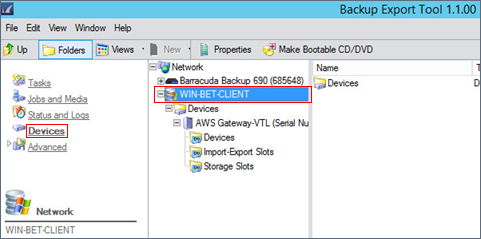
- Click Devices in the left pane:
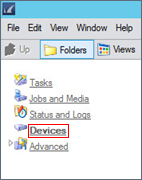
- Expand the tree under your Backup Export Tool client:
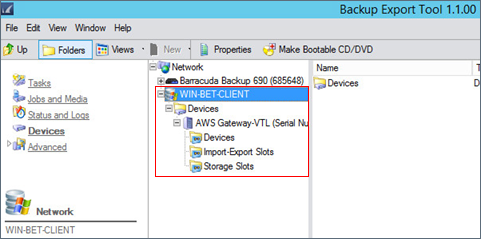
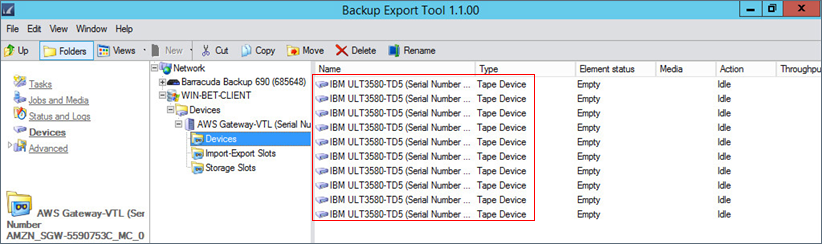
- If your tape drives are mapped correctly, they display under Drives:
- The tapes display under Import-Export Slots:
If the drives are not automatically mapped, see Step 4: Connect Your Gateway-VTL Devices to Your Windows Client in the Amazon Web Services User Guide.
Import a Tape into the Backup Export Tool
Use the steps in this section to import tapes from your Gateway-VTL into the Backup Export Tool software library.
To import a tape:
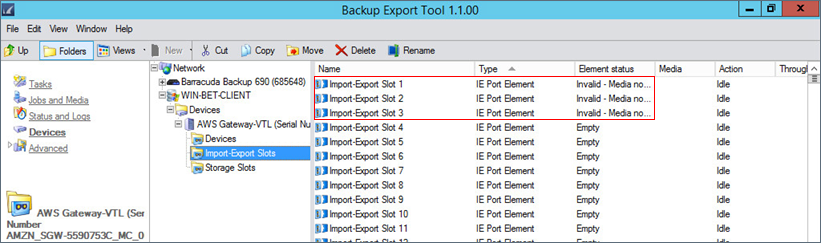
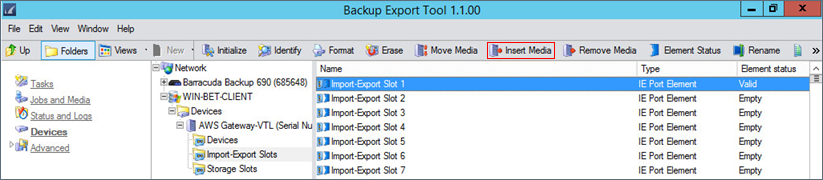
- Select Import-Export Slots in the Backup Export Tool client tree.
- The Import-Export Slots contain the tapes you created in the AWS Storage Gateway-VTL. In this example, 3 x 100 GiB virtual tapes have been created, shown in the Import-Exports Slots with an Element Status of Invalid – Media not identified. To insert all available tapes, select the first Import-Export Slot, press Shift on your keyboard, and click the last Import-Export Slot that shows an Element Status of Invalid – Media not identified:
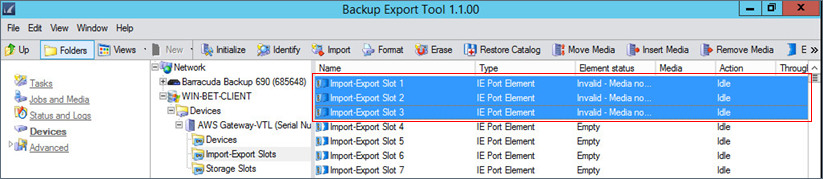
Click Insert Media in the toolbar:

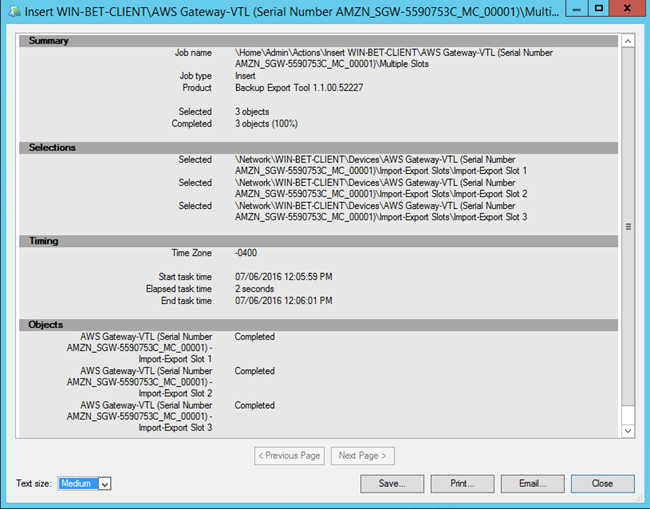
The virtual tapes are inserted into the first available storage slots:
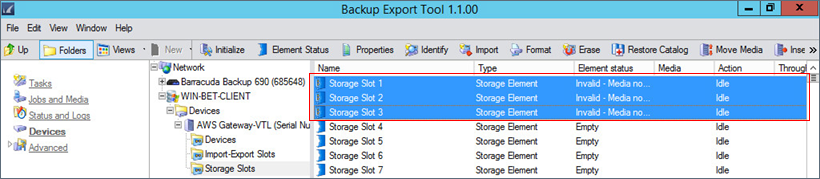
Close the Insert Media notification dialog box. In the Backup Export Tool client tree, select Storage Slots. The virtual tapes inserted in the previous steps display in the first available Storage Slots:
The virtual tapes are now imported and are ready for the first backup/export job. No additional configuration is necessary on the Devices page as each tape is identified and formatted automatically by the Backup Export Tool during the backup/export process.
Export Data from Barracuda Backup to a Tape
To export data from a Barracuda Backup appliance to a Gateway-VTL:
- Create a new Backup Job in the Backup Export Tool.
- S elect a tape device to write data to.
Archive a Tape Using the Barracuda Backup Export Tool
When you archive a tape, AWS Storage Gateway moves the tape from the Backup Export Tool tape library to the VTS, that is, the offline storage. You begin tape archival by ejecting from the tape drive to the storage slot and then exporting the tape from the slot to the VTS by using the Backup Export Tool.
To archive a tape using the Barracuda Backup Export Tool:
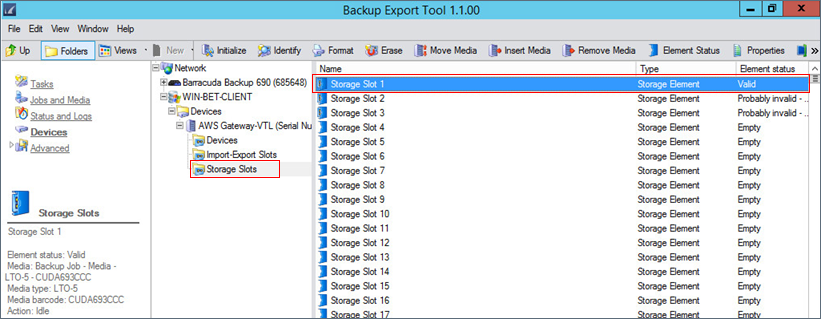
- Click Devices in the left pane, and expand the tree under your Backup Export Tool client:
- Click Storage Slots, and select the storage slot containing the tape(s) you want to archive:
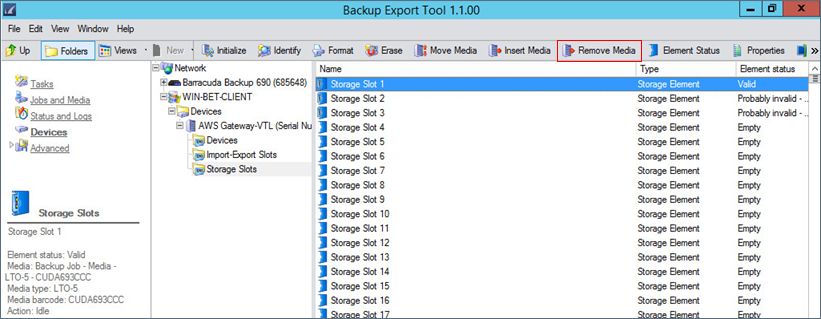
- Right-click the selected storage slot(s), and click Remove Media, or click Remove Media on the toolbar:
- The tape is removed from the storage slot:
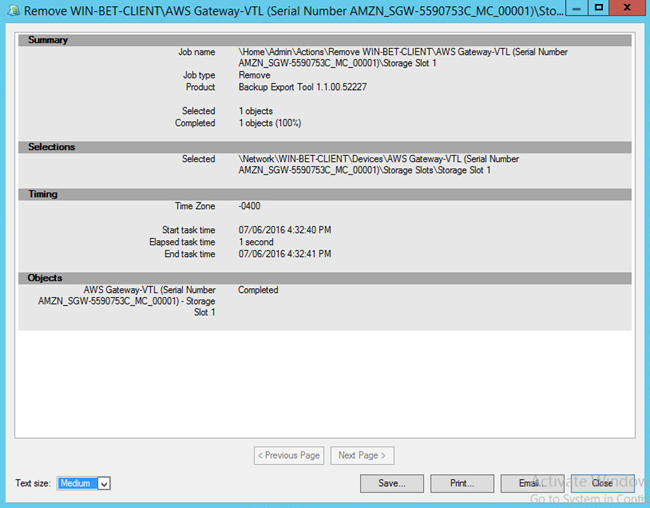
- The selected storage slot Element Status displays as Empty:

- In the AWS Storage Gateway console, click your gateway, and click VTL Tape Cartridges. Verify the status of the virtual tape you are archiving:
Restore Data from an Archived Tape Using the Backup Export Tool
Archived tapes are stored in a VTS which provides offline storage. If you want to access tape data, you must first retrieve the tape from the VTS back to your gateway. Use the steps in this section to retrieve the tape archived in the preceding section. Note that restoring archived data is a two-step process:
- Retrieve the archived tape from your (VTS) to a gateway-VTL
- Restore the data using the Backup Export Tool
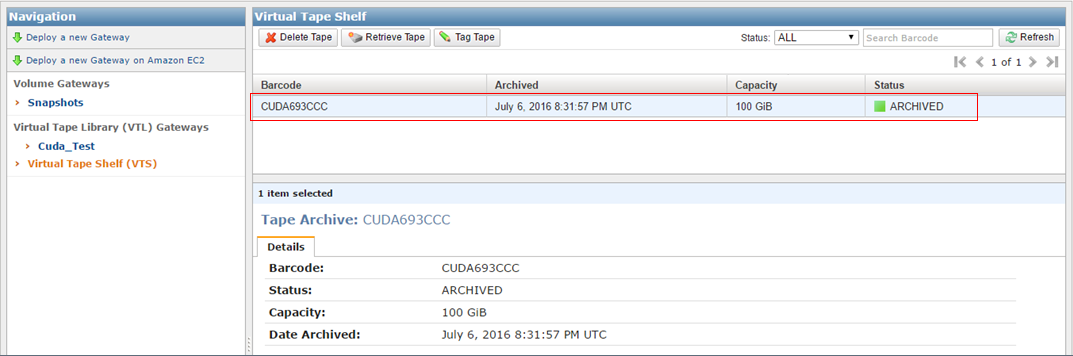
Retrieve Archived Tape
To retrieve an archived tape:
In the AWS Storage Gateway console navigation pane, click Virtual Tape Shelf (VTS); the console displays all virtual tapes archived by all of your gateways. Select the virtual tape you want to retrieve, and click Retrieve Tape:
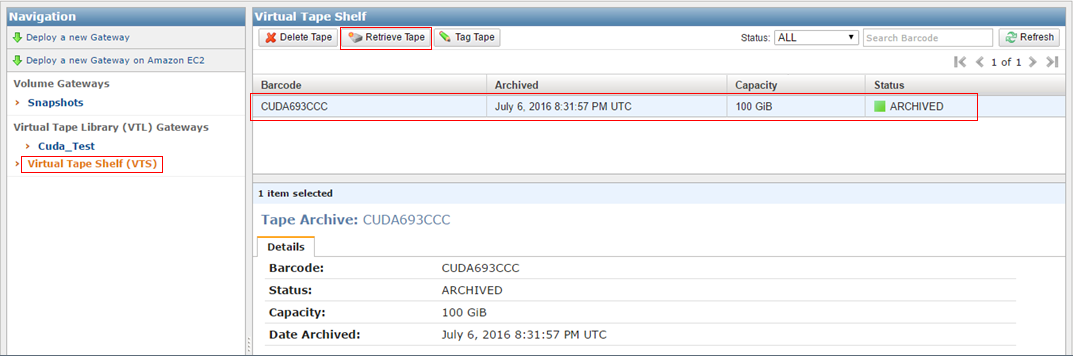
- In the Tape Barcode field of the Retrieve Tape wizard, verify the barcode identifies the virtual tape you want to retrieve:
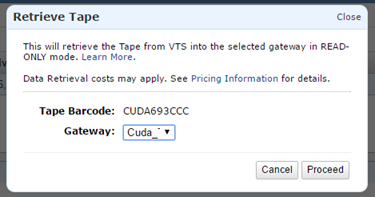
- From the Gateway drop-down list, select the gateway you want to retrieve the archived tape to, and click Proceed.
The virtual tape status changes from ARCHIVED to RETRIEVING. Once all data is moved, the status of the virtual tape in the VTS changes to RETRIEVED, and the tape displays in your gateway's VTL.
Restore Archived Data from an AWS Storage Gateway
Once the retrieved virtual tape status changes from RETRIEVING to RETRIEVED, use the steps in this section to import the tape back into the Backup Export Tool and configure a restore job.
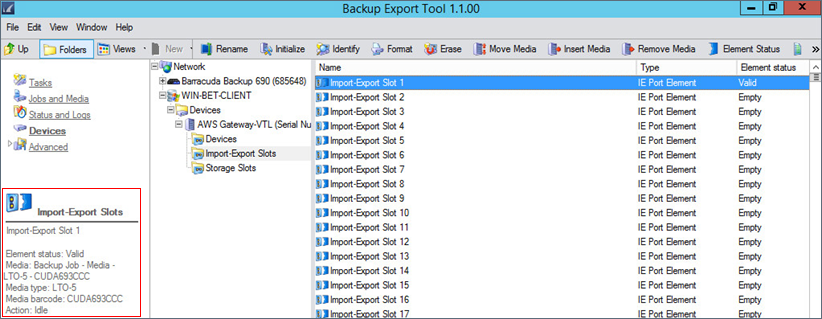
- Click Devices in the left navigation pane, and expand the tree under your Backup Export Tool client:

- Click Import-Export Slots, and verify the retrieved virtual tape appears in the import-export slot. Once a tape is retrieved from the VTS, it automatically appears in the first available import-export slot. Verify the Element Status displays as Valid, and the media barcode matches that of the virtual tape in your storage gateway:
Select the Import-Export Slot containing your retrieved virtual tape(s), and click Insert Media in the toolbar to insert the tape(s) into a storage slot:
- The virtual tape(s) are inserted into the first available storage slots. Close the Insert Media notification dialog box.
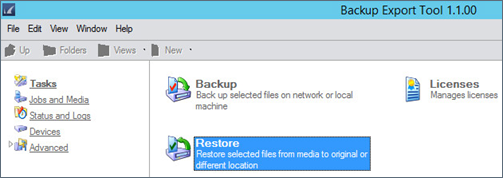
- Click Tasks in the left pane, and double-click Restore :
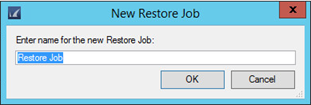
- In the New Restore Job dialog box, enter a name to identify your restore job:
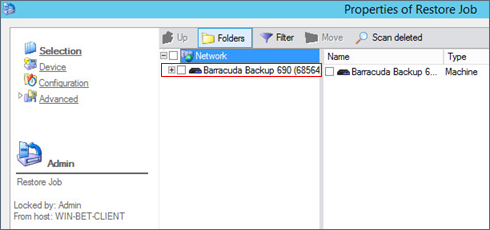
- The Restore Job Properties window displays. All previous backup/export jobs from Barracuda Backup appliances display in the tree below Network:
- Expand the tree until you reach the previously exported data you want to recover:
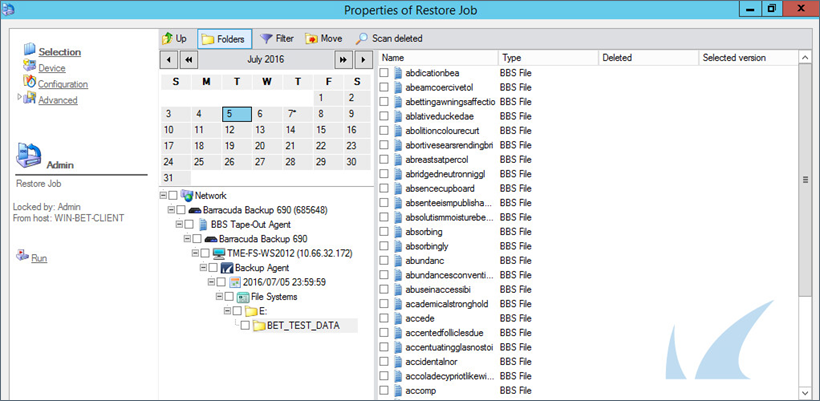
- Select either the entire folder from the tree or select individual files in the right pane. Once you select the data you want to restore, the Select Destination window displays.
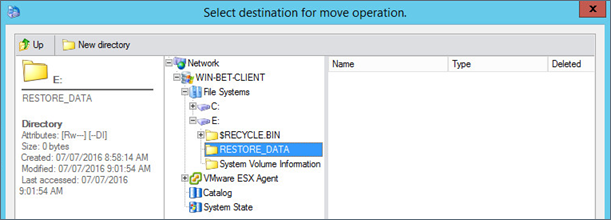
- Expand the tree under Network and locate a recovery destination for the selected data. The Backup Export Tool recognizes any computers in the network where the Backup Export Tool is installed. In this example, the recovery folder is titled RESTORE_DATA on the Backup Export Tool client system:
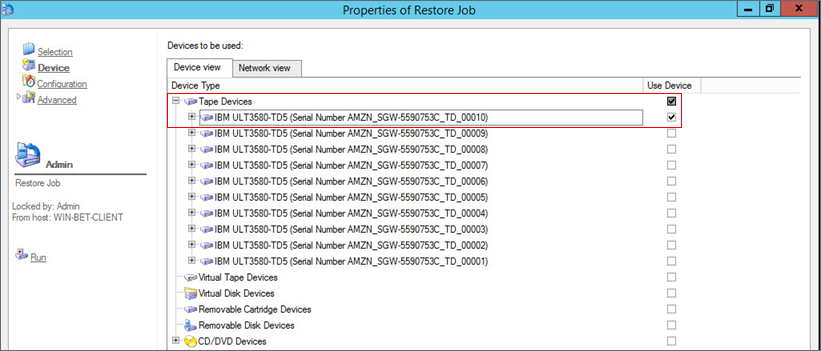
- Click OK. Click Device in the left pane, and expand the Tape Device tree.
Select a single tape device from the list; this is the device that you are restoring data from:
- Once all configuration options are configured, click OK.
- Click Jobs and Media in the left pane; the newly created restore job should now display in the right pane:

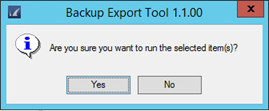
Right-click the restore job, and click Run, or click on the restore job and click Run in the toolbar to execute the restore job.
- In the confirmation dialog, click Yes to run the backup/export job:
- Click Status and Logs in the left pane to view the restore job status:
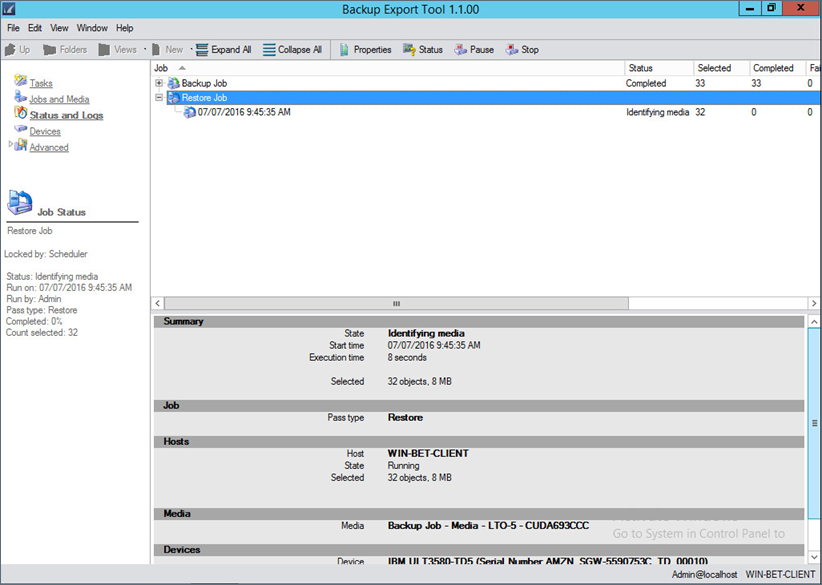
- Allow the restore job to complete. Verify the data is successfully restored.
Export Data to AWS Storage Gateway-VTL
Once you set up your AWS Storage Gateway-VTL, install and configure the Backup Export Tool on your primary server and enable it in the Barracuda Backup user interface, use the steps in this article to manually export data from a Barracuda Backup appliance to your AWS Storage Gateway-VTL:
- Open the Backup Export Tool.
- From the Tasks page, double-click Backup:

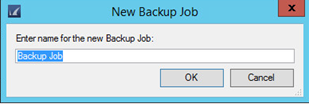
- In the New Backup Job window, enter a name to identify the backup/export job:
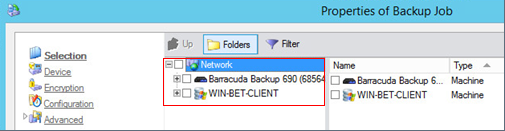
- Click OK. The Backup Job Properties window displays. All Barracuda Backup appliances connected to the Backup Export Tool client display below Network:
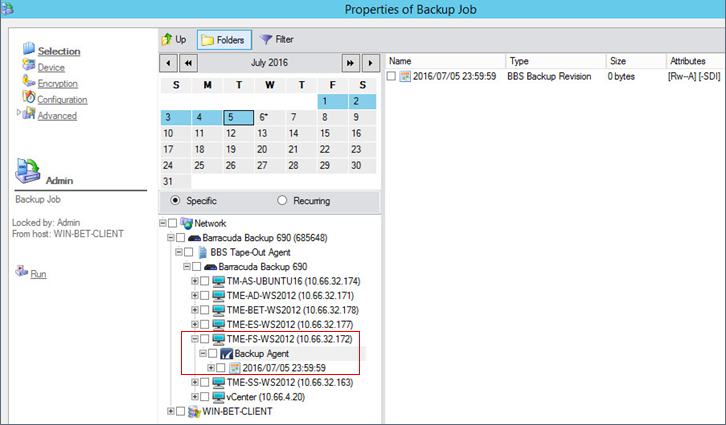
- Expand your Barracuda Backup appliance tree until you reach the backup sources currently being protected by the Barracuda Backup appliance:
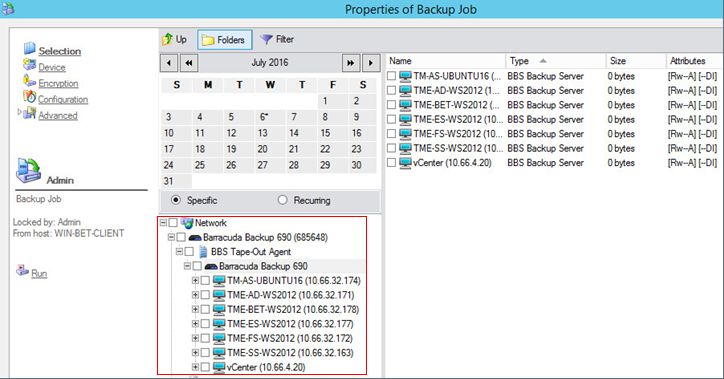
Expand the data source containing the data you want to export. The revisions available for export are listed under Backup Agent in the tree. Note that only weekly, monthly, and yearly revisions are available for export:
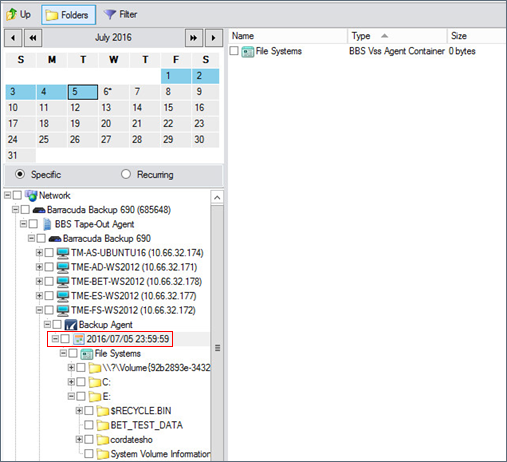
- Select the desired backup revision, and expand the tree to drill down into the folder structure. You can navigate the folder structure and any supported applications that are present, for example, Microsoft SQL, Exchange, Hyper-V:
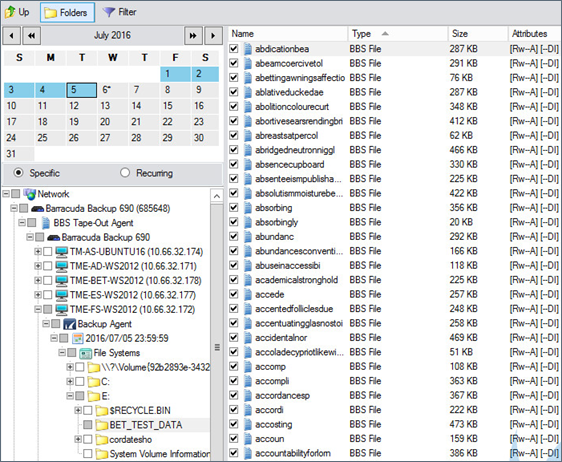
- Navigate to and select the folder(s) containing the data you want to export from the Barracuda Backup appliance. The contents of the selected folder(s) displays in the right pane:
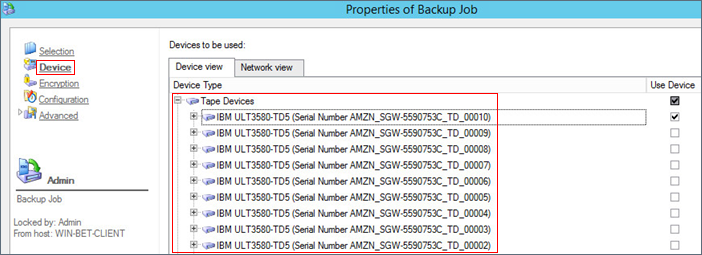
Click Device in the left pane, expand Tape Device in the right pane, and select a single tape device from the list:
Once you select a device, click Encryption in the left pane:
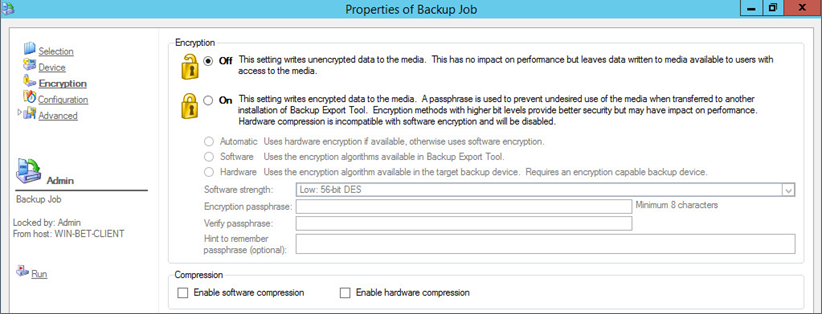
Once you select your encryption and compression options, click Configuration in the left pane. Use the Configuration page to specify how data is written to the selected storage device.
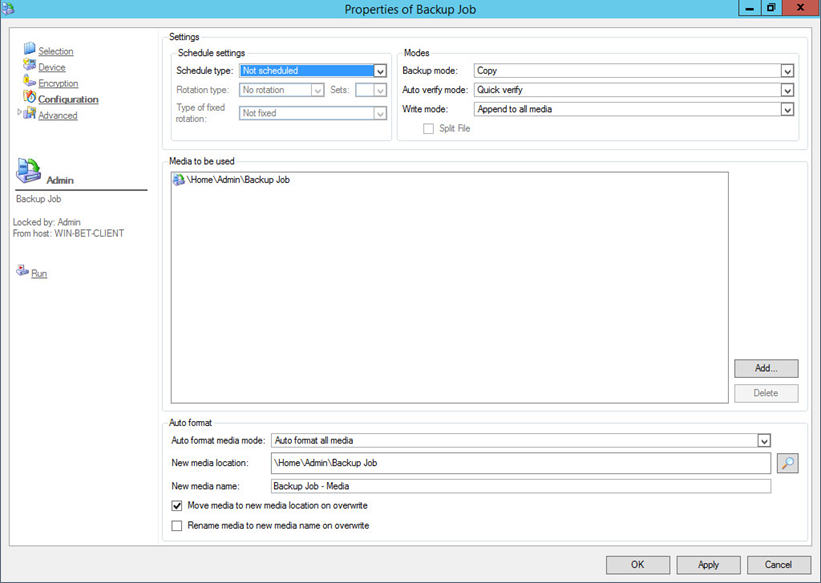
Once you configure your backup options, click Advanced in the left pane to access advanced options related to email alerts, log files, barcode filters, and copy policies.
- When you are done configuring options, click OK in the lower right corner to create the new backup job.
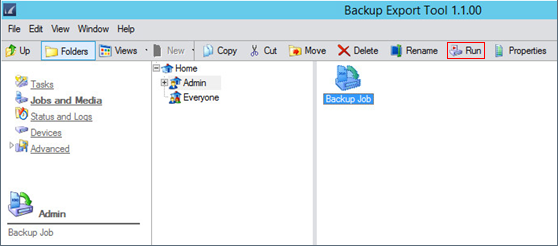
- Click Jobs and Media in the left pane. The newly created backup/export job should now display in the right pane:

- Click on the backup job, and select Run in the toolbar, or right-click the backup job and click Run to execute the data export:
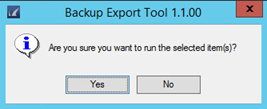
- In the confirmation dialog, click Yes to run the back/export job:
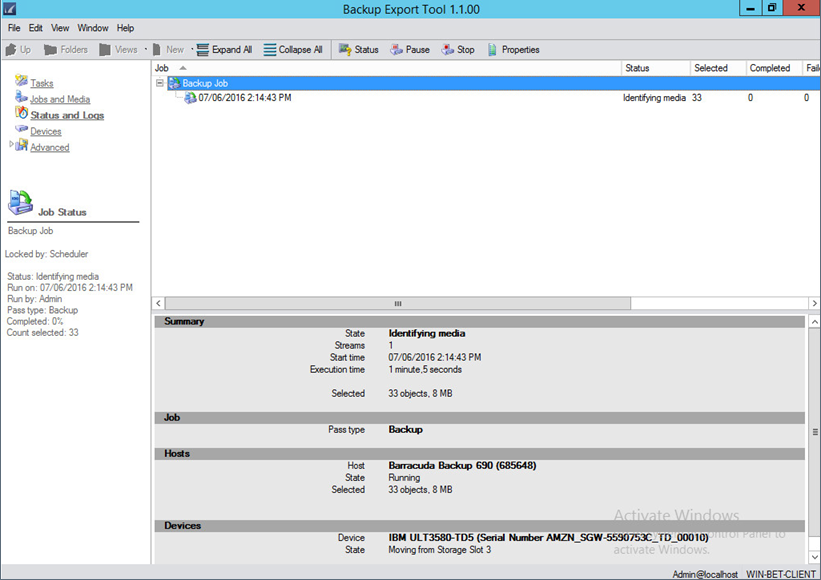
- Click Status and Logs in the left pane to view the backup/export job status:
- Allow the backup job to complete:
