To establish wireless Internet connections, you can install the external Barracuda 3G USB modem on the Barracuda NextGen Firewall X-Series. 3G connections are ideal for backup lines and for use in mobile offices or locations without terrestrial Internet links.
After you connect the Barracuda USB modem to the X-Series Firewall, configure the provider settings. Then verify that the default network route and network interface of the 3G WAN link have been successfully introduced and are available.
Step 1. Connect the Barracuda 3G modem
To connect the Barracuda modem:
- Follow the steps in the Barracuda 3G Modem Quick Start Guide to insert the SIM card into the Barracuda USB modem.
- Connect the Barracuda modem to an empty USB port of the X-Series Firewall.
- Connect the antenna to the Barracuda modem and place it in a stable location.
- Restart your firewall so that it recognizes the Barracuda modem.
- Go to the BASIC > Administration page.
- In the System Reload/Shutdown section, click Restart.
Step 2. Configure the provider settings
- Go to the NETWORK > IP Configuration page.
- In the 3G Network Interface section, select the following settings:
- Enable 3G Network Interface: Yes
- Classification: WAN
- Configure the remaining 3G Network Interface settings for your network requirements.
- You can configure the Barracuda modem to automatically choose the transmission standard with the best transmission performance. For Radio Preference, click Auto.
- For the initial configuration, keep the default Metric value of
400. In a multiprovider configuration, the firewall chooses the interface with the lowest metric for outgoing traffic. - If authentication is required, enter the username and password for establishing a connection to your ISP. If authentication is not required, select the No Auth check box.
- If a pin number is required to unlock your SIM card, enter it in the SIM PIN field.
- To use the DNS server that is assigned by your ISP, set Use Assigned DNS to Yes. The firewall then uses the DNS servers of the ISP for DNS requests.
To make the firewall reachable with a unique identifier (DNS-resolvable name), set Use Assigned DNS to Yes and enter your DynDNS credentials.
- To start the link automatically, set Connection Start Method to Automatic.
- To manually start and stop the link , set Connection Start Method to Manual. To control the link, go to the Dynamic Network Interfaces section of the NETWORK > Interfaces page.
- To monitor the 3G Internet connection, select a test type from the Health Check list. Most ISPs support LCP to continuously monitor successful data transmission. However, you can use ICMP requests for monitoring the Internet connection. If you use ICMP for link monitoring, add a target IP address to the Health Check Target list.
- Click Save Changes.
- At the top of the page, click on the warning message to execute the new network configuration.
- After committing your changes, log back into the X-Series Firewall.
- To verify that the Barracuda modem can establish a connection to your ISP, check its status LED lights. For information on the meaning of the LED lights, see the Barracuda 3G USB Modem Quick Start Guide.
Step 3. Verify the uplink and default network route
Verify that the X-Series Firewall can establish an Internet connection and that the default network route was introduced.
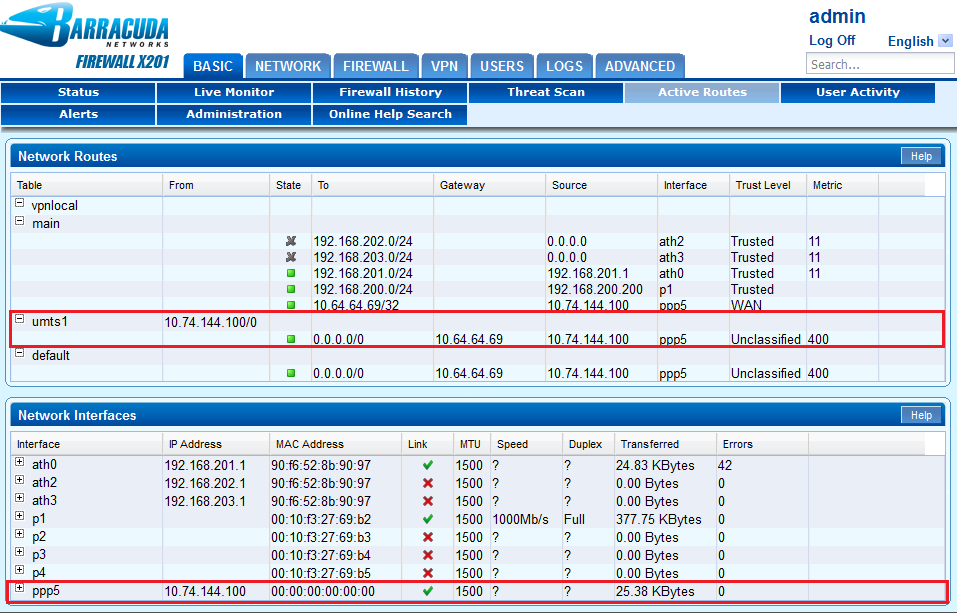
- Go to the BASIC > Active Routes page.
- In the Network Routes section, verify that a default network route for the 3G WAN link was introduced.
- In the Network Interfaces section, verify that the network interface of the 3G WAN link is available.