This article refers to firmware version 3.6.1.009 and higher running on a configured Barracuda Load Balancer 340 or higher.
This article applies to:
- Microsoft® Lync® Server 2010
- For Lync Mobility, Apple iPhone and iPad; Android phone; Windows Phone 7; and Nokia mobile devices
Microsoft Lync References:
- For a list of requirements, refer to Microsoft Lync Server 2010 Deployment
- For deployment options, refer to Understanding Microsoft Lync Server 2010 Deployment Options
- For mobility deployment details, refer to the Microsoft TechNet article Deploying Mobility
Use the IP Worksheet to record your configuration. Barracuda Networks recommends completing this worksheet as you perform these tasks to assist you when running the Topology Builder in Task 7.
To deploy the Barracuda Load Balancer in a Lync 2010 environment, complete the following tasks:
| Deployment Task | Where |
|---|---|
| Task 1. Modify TCP and UDP Connections Settings. | Do this on all active Barracuda Load Balancers, both internal and external. |
| Task 2. Configure Enterprise Pool Services. | Do this on the internal-facing Barracuda Load Balancer. |
| If you did not collocate A/V Services on your Front End Servers, you must also complete step 3: | |
| Task 3. Configure Internal A/V Services (if applicable). | Do this on the A/V Pool Barracuda Load Balancer. |
| If you have an edge deployment, you must also complete the following tasks: | |
| Task 4. Configure Internal Edge Services. | Do this on the internal-facing Barracuda Load Balancer. |
| Task 5. Configure External Edge Services. | Do this on the external-facing Barracuda Load Balancer. |
| If you have deployed Director servers, you must also complete the following task: | |
| Task 6. Configure Director Services. | Do this on the Director Barracuda Load Balancer. |
| Complete the following tasks after all Services are configured on the Barracuda Load Balancer: | |
| Task 7. Run Topology Builder. | Do this on the server where Topology Builder is installed. |
| Task 8. Enable Cookie Persistence. | Do this on the internal-facing Barracuda Load Balancer. |
| Configure Mobility Services and configure the Barracuda Load Balancer as a reverse proxy: | |
| Task 9. Configure Lync Mobility Services. | Do this on the internal-facing Barracuda Load Balancer. |
| Task 10. Configure the Barracuda Load Balancer as a Reverse Proxy for Lync Mobility Services | Do this on the external-facing Barracuda Load Balancer. |
Task 1. Modify TCP and UDP Connections Settings
Do the following on all active Barracuda Load Balancers, both internal (the Barracuda Load Balancer configured with the front-end servers) and external (if there is a Barracuda Load Balancer deployed with Edge servers).
To modify the TCP and UDP Connections settings on the System Settings page:
- Go to the ADVANCED > System Settings tab in the web interface.
- In the TCP Connections Timeout box, enter 1800 (30 minutes).
- In the UDP Connections Timeout box, enter 1800 (30 minutes).
Task 2. Configure Enterprise Pool Services
To configure all Services needed for an internal Lync deployment, perform the following steps on the internal-facing Barracuda Load Balancer:
- Go to the BASIC > Services page. Make sure the Add New Service section is in the advanced view.
Add each Service listed in the table using the steps that follow; all Services are required:
Service Name Service Type Virtual IP Address Real Servers MTLS Front TCP Proxy IP for FQDN of Internal Enterprise Lync Pool
e.g., 192.168.1.11/24 forfrontpool.domain.local
Port is 5061IP address of every front-end Server in your Lync Pool
(K and L from the example(1))DCOM WMI Front TCP Proxy IP for FQDN of Internal Enterprise Lync Pool; Port is 135 IP address of every front-end Server in your Lync Pool
(K and L from the example(1))Internal Conf Front TCP Proxy IP for FQDN of Internal Enterprise Lync Pool; Port is 444 IP address of every front-end Server in your Lync Pool
(K and L from the example(1))HTTPS Front Layer 7 - HTTPS IP for FQDN of Internal Enterprise Lync Pool; Port is 443 IP address of every front-end Server in your Lync Pool
(K and L from the example(1))Note:
(1) See Understanding Microsoft Lync Server 2010 Deployment Options for deployment examples.- For the HTTPS Front Service only:
- In the Persistence section, set Persistence Type to HTTP Cookie and Persistence Time to 1200. Leave Cookie Name blank.
- In the Advanced Options section, set Session Timeout to 0 (session never times out).
- For the DCOM WMI Front Service only, edit each Real Server associated with the Service by clicking the Edit icon next to each Real Server entry in the table. On the Real Server Detail page that appears:
- In the Server Monitor section, set the Testing Method to TCP Port Check.
- In the Port field, enter the value 5061. It is better to test port 5061 for this Service because port 135 always passes the TCP port check even if Lync Services are not responding.
The following Services are optional; add each Service only if you have deployed that feature:
| Service Name | Service Type | Virtual IP Address | Real Servers |
|---|---|---|---|
| Application Sharing (optional) | TCP Proxy | IP for FQDN of Internal enterprise Lync Pool; Port is 5065 | IP address of every Front-End Server in your Lync Pool (K and L from the example(1)) |
| QoE Agent (optional) | TCP Proxy | IP for FQDN of Internal Enterprise Lync Pool; Port is 5069 | IP address of every Front-End Server in your Lync Pool (K and L from the example(1)) |
| Response Group Service (optional) | TCP Proxy | IP for FQDN of Internal Enterprise Lync Pool; Port is 5071 | IP address of every Front-End Server in your Lync Pool (K and L from the example(1)) |
| Conferencing Attendant (optional) | TCP Proxy | IP for FQDN of Internal Enterprise Lync Pool; Port is 5072 | IP address of every Front-End Server in your Lync Pool (K and L from the example(1)) |
| Conferencing Announcement | TCP Proxy | IP for FQDN of Internal Enterprise Lync Pool; Port is 5073 | IP address of every Front-End Server in your Lync Pool (K and L from the example(1)) |
| Outside Voice Control (optional) | TCP Proxy | IP for FQDN of Internal Enterprise Lync Pool; Port is 5074 | IP address of every Front-End Server in your Lync Pool (K and L from the example(1)) |
| Note: (1) See Understanding Microsoft Lync Server 2010 Deployment Options for deployment examples. | |||
For each Service created, edit the Service by clicking the Edit icon next to the Service entry in the table. On the Service Detail page that appears, for any optional service created:
In the Persistence section, set Persistence Type to Client IP and Persistence Time to 1200.
In the Advanced Options section, set Session Timeout to 0 (session never times out).
Task 3. Configure Internal A/V Services (if applicable)
If you have more than 10,000 users in this pool, it is recommended that you separate the A/V Services of your Internal Lync Pool and do not collocate the A/V services on the Front End Pool. If you choose to collocate A/V Services on your Front End Pool, no further changes to the configuration are required.
Separating out the A/V Services into its own pool requires two more Barracuda Load Balancers operating as a High Availability pair. Contact Barracuda Networks Technical Support if your deployment has more than 10,000 A/V users for assistance.
Task 4. Configure Internal Edge Services
To configure all Services needed for a load-balanced Lync Edge deployment, perform the following steps on the internal-facing Barracuda Load Balancer.
- Go to the BASIC > Services page. Make sure the Add New Service section is in the advanced view.
Add each Service listed in the following table:
Service Name Service Type Virtual IP Address Real Servers MTLS Edge TCP Proxy IP for FQDN of Internal Edge Enterprise Lync Pool
e.g., 192.168.1.12/24 foredgepool.domain.local
Port is 5061Internal IP addresses of your Edge Servers
(I and J from the example)AV Auth Edge TCP Proxy IP for FQDN of Internal Edge Enterprise Lync Pool; Port is 5062 Internal IP addresses of your Edge Servers
(I and J from the example)RTP HTTPS Edge Layer 7 - HTTPS IP for FQDN of Internal Edge Enterprise Lync Pool; Port is 443 Internal IP addresses of your Edge Servers
(I and J from the example)HTTPS Layer 7 - HTTPS IP for FQDN of Internal Edge Enterprise Lync Pool; Port is 4443 Internal IP addresses of your Edge Servers
(I and J from the example)Web Conferencing Edge TCP Proxy IP for FQDN of Internal Edge Enterprise Lync Pool; Port is 8057 Internal IP addresses of your Edge Servers
(I and J from the example)RDP Media Edge Layer 4 - UDP IP for FQDN of Internal Edge Enterprise Lync Pool; Port is 3478 Internal IP addresses of your Edge Servers
(I and J from the example)Note:
(1) See Understanding Microsoft Lync Server 2010 Deployment Options for deployment examples.For each TCP Proxy Service created, edit the Service by clicking the Edit icon next to the Service entry in the table. On the Service Detail page that appears:
In the Persistence section, set Persistence Type to Client IP and Persistence Time to 1200.
- In the Advanced Options section, set Session Timeout to 0 (session never times out).
For the HTTPS and RTP HTTPS Edge Services only, edit the Service by clicking the Edit icon next to the Service entry in the table:
In the Persistence section, set Persistence Type to HTTP Cookie and Persistence Time to 1200. Leave Cookie Name blank.
- In the Advanced Options section, set Session Timeout to 0 (session never times out).
- No change is required for RDP Media Edge which is a Layer 4 - UDP Service.
Task 5. Configure External Edge Services
The Real Servers should be physically connected to a switch which is connected to the LAN port (for two-armed deployment) or the WAN port (one-armed deployment) of the Barracuda Load Balancer.
To configure all Services needed for a load balanced Edge Deployment of Lync Server, perform the following steps on the external-facing (Internet-facing) Barracuda Load Balancer:
Go to the BASIC > Services page. Make sure the Add New Service section is in the advanced view.
Add each Service listed in the following table:
Service Name(1) Service Type Virtual IP Address Real Servers Access Edge One-armed deployment: TCP Proxy
Two-armed deployment: Layer 4 - TCPIP for FQDN of Access Edge
e.g., IP address forlync.example.com;Port is 443IP address of Access Edge NICs on each Edge Server
(C and F from the example(2))Access Edge(3) One-armed deployment: TCP Proxy
Two-armed deployment: Layer 4 - TCPIP for FQDN of Access Edge
e.g., IP address forlync.example.com; Port is 5061IP address of Access Edge NICs on each Edge Server
(C and F from the example(2))Web Conferencing Edge One-armed deployment: TCP Proxy
Two-armed deployment: Layer 4 - TCPIP for FQDN of WebConf Edge
e.g., IP address forwebconf.example.com; Port is 443IP address of WebConf NICs on each Edge Server
(D and G from the example(2))A/V Edge One-armed deployment: TCP Proxy
Two-armed deployment: Layer 4 - TCPIP for FQDN of AV Edge
e.g., IP address forav.example.com; Port is 443IP address of AV NICs on each Edge Server
(E and H from the example(2))A/V UDP Layer 4 - UDP IP for FQDN of AV Edge
e.g., IP address forav.example.com; Port is 3478IP address of AV NICs on each Edge Server
(E and H from the example(2))Notes:
(1) Each Service must have its own VIP Address.
(2) See Understanding Microsoft Lync Server 2010 Deployment Options for deployment examples.
(3) This Service is required if you have enabled federation on your Enterprise Edge Pool.For each TCP Service created, edit the Service by clicking the Edit icon next to the Service entry in the table. On the Service Detail page that appears:
- For a two-armed deployment:
- In the Persistence section, set Persistence Type to Client IP and Persistence Time to 1200 - For a one-armed deployment:
- In the Persistence section, set Persistence Type to Client IP and Persistence Time to 1200.
- In the Advanced Options section, set Session Timeout to 0 (session never times out).
- For a two-armed deployment:
No further modifications are necessary to the default settings for the UDP Service
Task 6. Configure Director Services
Complete the following steps on the Director Barracuda Load Balancer.
To configure all the Services needed for a load balanced Edge Deployment of Lync Server, perform the following steps on the external-facing Barracuda Load Balancer:
- Go to the BASIC > Services page in the web interface. Make sure the Add New Service section is in the advanced view.
Add each Service listed in the following table:
Service Name Service Type Virtual IP Address Real Servers Directory MTLS TCP Proxy IP for FQDN of the Directory Service; Port is 5061 Internal IP address of your Directory Servers Directory MTLS Legacy(1) TCP Proxy IP for FQDN of the Directory Service; Port is 5060 Internal IP address of your Directory Servers Note:
(1) Add this Service if you need to support Office Communications Server prior to version 2007 R2. If you only have versions of Office Communications Server that are 2007 R2 or later (including Lync), do not add this Service.For each Service created, edit the Service by clicking the Edit icon next to the Service entry in the table. On the Service Detail page that appears:
- In the Persistence section, set Persistence Type to Client IP and Persistence Time to 1200.
- In the Advanced Options section, set Session Timeout to 0 (session never times out).
Task 7. Run Topology Builder
Once all of the Services are configured on the Barracuda Load Balancer, run Lync Topology Builder; use the configuration information recorded in the IP Worksheet to complete the required fields.
Task 8. Enable Cookie Persistence
In this step you install an SSL certificate on the internal-facing Barracuda Load Balancer to enable cookie persistence for the Layer 7 - HTTPS Services that were partially configured previously. Additionally, you configure backend SSL on the Real Servers. The Barracuda Load Balancer uses the certificate that you install to decrypt the SSL traffic directed to Layer 7 - HTTPS Services. It checks for a persistence cookie and then re-encrypts the traffic before sending it to a server in the pool.
Each of the front-end Lync servers should have the pool name in its certificate. Export a certificate, making sure it has the pool name, from one of the front-end servers.
Using the Certificate Manager in the Microsoft Management Console (MMC), export a certificate along with its private key.
To enable cookie persistence, perform the following steps on the internal-facing Barracuda Load Balancer
- Import the certificate using the BASIC > Certificates page.
- Go to the BASIC > Services page and edit the HTTPS Front Service. On the Service Detail page, in the SSL Offloading section, select the SSL certificate from the SSL Certificate list.
- Go the BASIC > Services page and edit each Real Server that is associated with the HTTPS Front Service. On the Real Server Detail page, set Enable HTTPS/SSL to Yes so that the Barracuda Load Balancer re-encrypts the traffic sent to the Real Server.
If you deployed edge services on the internal-facing Barracuda Load Balancer, identify the certificate for the HTTPS and RTP HTTPS Edge Services:
- Go to the BASIC > Services page and edit the HTTPS and RTP HTTPS Edge Services. On the Service Detail, in the SSL Offloading section, select the SSL certificate from the SSL Certificate list.
- Go to the BASIC > Services page and edit each Real Server that is associated with each of these Services. On the Real Server Detail page, set Enable HTTPS/SSL to Yes so that the Barracuda Load Balancer re-encrypts the traffic sent to the Real Server.
Your installation of the Barracuda Load Balancer and Microsoft Lync Server is now complete. Continue to configure the Barracuda Load Balancer for Lync Mobility.
Task 9. Configure Lync Mobility Services
To configure the Services needed for a Lync Mobility deployment, perform the following steps on the internal-facing Barracuda Load Balancer:
- Go to the BASIC > Services page. Make sure the Add New Service section is in the advanced view.
Add each Service listed in the following table:
Service Name Service Type Virtual IP Address Real Servers Lync Mobility HTTPS Layer 7 - HTTPS IP address for FQDN of Internal Enterprise Lync pool; Port is 4443 Internal IP addresses of front-end Servers; Port is 4443 Lync Mobility HTTP(1) (optional) Layer 4 - TCP IP address for FQDN of Internal Enterprise Lync pool; Port is 8080 Internal IP addresses of front-end Servers; Port is 8080 Note:
(1) The optional Lync Mobility HTTP service is required only if you enabled Lync Mobility connections over HTTP.- For the Lync Mobility HTTPS Service only, edit the Service by clicking the Edit icon in the Actions column. On the Service Detail page that appears:
- In the Persistence section, set Persistence Type to HTTP Cookie, and the Persistence Time to 1200; leave the Cookie Name box blank.
- In the SSL Offloading section, in the Certificate list, select the certificate assigned to the Lync front-end Server for external web services; see Appendix A. Certificate for Lync Mobility Service for additional information.
- In the Advanced Options section, set Session Timeout to 0 (session never times out).
Task 10. Configure the Barracuda Load Balancer as a Reverse Proxy for Lync Mobility Services
A reverse proxy is required to support Lync Mobility Services, as it allows remote users to access the functionality provided by Lync Web Services. To configure the Services needed to deploy the Barracuda Load Balancer as a reverse proxy, perform the following steps on the external-facing Barracuda Load Balancer:
- Go to the BASIC > Services page. Make sure the Add New Service section is in the advanced view.
Add each Service listed in the following table:
Service Name Service Type Virtual IP Address Real Server Lync RP HTTPS Secure TCP Proxy IP address of the FQDN of External Web Services; Port is 443 VIP address of the Lync Mobility HTTPS Service; Port is 4443 Lync RP HTTP(1) (Optional) Layer 4 - TCP IP address of the FQDN of External Web Services; Port is 80 VIP address of the Lync Mobility HTTP Service; Port is 8080 Note:
(1) The optional Lync RP HTTP service should be added only if you enabled Lync Mobility connections over HTTP.For the Lync RP HTTPS Service only, edit the Service by clicking the Edit icon in the Actions column. On the Service Detail page that appears:
- In the Persistence section, set Persistence Type to HTTP Cookie, and the Persistence Time to 1200. Enter MS-WSMAN in the Cookie Name box.
- In the SSL Offloading section, in the Certificate list, select the certificate assigned to the Lync front-end Server for external web services; see Appendix A. Certificate for Lync Mobility Service for additional information.
- In the Advanced Options section, set Session Timeout to 0 (session never times out).
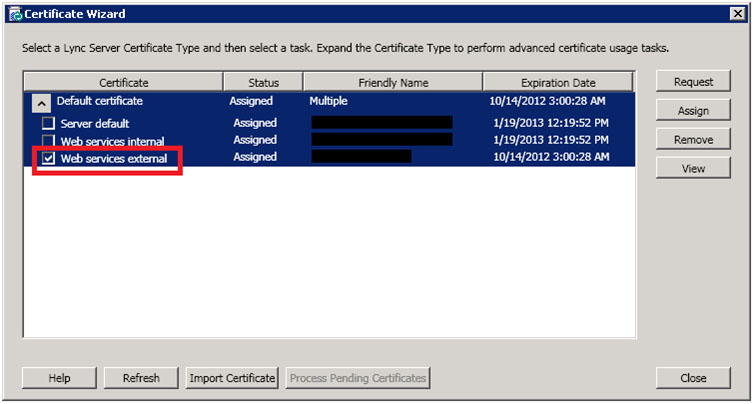
Appendix A. Certificate for Lync Mobility Service
You can create the certificate to be assigned to the Lync Mobility Service and to the Reverse Proxy (RP) Service using the Lync Certificate Wizard. The certificate's SAN must contain the autodiscover URL and your external web services URL. The Lync RP HTTPS Service and the Lync Mobility HTTPS Service that you create on the Barracuda Load Balancer can be assigned the same certificate
For more information regarding certificate requirements, refer to the Microsoft TechNet article called Certificate Summary - Reverse Proxy: http://technet.microsoft.com/en-us/library/jj205381.aspx
When you use the Lync Certificate Wizard to request the certificate, select the Web services external option check box, and assign the resulting certificate to the Barracuda Load Balancer: