

Email Gateway Defense is a cloud-based email security service that protects both inbound and outbound email against the latest spam, viruses, worms, phishing, and denial of service attacks. The Email Gateway Defense web interface includes the Message Log from which you can manage your quarantined messages. Additionally, you can set account preferences based on features enabled for your account by the administrator.
Permissions may include:
- Modify quarantine notification report settings. Set email receipt frequency with a list of messages in your quarantine account. Once received, you can select whether to delete or deliver these messages to your email address.
- Create exemption (accept mail from), block, or quarantine policies for email addresses, domains, and users.
- Manage quarantine inbox delivery or delete quarantined messages.
- Change password (manually added users only)
Link Accounts. Use the current account as an alias and add additional email addresses in the same domain for which quarantined email is to be forwarded to this account.
Welcome Email
After your system administrator creates your account, Email Gateway Defense sends you a welcome email including a login link. The login link expires after seven days.
Note that when using Azure or LDAP, your system administrator must first generate the welcome email, which will then be sent to you with the login link.
Message Log
The Email Gateway Defense web interface includes the Message Log from which you can manage your quarantined messages.
Quarantined Mail
When enabled, you are notified on a regular interval when you have quarantined messages. The quarantine notification interval is set either by your administrator or, if you have permissions, you can set the interval on the Settings > Quarantine Notification page. Note that quarantined messages are deleted after 30 days. For more information, see Quarantine Notifications.
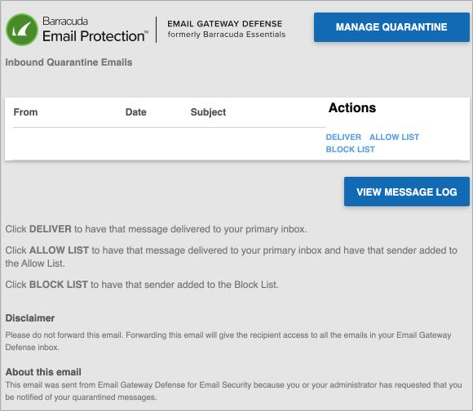
The links in the Actions column allow the user to:
- Deliver – Click to deliver the message to regular inbox.
- Allow List – Click to deliver the message and add the sender to your allow list. All future messages from the sender are allowed and go directly to the Inbox.
- Block List – Click to have the sender added to the block list.
Figure 1. Sample Quarantined Email Notification
Clicking on the links in the quarantine notification email will redirect you to log into Email Gateway Defense. You can also manually log in into Email Gateway Defense.
Sign In with a Temporary Passcode
The administrator can enable the temporary passcode setting so that you can request a temporary passcode when you click on a link in the quarantine notification email or when logging into Email Gateway Defense. A passcode is then sent to your email address that you can use to log in. If you are using a shared mailbox or part of a distribution list, the passcode will be sent to the Shared Mailbox email address.
This is useful for users signing into a shared mailbox or distribution list, if users forgot their password, or if SSO is unavailable.
If the feature is enabled, you will see a new option when you attempt to sign into the shared email address.
Use the following instructions to authenticate with a temporary passcode:
- Click on a link or button in their quarantine digest email (Manage Quarantine, View Message Log, Deliver, Allow List, Block List) or manually log into Email Gateway Defense.
- You are prompted to sign into Email Gateway Defense.
- Enter a shared inbox or distribution list email address in the Email Address field and click Next.
- If the account is SSO enabled, you will see an intermediary page to log in with SSO or request a temporary passcode. Note that the SSO login is not for shared email addresses.
- If the account does not have SSO enabled, you will enter your password or shown the option to request a temporary passcode.
Click Email a temporary passcode to send a passcode to the shared mailbox.
- You will receive an email to the shared inbox with the temporary passcode. Copy and paste the passcode into the Temporary passcode field. Note that passcodes are case sensitive.
- Click Log in.
You are now logged into your Message Log and can manage your quarantine emails. You can also use the Deliver, Allow List, Block List buttons in the quarantine digest email as normal.
For help logging into Email Gateway Defense, contact Barracuda Networks Technical Support.
Manage Mail
Use the Message Log to manage mail. The Message Log page displays all email messages that come through Email Gateway Defense to your account. You can filter messages by All, Allowed, UI Delivered, Not Allowed, Blocked, Deferred, or Quarantined using the drop-down menu.
The Message Log action column is also color-coded to provide a quick view of the action taken for each message. For example, in Figure 2 below, yellow indicates the message was quarantined and red indicates the message was blocked.
Note that messages are deleted after 30 days.
Figure 2. Filter Messages in the Message Log

Messages are blocked due to the following:
- Spam and virus policies set by your administrator for the domain; and
- Email address or domain block policies, as well as email from other users, set by your administrator for the domain.
Messages are deferred for various reasons. Click the Help icon on the Message Log page for more information as well as details on searching for and filtering messages.
From the Message Log page, select one or more messages, and then click on an action. To select all messages, select the check box at the top of the Message List.
Depending on the message filter, once you select one or more messages, you can take the following actions:
- Allow List – Senders of selected messages are added to the allow list; note that you cannot add blocked messages to the allow list.
- Recategorize – When one or more categorized emails are selected, allows you to change the category. For example, if the message is categorized as Corporate but you believe it should be categorized as Marketing Materials, you can change the category via the Recategorize drop-down. This action submits this email message for recategorization to your selected category. If you select Other and enter a custom category, the category updates for that particular email message. For more information, see Email Categorization below.
- Export – Selected messages are exported to a CSV file. When prompted, enter a file name and select whether to save to your local desktop or network.
- Deliver – The service attempts to deliver the selected messages to your mailbox; note that you cannot deliver messages blocked for Advanced Threat Protection (ATP). If a message is successfully delivered, the Delivery Status changes to Delivered. The mail remains in the log until you select the message and click Delete. If the mail cannot be delivered, a notice displays in your browser window and the Delivery Status does not change. If delivered messages are not delivered to the recipient's mailbox, it may be due to a filter on the mail server or a service on your network catching the mail as spam. Check with your system administrator for more information. Additionally, check your local trash/spam folder for the mail.
Figure 3. Message Actions

Email Categorization
If the Reason for a message in your Message Log displays as Email Categorization, the email from this sender is categorized as not necessarily spam, but something that you may have subscribed to at one time but no longer want to receive. For example, newsletters and memberships, or marketing information. Email Categorization assigns some of these emails to specific categories, which the administrator can decide to allow, block, or quarantine. Supported categories display in the Message Log Reason field as:
- Email Categorization (corporate) – Emails sent by a user at an authenticated organization from an MS Exchange Server that involves general corporate communications. Does not include marketing newsletters.
- Email Categorization (transactional) – Emails related to order confirmations, bills, invoices, bank statements, delivery/shipping notices, and service-related surveys.
- Email Categorization (marketing) – Promotional emails from companies such as Constant Contact.
- Email Categorization (mailing lists) – Emails from mailing lists, newsgroups, and other subscription-based services such as Google and Yahoo! Groups.
- Email Categorization (social media) – Notifications and other emails from social media sites such as Facebook and LinkedIn.
View Message
To view the message source, headers, and available options, double-click the message; the message content displays. You can take the following actions:
- Click Source to view all headers
- Click Allow List to allow the sender
- Click Block and select whether to block the message Domain or Email
- Click Download to download the message to your local system or network
- Click Deliver to deliver the message to your regular mailbox
- Click Delete to remove the message (This option is available for quarantined messages only)
- Click Report as Incorrectly Blocked for a message that should have been delivered to your regular mailbox. This includes messages that are not spam. (This option is available for quarantined and blocked messages only)
- Click Report as Incorrectly Delivered for a message that should have been blocked. This includes spam messages.
Figure 4. Message Source with Headers

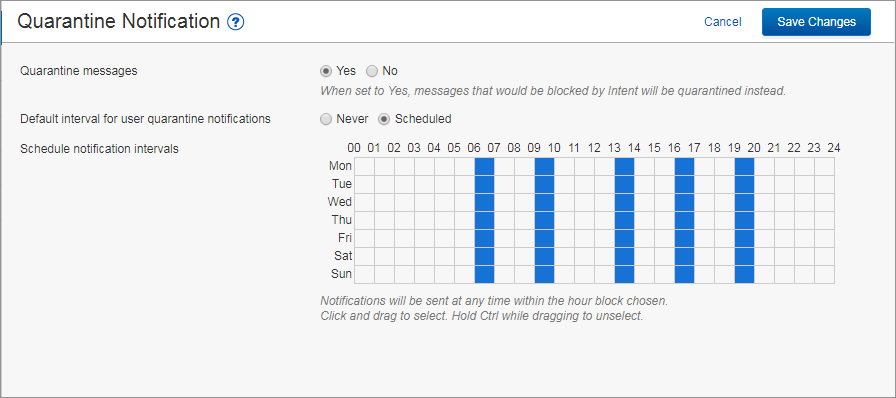
Set Quarantine Notification Interval
Quarantined messages are deleted after 30 days.
You can direct Email Gateway Defense to notify you by email when you have quarantined messages. When set to Yes, messages that would normally be blocked are instead quarantined. This setting does not apply to messages blocked by Sender or Content policies. On the Settings > Quarantine Notification page, select Scheduled. Click and drag in the Schedule notification intervals section to set the day and time for quarantine notification email delivery. Click to clear a selection. Alternatively, select Never if you do not want to receive quarantine notifications. Click Save Changes to save your settings.
Figure 5. Set Quarantine Notification Interval
Set Exempt and Block List Policies
Use the Sender Policy page to specify whether to block, allow, or quarantine messages from a specific sender or domain. These are called exempt/block list policies. To create a new policy:
- Go to Settings > Sender Policy page, and enter the email address or domain in the Sender field.
- From the Policy drop-down menu, select whether to Block, Exempt, or Quarantine the sender.
- Optionally, you can add a comment to indicate why you created the policy.
- Click Add to save the policy:
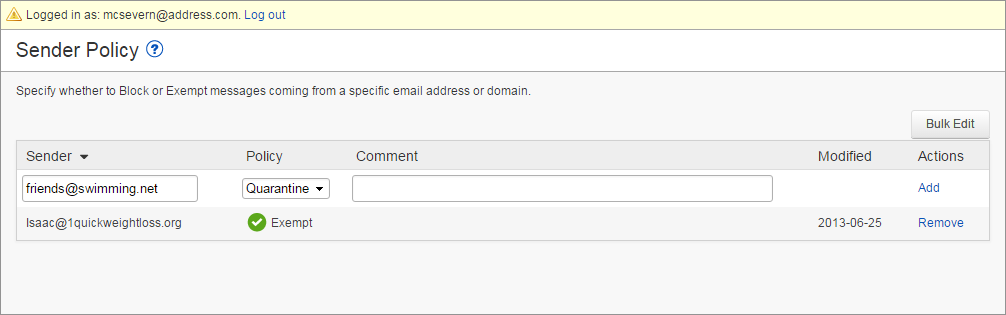
- To remove a policy, click Remove in the Actions column for the sender policy you want to remove.
Link Quarantine Accounts
You can add additional email addresses in the same domain for which quarantined email is to be forwarded to this account. From the Settings > Linked Accounts page, enter the email address in the Account field, select whether to Link account without verification, and click Add.
Change Your Password
Use the Settings > Change Password page to change your password. Click Save Changes to change your password.