

To use user-specific services, they must be made available on interfaces connected to the environmental networks.
Step 1. Configure the Shared Network and IPs
- Go to CONFIGURATION > Configuration Tree > Box > Network.
- Click Lock.
- Scroll down to the section Shared Network and IPs.
- Click +.
- The Shared Networks and IPs window opens.
- Enter the name of the new shared network.
- Click OK.
- The Shared Networks and IPs <your shared network name> window opens.
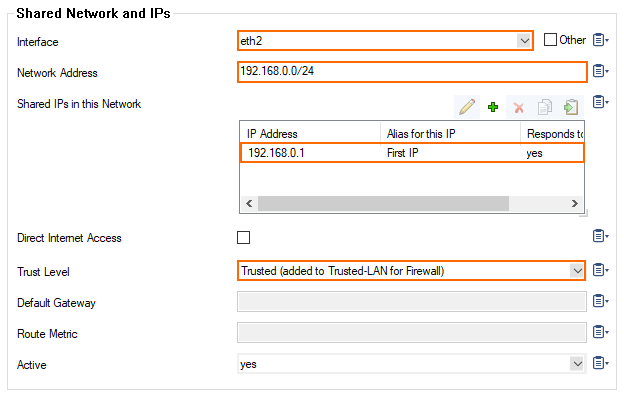
- For Interface, select the interface on which the shared network must be reachable, e.g., eth2.
- Enter the Network Address with an address mask for the network on the selected interface.

Step 2. Configure the Shared IPs in the Shared Network for the IPv4 Network
A configured shared IP will be available for assignment to a special service later on. Repeat the following steps until you have configured all necessary shared IP addresses.
- For Shared IPs in the Network, click +.
- The Shared IPs in this Network window opens.
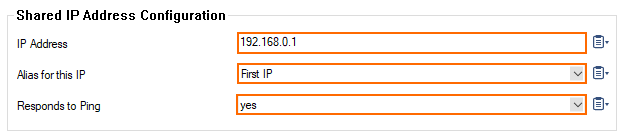
- Enter a valid IP Address within the Shared Network address.
- For Alias for this IP, select either First IP, Second IP, or leave the default value unchanged.
- If necessary, set Responds to Ping to yes.
- For Trust Level, select the relevant trust level that best applies.
- Click OK.
- The shared IP address is added to the list of Shared IPs in this Network.
(optional) Step 3. Configure Direct Internet Access
In case the network address has been assigned by an Internet provider, you can classify the shared network address to have direct Internet access, e.g., 62.99.0.0/24. You then have to configure a gateway as a forwarder for the traffic, e.g., 62.99.0.254.
- For Direct Internet Access, select the check box.
- The following fields are activated for further interaction:
- Provider Name – You can enter a name to signify the line to your provider.
- Provider Class – Select the quality class of your connection. Select from Bulk, Quality, and Fallback.
- Default Gateway – If set, a default route 0.0.0.0/0 via this IP address is created. The IP address must be within the configured network address.
- Route Metric – Set an individual preference for prioritizing multiple routes among each other.
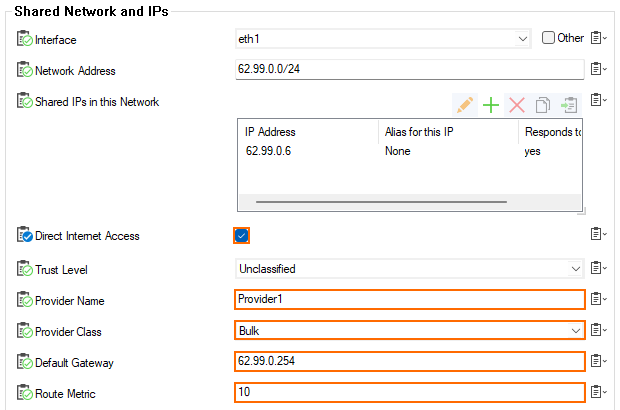
- Verify that Active is set to yes at the bottom of the configuration area.
(optional) Step 4. Configure IPv6 Shared Networks and IPs
- For IPv6 Shared Networks and IPs, click +.
- The IPv6 Shared Networks and IPs window opens.
- Enter the name of the new shared network.
- Click OK.
- For Interface, select the interface on which the shared network must be reachable, e.g., eth1.
- Enter the Network Address with an address mask for the network on the selected interface.
(optional) Step 5. Configure the Shared IPs in the Shared Network for the IPv6 Network
A configured shared IP will be available for assignment to a special service later on. Repeat the following steps until you have configured all necessary shared IP addresses.
- For Shared IPs in the Network, click +.
- The Shared IPs in this Network window opens.
- For Alias for this IP, select either First IP, Second IP, or leave the default value unchanged.
- If necessary, set Responds to Ping to yes.
- Click OK.
- The shared IP address is added to the list of Shared IPs in this Network.
Step 6. Finalize the Configuration
- Click OK.
- The Shared Networks and IPs window closes.
- Click Send Changes and Activate.
You can now activate and assign a special service to your firewall and use the configured service IP addresses. For more information, see How to Assign Services.