

To back up and restore your system, you must create a Portable Archive (PAR) file. A Barracuda CloudGen Firewall running firmware 6.0.1 or higher can also create encrypted PCA files to store the system configuration.
| File Type, Suffix | PAR File Format | Human Readable | Original Box Readable | Replacement Box Readable | CC Readable (managed boxes) | Comment | Restore Configuration via... |
|---|---|---|---|---|---|---|---|
| PCA | Encrypted PAR file. Uncompressed. | NO | YES (Specific SN# only!) | YES (password protected) | YES (password protected) | For security reasons, this is the factory preset default option. Note that the PCA file format is tied to the serial number of the appliance, which is unique. Therefore, in case of a hardware failure, you will not be able to re-use this file on your new appliance. In such a case, consider using the PPE or PGZ file format instead, which will be accepted by any appliance. | Barracuda Firewall Admin. If the password is set to the serial number of the appliance, you can also restore via /opt/phion/update/ or USB stick when using F-Series Install. |
| PPE | Binary encoded PAR file. Uncompressed, unencrypted. | NO | YES | YES | YES | Use this standard binary file format if you want to avoid human-readable text files. | Barracuda Firewall Admin. |
| PAR | Cleartext PAR file. Uncompressed, unencrypted. | YES | YES | YES | YES | This file format is human-readable. Beware of using this file format if security is a high priority. | Barracuda Firewall Admin, /opt/phion/update/, USB stick when using Barracuda F-Series Install |
| PGZ | Compressed PAR file. Unencrypted. | NO | YES | YES | YES | Can only be created via Barracuda Firewall Admin. | Barracuda Firewall Admin, /opt/phion/update |
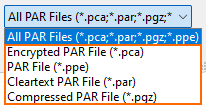
These file extensions will be displayed in the window to select which file format to use for saving your archive file:
In Barracuda Firewall Admin, you can create these PAR files on two levels of the configuration tree:
- Box level – Creating a PAR file on the box level applies both to stand-alone boxes and to the box level of a Control Center.
- CC level – Creating a PAR file on the CC level lets you create backups for the whole configuration tree and for single boxes in the configuration tree.
You can trigger the creation and restoration of a backup via the popup menu in Barracuda Firewall Admin:
| Level | Operation | Single Box | All Boxes | Note |
|---|---|---|---|---|
| Box Level | Create backup | 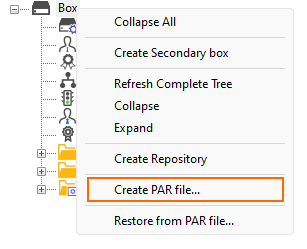 | - | This applies to stand-alone boxes and the box level on Control Centers. |
| Restore backup | 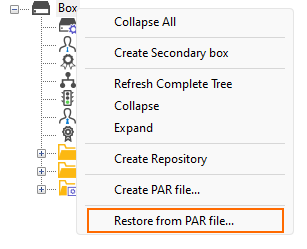 | - | This applies to stand-alone boxes and the box level on Control Centers. | |
| CC Level | Create backup | 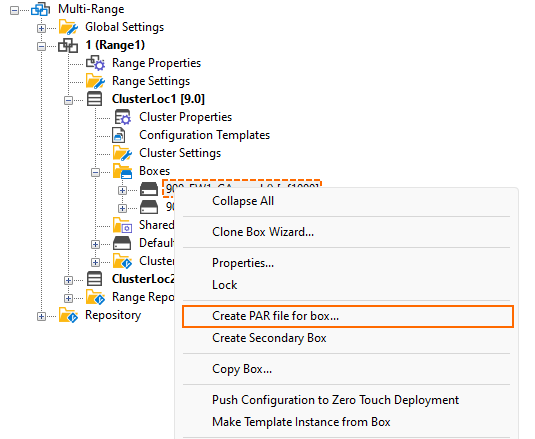 |  | Creating a backup for multiple boxes will store the whole configuration tree on the CC level. The preset file name for a single box will have the name of the firewall, e.g., The preset name for multiple boxes (= whole configuration tree) will suggest the name |
| Restore backup | 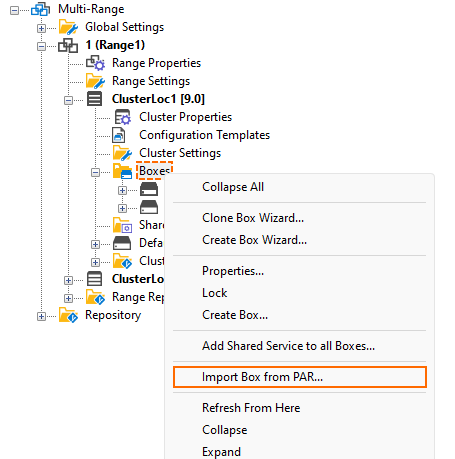 | 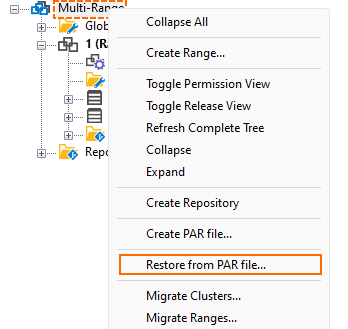 | Restoring a backup for a single box will restore it under the Boxes node in the related cluster. Restoring a backup for multiple boxes will restore the whole configuration tree on the CC level. |
Stand-Alone CloudGen Firewall and Stand-Alone Secure Access Controller
Create a PCA or PAR file to back up and restore the configuration of a stand-alone CloudGen Firewall or a stand-alone Secure Access Controller.
Back-Up the CloudGen Firewall or Secure Access Controller
- Go to CONFIGURATION > Configuration Tree.
- Right-click Box and select Create PAR file. The Save As window opens.
- Select the archive type:
- Encrypted PAR File (*.pca) (Default)
- PAR file (*.ppe)
- Cleartext PAR File (*.par)
- Compressed PAR File (.pgz)
- If you selected Encrypted PAR file, the Password window opens.
Click Use Serial Number, or enter the Password manually.
Restore the CloudGen Firewall or Secure Access Controller
Go to CONFIGURATION > Configuration Tree.
Right-click Box and select Restore from PAR file. Select the required PCA / PPE / PAR / PGZ file.
If you are using a PCA file, enter the Password and click OK.
Click Activate.
Go to CONTROL > Box.
In the left navigation pane, expand Operating System and click Firmware Restart. Click Yes to confirm that you want to restart the subsystem.
Expand Network and click Activate new network configuration.
Activate the new network configuration:
If you are continuing to use the same management IP address and management port, click Failsafe.
If the new network configuration uses a new management IP address, click Activate Now.
For information, see How to Activate Network Changes.
Barracuda Firewall Control Center
Two PAR files are needed to back up your Firewall Control Center: the box layer box.par and the archive.par containing the Control Center configuration that includes all managed firewalls, the Secure Access Controller, and all Secure Connectors. You cannot restore a managed firewall from the archive.par directly.
Back-Up the Control Center Box Layer
To back up the Firewall Control Center, you must create a PAR file for the box layer and the archive.par for the Control Center configuration.
- Log into the box layer of the Control Center.
- Go to CONFIGURATION > Configuration Tree.
- Right-click Box and select Create PAR file. The Save As window opens.
- Select the archive type:
- Encrypted PAR File (*.pca) (Default)
- PAR file (*.ppe)
- Cleartext PAR File (*.par)
- Compressed PAR File (.pgz)
- If you selected Encrypted PAR file, the Password window opens.
Click Use Serial Number or enter the Password manually.
The box.par file is saved to your local hard drive.
Restore the Control Center Box Layer
To restore the Control Center:
- Log into the box layer of the Control Center.
- Go to CONFIGURATION > Configuration Tree.
- Right-click Box and select Restore from PAR file. Select the required PCA / PPE / PAR / PGZ file.
- If you are using a PCA file encrypted with a manual password, enter the Password and click OK.
- Click Activate.
- Go to CONTROL > Box
- In the left navigation menu, expand Operating System and click Firmware Restart. Click Yes to confirm that you want to restart the subsystem.
- Expand Network and click Activate new network configuration.
- Select one of the following network configuration activation modes:
- If you are continuing to use the same management IP address and management port, click Failsafe.
- If the new management IP address and management port are different from the ones currently configured on the appliance, click Activate now.
For information, see How to Activate Network Changes.
Back-Up the Control Center Configuration
- Log into the Control Center.
- Go to CONFIGURATION > Configuration Tree.
- Right-click the Multi-Range and select Create PAR file.
- The Save As window opens.
- Select the archive type:
- Encrypted PAR File (*.pca) (Default)
- PAR file (*.ppe)
- Cleartext PAR File (*.par)
- Compressed PAR File (.pgz)
- If you selected Encrypted PAR file, the Password window opens.
Click Use Serial Number or enter the Password manually.
The archive.par file is saved to your local hard drive.
Restore the Control Center Configuration
In order to prevent the Control Center from accidentally sending configuration updates to the managed firewalls while restoring the PAR file, it is recommended to block the update process:
- Log into the Control Center.
- Go to CONTROL > Configuration Updates.
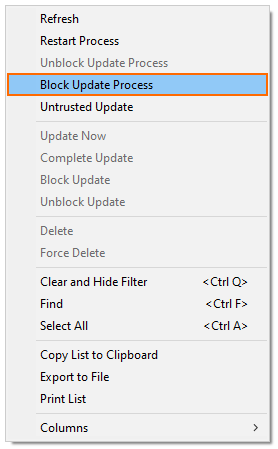
- Right-click into the main display area of the window.
- A list is displayed.
- Select Block Update Process from the list.
It is now safe to restore the PAR file:
- Go to the CONFIGURATION > Configuration Tree page. If you are prompted with warning messages, click no.
- Right-click Multi-Range and select Restore from PAR file.
- Select the required archive.par file.
- (Optional) If the license has changed, you must also import the base license of the box layer on the Control Center. For more information, see How to Manually Install the Licenses for the Control Center.
After restoring the PAR file, configuration updates must be unblocked:
- Go to CONTROL > Configuration Updates.
- Right-click into the main display area of the window.
- A list is displayed.
- Select Unblock Update Process.
Managed CloudGen Firewalls and Managed Secure Access Controller
To back up and restore the configuration of a CloudGen Firewall or Secure Access Controller that is managed by the Control Center, you must create a PAR file in the Control Center and then recover the managed firewall directly.
Back-Up the Managed CloudGen Firewall or the Managed Secure Access Controller
- Log into the Control Center.
- Click the CONFIGURATION tab.
- In the Configuration Tree, navigate to the range and cluster for the CloudGen Firewall or the Secure Access Controller.
- Expand Boxes, right-click the CloudGen Firewall or the Secure Access Controller, and select Create PAR file for box.
- Select the archive type:
- Encrypted PAR File (*.pca) (Default)
- PAR file (*.ppe)
- Cleartext PAR File (*.par)
- Compressed PAR File (.pgz)
- If you selected Encrypted PAR file, the Password window opens.
If you selected Encrypted PAR file, click Use Serial Number or enter the Password manually.
- Save the PAR file to your local hard drive.
Restore the Managed CloudGen Firewall or the Managed Secure Access Controller
Log into the CloudGen Firewall or the Secure Access Controller.
Go to the CONFIGURATION > Configuration Tree page.
Right-click Box and select Restore from PAR file. Select the PAR or PCA file you previously created for this firewall in the Control Center.
If you are using a PCA file encrypted with a manual password, enter the Password and click OK.
Click OK to confirm the Emergency Override warning message.
Click Activate.
Go to the CONTROL > Box page.
In the left navigation pane, expand Operating System and click Firmware Restart. Click Yes to confirm that you want to restart the subsystem.
Expand Network and click Activate new network configuration.
Select one of the following network configuration activation modes:
If you are continuing to use the same management IP address and management port, click Failsafe.
If the new management IP address and management port are different from the ones currently configured on the appliance, click Activate now.
For information, see How to Activate Network Changes.