

Complete the steps in this guide to configure, launch, and license your Barracuda WAF Control Center instance.
Before You Begin
- The Barracuda WAF Control Center Vx is deployed with one Network Interface Card (NIC) by default
- The management interface cannot be added without adding the LAN interface
- For deployments in AWS or Azure, the license type is “Bring your own license” (BYOL)
Deployment Steps
Perform the following steps:
- Step 1. Open Network Address Ranges
- Step 2. Start the Virtual Appliance, Configure Networking, and Enter the License
- Step 3. Accept the End User License Agreement and Verify Configuration
- Step 4. Update the Firmware
- Step 5. Verify Configuration and Change the Password
- Step 6. Creating the Barracuda WAF Control Center Account Admin
Step 1. Open Network Address Ranges
For private cloud deployments, ensure that the network ranges/ports are allowed on the upstream network firewall. For public cloud deployments, create the security group/network security groups.
For more information on the usage of ports for the WCC, check the following table:
| Hostname | Port | Direction | TCP/UDP | Purpose |
|---|---|---|---|---|
| term.cuda-support.com | 22 | Outbound | TCP | Technical Support connections |
| 25 | Inbound/Outbound | TCP | Email alerts | |
| 53 | Outbound | Both | Domain Name Service (DNS) | |
| cnt12.upd.cudasvc.com | 80/8000 | Inbound/Outbound | TCP |
|
| cnt13.upd.cudasvc.com | ||||
| cnt14.upd.cudasvc.com | ||||
| cnt15.upd.cudasvc.com | ||||
| ntp.barracudacentral.com | 123 | Outbound | UDP | Network Time Protocol (NTP) |
| updates.cudasvc.com | 443 | Outbound | TCP | Initial VM provisioning * |
| * The initial provisioning port can be disabled after the initial provisioning process is complete. | ||||
Connectivity between WAF Instances and the WCC:
| Port | Direction | TCP/UDP | Purpose |
|---|---|---|---|
| 48320/48321 | Inbound/Outbound | TCP | Secure tunnel between the WCC and WAFs |
| 2200 | Inbound/Outbound | TCP | File transfer |
Step 2. Start the Virtual Appliance, Configure Networking, and Enter the License
You should receive your license token/serial # of Barracuda Vx via email or from the website after you download the Barracuda WAF Control Center Vx package. If not, you can request an evaluation on the Barracuda website at https://www.barracuda.com/purchase/evaluation or purchase one from https://www.barracuda.com/purchase/index. The license token looks similar to the following: 01234-56789-ACEFG.
Virtual Machine Deployment for Private Clouds
- In your hypervisor client, start the virtual appliance and allow it to boot up.
- For instructions on deploying the images on specific private cloud platforms, see How to Deploy the Barracuda WAF Control Center Vx image.
- For instructions on allocating system resources like CPU, RAM, and storage, see Allocating Cores, RAM, and Hard Disk Space for Your Barracuda WAF Control Center Vx.
- After the deployment is complete, access the serial console of the VM, and from the console, log in with the following: username is "admin", and the password is the serial number.
- In the System Configuration window, use the down arrow key and select TCP/IP Configuration. Configure the following:
- WAN IP Address
- WAN Netmask
- Gateway Address
- Primary DNS Server
- Secondary DNS Server
- If the Internet can be accessed only through an explicit proxy, configure the proxy server using Proxy Server Configuration (Optional), so that it reaches the Internet for provisioning.
- Under Licensing enter your Barracuda License Token and Default Domain to complete provisioning. The appliance will reboot as a part of the provisioning process.
Virtual Machine Deployment for Amazon Web Services or Microsoft Azure
- Select the Barracuda Application Security Control Center - BYOL from the respective marketplaces and proceed to deploy the virtual machine.
- Ensure that the instance type has support for a minimum of 4 vCPU, for example, M4.XLarge.
- Bind the security group/network security group created for the deployment.
- Ensure that the virtual machine is provisioned with 1 NIC card only.
- Proceed to deploy the virtual machine with the steps normally followed to deploy an AMI / Azure VM.
Step 3. Accept the End User License Agreement and Verify Configuration
- Go to https://<ip address> to access the web interface.
- Read through the End User License Agreement. Scroll down to the end of the agreement.
- Enter the required information: Name, email address, and company (if applicable). Click Accept. You are redirected to the Login page.
Virtual Machine Deployment for Private Clouds
- Log into the Barracuda WAF Control Center Vx web interface with username admin and the password, which is either:
- The numeric part of the serial number if your Vx preboot version is 4.6.1 or higher. To find the preboot version, check the name of downloaded Vx image (zip file), which is something like BarracudaEmailSecurityGateway-p2-vm4.6.1-fw8.1.0.003-20200113-esx-vbox.zip. The text between "vm" and "-fw" in the file name is the preboot version. In this example, it is 4.6.1. The serial number of your Vx is in your invoice and in your VM setup email.
- The word "admin" if your Vx preboot version is below 4.6.1. For help finding the serial number of your virtual appliance, see Serial Number for Hardware and Virtual Appliances.
- Go to the BASIC > IP Configuration page and configure the following:
- Configure TCP/IP configuration.
- Verify that the primary and secondary DNS servers are correct in the DNS Configuration section.
- Enter Default Hostname and Default Domain (for example, <yourcompanydomain.com>) in the Domain Configuration. The Hostname will be used in reporting and the Default Domain is the domain for the system.
Virtual Machine Deployment for Amazon Web Services or Microsoft Azure
Open the browser and enter the elastic IP address with port 8000 for HTTP. No port is required for HTTPS. For example:
For HTTP: http://<Public DNS>:8000 (Unsecured)
For HTTPS: https://<Public DNS> (Secured)- After the boot process is complete, the Licensing page displays with the following options:
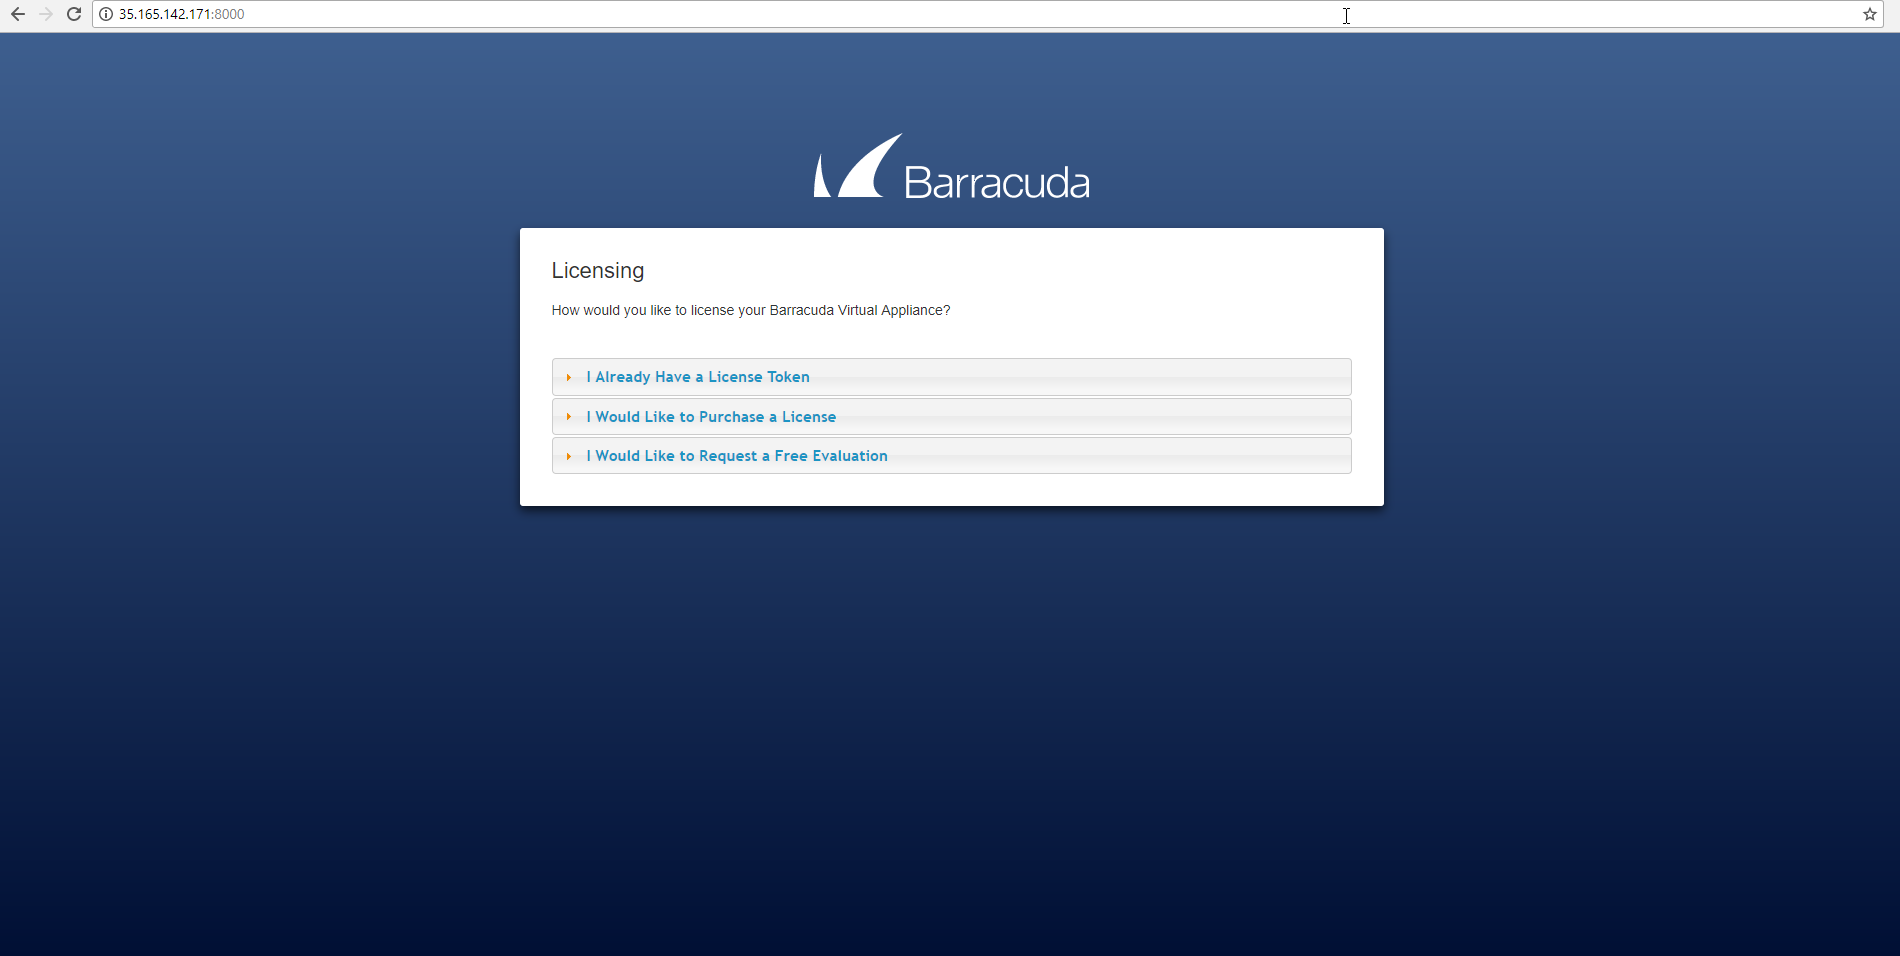
- I Already Have a License Token – Use this option to provision your Barracuda WAF Control Center with the license token you have already obtained from Barracuda Networks. Enter your Barracuda Networks Token and Default Domain to complete licensing, and then click Provision. The Barracuda WAF Control Center connects to the Barracuda Update Server to get the required information based on your license, and then reboots automatically. Allow a few minutes for the reboot process. After the instance is provisioned, you are redirected to the login page.
- I Would Like to Purchase a License – Use this option to purchase the license token for the Barracuda WAF Control Center. Provide the required information in the form, accept the terms and conditions, and click Purchase. The Barracuda WAF Control Center connects to the Barracuda Update Server to get the required information based on your license, and then reboots automatically. Allow a few minutes for the reboot process. After the instance is provisioned, you are redirected to the login page.
- I Would Like to Request a Free Evaluation – Use this option to get a 30-day free evaluation of the Barracuda WAF Control Center. Provide the required information in the form, accept the terms and conditions, and click Evaluate. The Barracuda WAF Control Center connects to the Barracuda Update Server to get the required information based on your license, and then reboots automatically. Allow a few minutes for the reboot process. After the instance is provisioned, you are redirected to the login page.
To log into the virtual machine:
For AWS deployments, the Username is admin and the Password is the EC2 Instance ID.
For Microsoft Azure deployments, the Username is admin and the Password is the string entered during the initial configuration.
Step 4. Update the Firmware
Click on the ADVANCED > Firmware Update page. If there is a new Latest General Release available, perform the following steps to update the system firmware:
- Click on the Download Now button located next to the firmware version that you wish to install. To view download progress, click on the Refresh button. When the download is complete, the Refresh button will be replaced by an Apply Now button.
- Click on the Apply Now button to install the firmware. This will take a few minutes to complete.
- After the firmware has been applied, the Barracuda WAF Control Center Vx will automatically reboot, displaying the login page when the system has come back up.
- Log back into the web interface again and read the Release Notes to learn about enhancements and new features. It is also good practice to verify settings you may have already entered because new features may have been included with the firmware update.
Step 5. Verify Configuration and Change the Password
- Log into the Barracuda WAF Control Center web interface as the administrator:
- Username: admin
- Password: Instance ID of your Barracuda WAF Control Center in Amazon Web Services.
- Username: admin
- Go to the BASIC > Administration page and enter your old password, new password, and re-enter the new password. Click Save Password.
Step 6. Creating the Barracuda WAF Control Center Account Admin
The Barracuda WAF Control Center Account Admin creates user accounts and associates the Barracuda Web Application Firewall instances to the corresponding accounts. Refer the link: Accounts and Roles for more details on accounts and roles.
To create the Barracuda WAF Control Center Account Admin, first log into the web interface using the Barracuda WAF Control Center Administrator Account (admin/aws-instance-id), and the complete the listed steps:
- Go to the BASIC > Account Management page, and in the Account Creation section, enter the Account Name, Administrator Email Address, and select the Preferred Time Zone for the new account.
- Click Create Account. The account displays in the Account View table at the top of the page.
- A confirmation email containing the login credentials is sent to the administrator email address entered in Step 1 above. Use these credentials to log into the web interface to create users and assign permissions, connect devices, and view device status.