

To use the REST API, each call must be authenticated. For Control Center-managed firewalls, create a dedicated CC admin user and administrative role to allow REST API access. In the administrative role, you can differentiate between the internal and external interface and even grant write permissions to the REST API. Some actions, such as VPN access, may require additional permissions.
Step 1. Create a Custom Administrative Role
- Go to CONFIGURATION > Configuration Tree > Multi-Range > Global Settings > Administrative Roles.
- Click Lock.
- In the Roles section, click + to create a new role.
Enter a number for the role in the Name field and click OK. The Roles configuration window opens.
- Enter a Role Name.
- (Optional) Enter a Description.
Scroll down to add the REST API access rights to the administrative role:
In the REST API section, select the Access to REST API check box.
Click Set/Edit to configure detailed permissions.
Configure the access rights:
Write Access – Provides write access on the selected interface.
Click OK.
- Click OK.
- Click Send Changes and Activate.
Step 2. Create an Admin Account
- Click the ADMINS tab.
- Click + New Admin on the top right of the window, or right-click the list, and select Create New Admin. The Create new CC Admin window opens.
- For local authentication, configure username and password:
- Login – Enter the username for the REST API CC admin.
- Full Name – Enter the full name.
- Authentication Level – Select Password.
- Click the cogwheel icon next to the Password field, define a password for the administrative user, and click OK. For more information on authentication options, see How to Configure Administrative Profiles.
- Configure additional Settings:
- Assigned Range – This option in combination with linked ranges controls which entries an administrator can see in CONFIGURATION > State Info > Sessions..., in the window Configuration Sessions.
- Login Event – Chose between the following options of possible associated events. For more information on events, see Events.
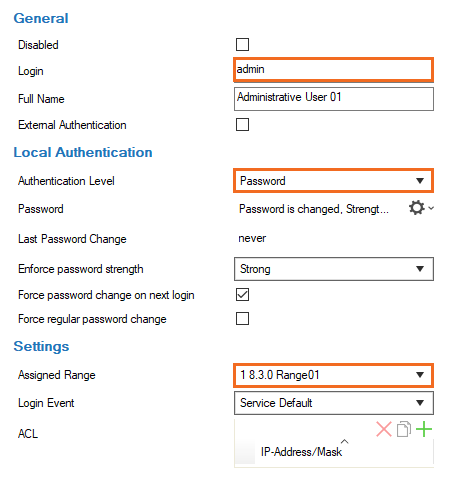
- ACL – Click + to configure access restriction for the admin to certain IP addresses or networks.
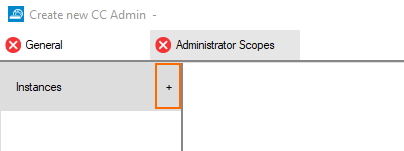
Step 3. Add a New Instance to Configure the Administrative Scope and Rights
After creating the account, one or more specific scope(s) must be defined that will be associated with the administrator. For more information on administrative roles, see How to Configure Administrative Roles.
- In the window, click the Administrator Scopes tab.
- Click + next to Instances. A new instance of the category Global is displayed.
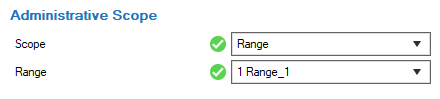
- Configure the Administrative Scope. The options Global, Range, and Cluster signify that the configured administrative rights apply to every node in CONFIGURATION > Configuration Tree at or below the node Global, Range, or Cluster that must be selected at configuration.
The options Global Linked and Range Linked associate the configured administrative rights with any individually selected node (in the Links list) at or below a configured Global Linked or Range Linked node (in the Range list). Click + to add selected nodes to the Links list.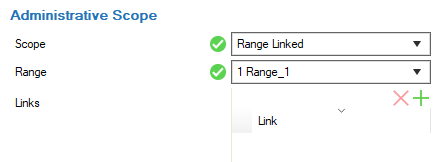
- Configure Administrative Rights:
- Configuration Level – Administrative rights are filed individually on a per-administrator basis. When an administrator's configuration level is lower than or equal to the configured number, the administrator is granted access according to their filed administrative rights. A configuration level of 2 or lower means write access, 99 or lower means read access. Usually, the write level is lower than the read level. For more information on the configuration level, see Control Center Admins.
- Assign Roles – Click + and add the role created in Step 1.
- Shell Level – Select No.
- Click OK to save the data.
The CC admin user you just created can now access the REST API interface for the ranges and clusters assigned to the user.