

An excellent way to identify the OID for an SNMP endpoint that you want to configure a custom monitor for is by walking an SNMP. Additionally, some SNMP-enabled devices may not respond to specific Object Identifiers (OIDs) defined in their manufacturer’s Management Information Base (MIB), or may be throwing errors when trying to iterate over an extended OID. In cases like these, it is valuable to be able to browse through the available SNMP information on the device outside of Barracuda RMM.
In most cases, the free iReasoning MIB browser version will work in performing and SNMP walk, however it does not support SNMP v3.
To begin, it can help to understand how SNMP OIDs work, and what walking them actually entails.
SNMP OIDs are a Tree structure, where the root is represented by the initial period (.) and branches are indexed by numbers. Below is a very simple example of an OID tree.
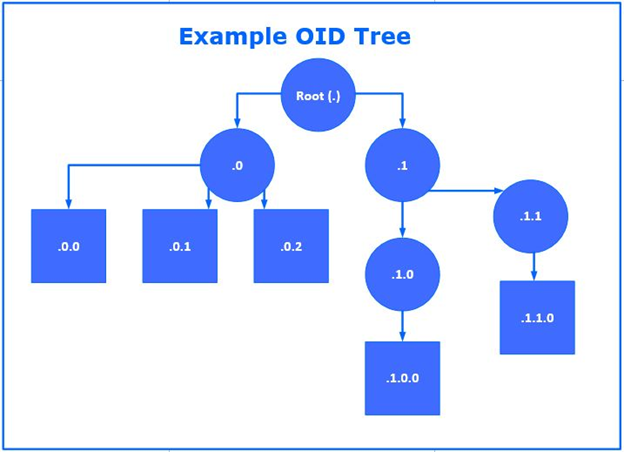
A walk is a means to go through a tree to discover all available branches and leaves (further explained here) In the example OID, an in-order-walk (like what iReasoning does) would go through from left to right, top to bottom, like this:
., .0, .0.0, .0.1, .0.2, .1, .1.0, .1.0.0, .1.1, .1.1.0
Which gives all the elements in ascending order by value.
This means that an SNMP walk through a device that’s throwing SNMP errors on a particular OID will be able to pull all the information for all OIDs on that device up to the one which is failing, which can give an idea of what might be wrong with it.
Performing an SMP Walk using iReasoning
To perform an SNMP walk using the iReasoning MIB browser (freely available here) follow the steps below:
- Enter the IP address of the device you want to walk.
If it’s using SNMP v2 or v3, or uses a community string other than “public”, click Advanced and enter in the correct credentials or community string. - Select Walk from the Operations drop down.
- Click GO.
The OID will typically get picked up by iReasoning automatically. Otherwise you can manually enter the Enterprise-specific OID specified by the device’s manufacturer.
iReasoning will then perform an in-order walk through the OID tree and output a table showing the Name/OID, the Value, the Type, and the IP:Port
The Name/OID is either the (mostly) human-readable name for the OID or its plain OID number.
The Value shows the value that would be picked up by Barracuda RMM for that OID.
The Type identifies the type of data – this is important if you’re configuring a custom SNMP monitor.
IP:Port is important if you’ve been walking or querying multiple devices with iReasoning since it will identify which device the data came from.
Performing an SNMP Walk for SNMP v3
To perform an SNMP walk for SNMP v3 you can use the SNMP Walk at the command line.
Below are some examples of how to use the SNMP Walk:
SNMP Using v1/v2 community strings
- Target IP: 10.75.1.8
- Community string: public
- OID's: .1.3.6.1.2.1.1.1 to .1.3.6.1.2.1.1.7
SnmpWalk.exe -r:10.66.1.8 -c:public -os:.1.3.6.1.2.1.1.1 -op:.1.3.6.1.2.1.1.7 -q
SNMP Using v3
- Target IP: 10.66.19.51
- Username: snmpv3user
- Authentication Model: MD5
- Password: AbGJozJh5*
- OID's: .1.3.6.1.2.1.1.1 to .1.3.6.1.2.1.1.7
SnmpWalk.exe -r:10.66.1.5 -v:3 -sn:snmpv3user -ap:MD5 -aw:AbGJozJh5* -os:.1.3.6.1.2.1.1.1 -op:.1.3.6.1.2.1.1.7 -q
SNMP Using v3 with Privacy
- Target IP: 10.66.1.5
- Username: snmpv3user
- Authentication Model: MD5
- Password: AbGJozJh5*
- Privacy Proto: DES
- Privacy PW: AbGJozJh5*
- OID's: .1.3.6.1.2.1.1.1 to .1.3.6.1.2.1.1.7
SnmpWalk.exe -r:10.66.1.5 -v:3 -sn:snmpv3user -ap:MD5 -aw:AbGJozJh5* -pp:DES -pw:AbGJozJh5* -os:.1.3.6.1.2.1.1.1 -op:.1.3.6.1.2.1.1.7 -q