

The Barracuda SecureEdge hardware appliances ship with a Quick Start Guide. Follow this guide to connect your appliance.
Step 1. (Optional) Install the SecureEdge Appliance in a Rack
Some appliances are desktop sized; the larger models can be mounted in standard-sized racks.
For more information, see Rack Installation for Barracuda Appliances.
Step 2. Connect the Appliance to the Network
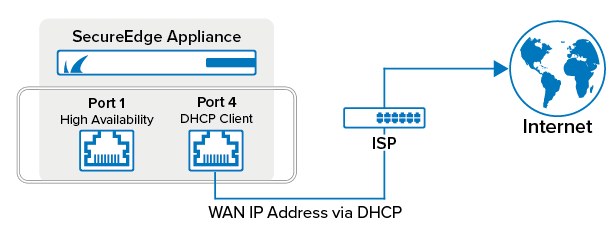
The DHCP WAN port for the appliance differs depending on the model. Connect the WAN port to the Internet using DHCP. Default for DHCP connections is port 4, except model T93 Revision A where DHCP is located on port 2.
If you are using High Availability, connect port 1 of the appliance with port 1 of the other appliance of the high availability cluster.
Step 3. Connecting Power
Follow the instructions in the Quick Start Guide to connect your Barracuda SecureEdge appliance to a power source. Then, complete the instructions in the Quick Start Guide.
Further Information
- For more information on getting started with Barracuda SecureEdge, see Getting Started.
- For more information on the configuration of your site appliance, see How to Create a T/VT Site Configuration in Barracuda SecureEdge.
- For more information on the available hardware models, see Hardware Models.