

For details on how to create DNS policies, see How to Configure DNS Filtering and Policies. See also Best Practices for DNS Filtering Deployment.
Before you configure policies, consider the following:
- Whether you want to allow most content and only block some categories of domains (which Barracuda Networks recommends), or if you prefer to block most content and only allow certain categories. You can always create allow or block exceptions for specific domains.
You can simulate groups by segregating users by different external IP addresses. This provides the option to apply different policies to different groups. For example, the Students group could be assigned a High security policy while the Faculty group could have a Low security policy.
Begin creating a policy as follows:
- Go to the DNS Filtering page.
- Follow steps 1 and 2 of the instructions under Configure a New Filtering Policy For a Network.
- In step 3, for Category Policy, begin by creating a baseline policy and then add exception policies as needed. The first step can be creating EITHER:
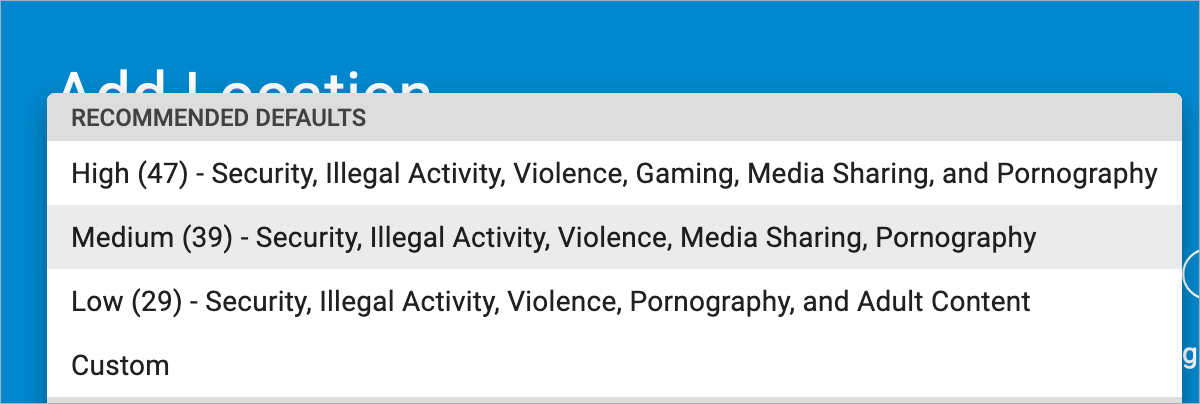
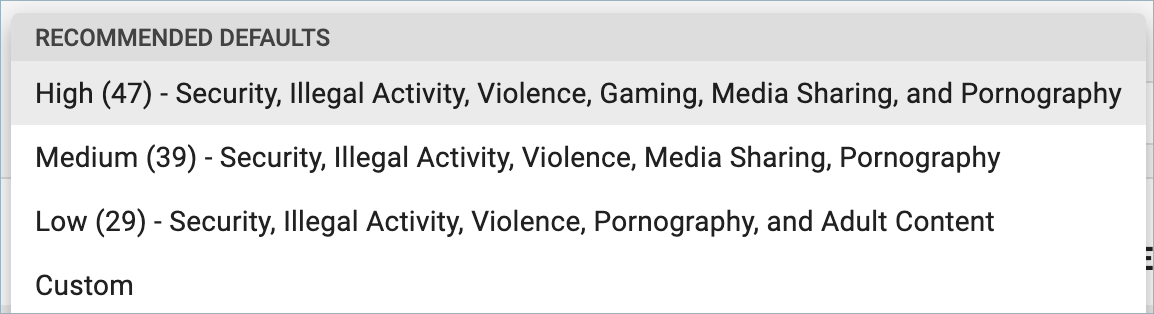
- A baseline Allow policy: Barracuda Networks recommends starting with a baseline Allow policy using a pre-configured filtering level of Medium. This is the default policy. Any category that is checked will be blocked. Next, scroll through the list of categories and check any additional that you want to block. You can then override this policy using exceptions for specific domains you want to block or allow as demonstrated in the examples below.
– OR – - A baseline Block policy: (not recommended) Select a pre-configured filtering level of Medium, also checking categories you want to block in general. You can then override this policy using exceptions for specific domains you want to allow.
- A baseline Allow policy: Barracuda Networks recommends starting with a baseline Allow policy using a pre-configured filtering level of Medium. This is the default policy. Any category that is checked will be blocked. Next, scroll through the list of categories and check any additional that you want to block. You can then override this policy using exceptions for specific domains you want to block or allow as demonstrated in the examples below.
Barracuda Networks recommends testing your initial selection of block/allow policies using various domains that you know you want blocked, and/or that you know your organization needs to access, and then make updates to your policies as needed.
For large policies where you want to block multiple domains, it is best to block by categories, not just domains.
Exceptions to Policy
If you want to block or allow a few specific domains, use Exceptions as illustrated in the examples below. You can create exceptions to policy when you use ADD LOCATION or you can edit or add exceptions by clicking Exceptions in the Exception Policy column of the table on the DNS Filtering page.
Example 1: Create an overall Medium level allow policy with exceptions.
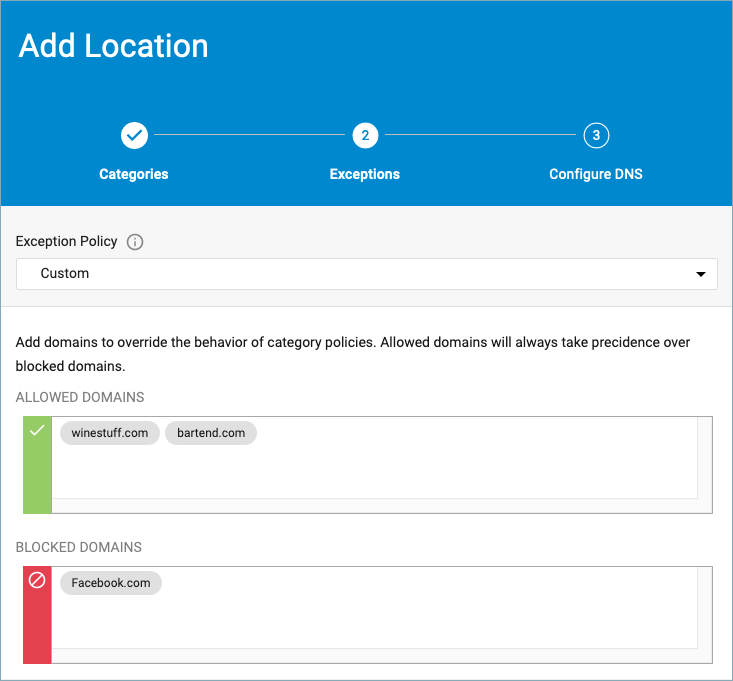
Barracuda Networks recommends starting with the Medium category policy, which allows most categories, but blocks supercategories such as Illegal, Adult Material, Adult Recreation Or Illegal, some Security categories, and few others. In this example, a company sells products that include alcohol and drinking materials. Since the Medium policy blocks the Drinking and Alcoholic Products categories, the company may want to make some exceptions to allow certain domains for business use. The company also wants to block Facebook, which is allowed by the Medium policy.
- Go to the DNS Filtering page.
- Follow steps 1 and 2 of the instructions under Configure a New Filtering Policy For a Network.
- For step 3, select the Medium Category Policy.
- Now you can do either of the following:
- Allow the categories: Scroll down and uncheck the Alcoholic Products and Drinking categories so sites categorized as such are not blocked. – OR –
- Allow specific domains: Click NEXT in the Add Location window and select Custom in the Exception Policy drop-down as shown below. In the Allowed Domains text box just below that, enter each specific domain you want to exempt from the policy. For specifics on format for entering domains or subdomains, see How to Create Exception Policies for DNS Filtering.
- Block the Facebook domain : In the Blocked Domains text box, enter Facebook.com.
- Allow the categories: Scroll down and uncheck the Alcoholic Products and Drinking categories so sites categorized as such are not blocked. – OR –
- Click NEXT and continue configuring DNS.
Example 2: Create an overall High level block policy with exceptions.
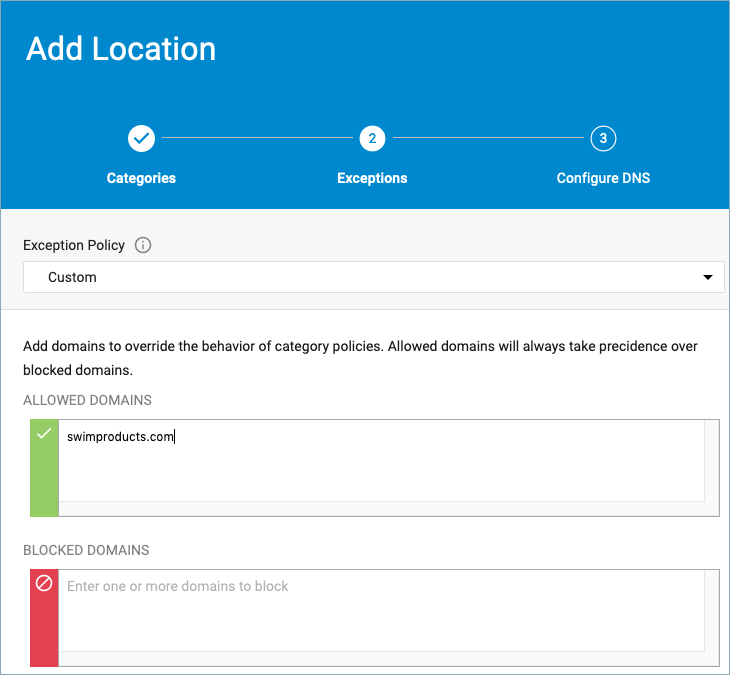
Say you want a very strict web filtering policy for best security, so you choose the High Category Policy option, which blocks a lot of categories, including Swimsuits and Lingerie. However, your company sells swim workout gear and you want your employees to be able to browse competitive product sites. Since the High policy blocks the category Swimsuits and Lingerie, you would add exceptions for specific product-related domains, or allow that category.
- Go to the DNS Filtering page.
- Follow steps 1 and 2 of the instructions under Configure a New Filtering Policy For a Network.
- For step 3, select the High Category Policy.
- Now you can do either of the following:
- Scroll down and uncheck the Swimsuits and Lingerie category so sites categorized as such are not blocked. – OR –
- Click NEXT in the Add Location window and select Custom in the Exception Policy drop-down as shown below. In the Allowed Domains text box just below that, enter each specific domain you want to exempt from the policy. For specifics on format for entering domains or subdomains, see How to Create Exception Policies for DNS Filtering.
Click NEXT and continue configuring DNS.