

VMware QuickSpin allow you to back up VMware virtual machines frequently as well as restore in a matter of minutes.
VMware QuickSpin cannot back up to the cloud. if you need an off-site copy of the virtual machines you need a VMware Standard backup set in addition to a VMware QuickSpin set.
Best practices are to put QuickSpin backups on a different host than the one housing the virtual machines being backed up, but it is not a requirement for them to work. You should be able to run a VMware QuickSpin backup from any machine that can access and authenticate with the ESX/EXi host or vCenter machine managing the virtual machines you want to back up.
During the Backup
If the virtual machines' host is not already recognized, you need to add the IP address of the ESX/ESXi host or vCenter machine managing the virtual machines.
If the Backup Agent needs credentials to authenticate with the server you added, it prompts you for them. After the host/vCenter has been added, a list of virtual machines available to be backed up are displayed
For a virtual machine to be eligible for backups, it must meet the following requirements:
- The UUID attribute must be enabled for the virtual machine you intend to back up.
- The virtual machine must use only SCSI disks.
- The virtual machine must not use dynamic disks.
For clarification, dynamic disks are excluded from being present at the guest operating system level; if you open Disk Management from within the guest OS and there are dynamic volumes present, they are not backed up.
Destination Host
The VMware QuickSpin backup replicates the source VM data to a standby VM on another host. You must select the Destination Host and the Datastore that host the recovery VMs. It is optional to designate a resource pool and VM folder; however, you must select None on the Recovery VM Destination page if you do not want these options.
When the backup runs, the recovery VM is updated so the backup/standby VM is always up to date as of the latest backup. Whatever has changed between the last backup and the current backup is then stored in the local storage that you selected.
A VM cannot be part of more than one VMware Standard backup set or more than one QuickSpin backup at a time. However, a VM can be part of a VMware Standard and a VMware QuickSpin backup set simultaneously.
VMware QuickSpin Licensing
A monthly license fee is charged on a per ESXi host basis when 1 or more VMs are backed up from that ESXi host. The license fee is the same whether you back up 1 VM or many VMs on that ESXi host. This license fee is incurred for each ESXi host in your inventory that has one or more VMs being backed up.
Backup Up
To create a VMware QuickSpin backup, perform the following steps.
- Navigate to the Computer page. See Navigating to the Computer Page for instructions.
The Computer page is displayed.
Click the Backup tab.
The Backup Selections page is displayed.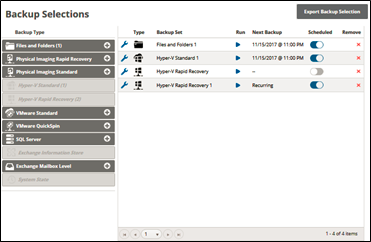
In the Backup Type pane, click VMware QuickSpin.
The Select page is displayed.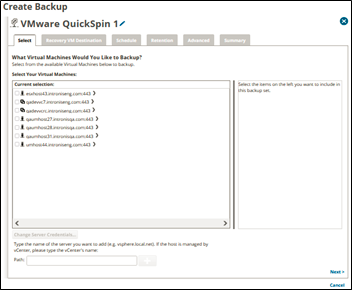
Click the Backup Name to provide a new name for the backup set or accept the default. See Changing Backup Set Names.
If the following error message is displayed, you must provide a valid certificate, otherwise your system security is at risk.
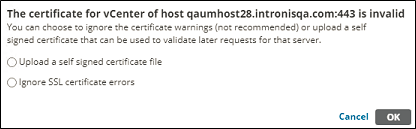
To upload a self-signed certificate, click the Upload a self-signed certificate file and then click OK.
See Self-signed Certificates.
The Open dialog is displayed where you can select the certificate.Select the VMs to be backed up.
Note: Any VMs that already are included in other backup sets are grayed out.
Clicking the arrow at the right of the VM displays more revisions of the VM.
Your selections are displayed in the far-right pane.Click the remove icon
 to remove any selections or clear the item check box.
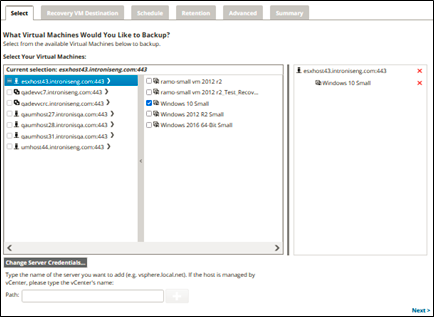
Click Next.
The Recovery VM Destination page is displayed.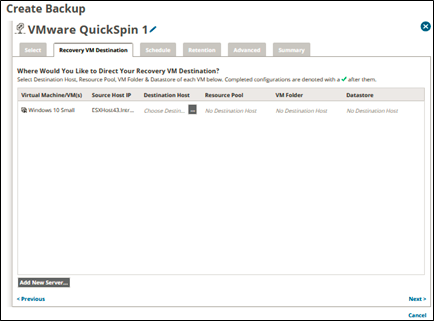
Requirements: You must select the Destination Host and the Datastore that is hosting the recovery VMs. It is optional to designate a Resource Pool and VM Folder; however, you must select None if you do not want these options.
- To add a new ESXi or vCenter server, see Adding a New ESXi or vCenter Server.
Select the ellipsis
 in the Destination Host column.
The Destination Host pop up is displayed.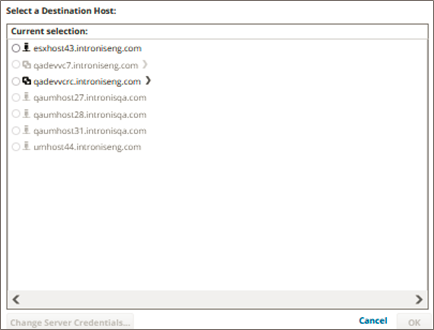
Click the Destination Host.
The Change Server Credentials option is activated.
To change server credentials, see Changing Server Credentials.
Select the Destination Host radio button, and then click OK.
Select the VM Folder radio button or the None radio button, if you do not want a VM Folder, and then click OK.
The ellipses are displayed for the other options.
Select the ellipsis
 in the Resource Pool column.
The Resource Pool pop up is displayed.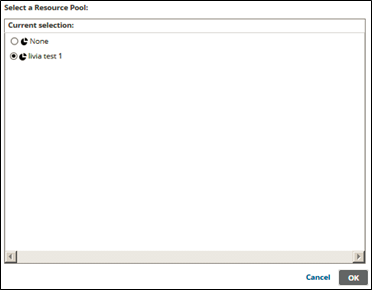
Select the Resource Pool radio button or the None radio button, if you do not want a Resource Pool, and then click OK.
Select the ellipsis
 in the VM Folder column, if required.
The VM Folder pop up is displayed.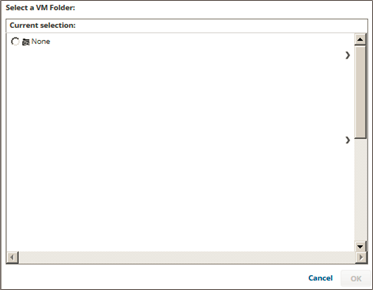
Select the VM Folder radio button or the None radio button, if you do not want a VM Folder, and then click OK.
Select the ellipsis
 in the Datastore column, if required.
The Datastore pop up is displayed.
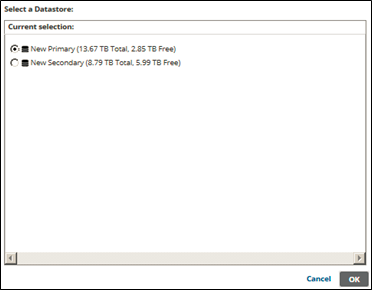
Select a Datastore radio button, and then click OK.
After making your selections, the completed configuration is denoted with a green check mark as shown below.

Click Next.
The Schedule page is displayed.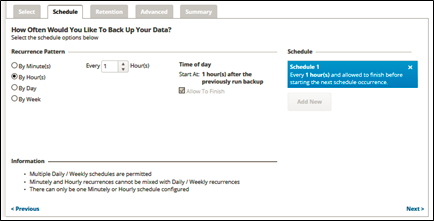
Accept or edit the default schedule. See Adding a New Daily or Weekly Schedule for more information.
After setting the schedule, click Next.
The Retention page is displayed.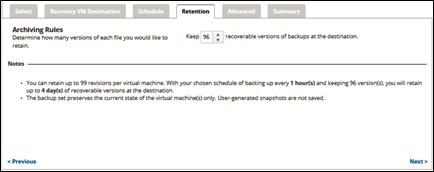
Optionally, select how many versions of each file you would like to keep, and then click Next.
Note: The number of revisions can be set to any number between 1 and 99.
The Advanced page is displayed.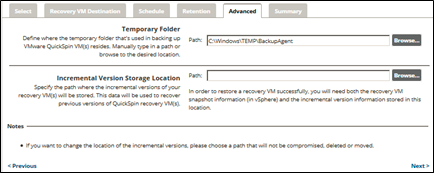
Requirement: You must specify a temporary folder located on a disk with enough space.
At the Temporary Folder field, accept the default, type a new path, or click the Browse button to locate the temporary folder that is used in backing up. See Browsing to a Folder.
Requirement: You must specify a location for the local storage of the incremental backups.Type the path or browse to where the incremental versions of your recovery VMs are to be stored, and then click Next. See Browsing to a Folder.The Summary page is displayed.
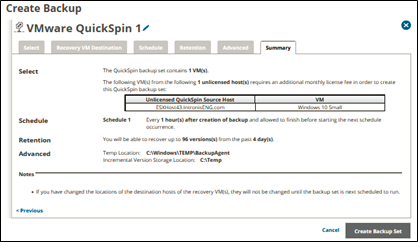
Licensing Note: If you added an unlicensed host and added a VM to back up, the following message is displayed on the Summary page indicating a licensing fee charge. See VMwareQuickSpinLicensingVMwareQuickSpinLicensingVMware QuickSpin LicensingVMwareQuickSpinLicensingVMwareQuickSpinLicensingfor more information.After reviewing your selections, click the Create Backup Set button.
If you did not change the default backup set name, a confirmation pop-up is displayed, as shown in the example below.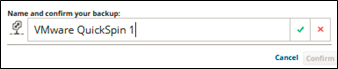
This feature allows you to create a unique name for the backup set. If you already changed the default backup set name, the pop-up is not displayed. See Changing Backup Set Names
Optionally, change the backup set name, press Enter, and then click Confirm.
The scheduled backup is displayed on the Backup Selections page.