Tufin SecureTrack is a firewall management solution that enables security, compliance, and connectivity visualization of enterprise IT across multi-vendor firewall environments and cloud platforms. SecureTrack provides insights into network connectivity and security policy changes, and can also alert for potential new security risks.
As of firmware release 8.2, the CloudGen Firewall supports integration with Tufin SecureTrack.
How the CloudGen Firewall Integrates with Tufin
SecureTrack provides multiple dashboards for displaying a range of network connectivity data for a variety of firewalls. Because SecureTrack supports multi-vendor firewall environments, both CloudGen Firewalls and Control Centers are covered.
To connect to SecureTrack, Tufin provides a software package that must be installed on the CloudGen Firewall and/or Control Center before these appliances can transmit data. The service for Tufin integration must then be enabled on the CGF/CC and all relevant parameters must be set.
Based on the settings, network connectivity data can then be synchronized to SecureTrack.
Before You Begin
- Ensure that you have licensed your Tufin SecureTrack. Once you have done so, Tufin will provide access for downloading the required installation package for the CloudGen Firewall.
- Ensure that you are familiar with all relevant aspects of running your Tufin product. For more information, see www.tufin.com.
- Ensure you have downloaded the most recent API installation package for your firewall from Tufin.
Setup and Configuration of Tufin Integration
Step 1. Get All Relevant Certificates from Tufin
- In your web browser, go to https://portal.tufin.com/aspx/TechnicalDocument .
- Locate and follow the instructions for obtaining all relevant certificates.
Step 2. Configure the TUFIN Integration Service API
- Log into the firewall / Control Center on box level.
- Go to CONFIGURATION > Configuration Tree > Box and expand the node Infrastructure Service.
- Double-click TUFIN Integration API Service.
- Click Lock.
- In the display area Tufin Integration, configure the following parameters:
- Enable Tufin Integration – Select the check box.
- Tufin System Host – Enter the IP address of the SecureTrack Tufin host.
- Tufin System Port – Enter
9099for the port number. - Tufin Client Certificate – Select explicit from the list.
- Tufin Client Private Key – Import the client private key provided by Tufin.
- Explicit Tufin Client Certificate – Import the client certificate provided by Tufin.
- Tufin Server Certificate – Import the server certificate provided by Tufin.
- Click Send Changes / Activate.

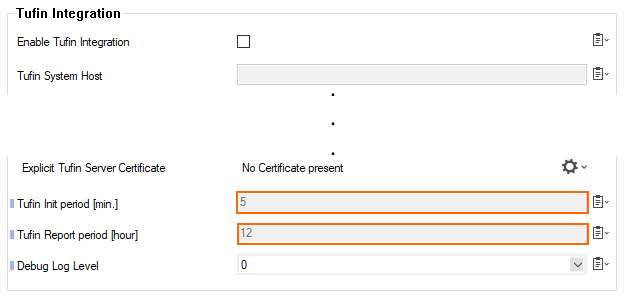
According to the default settings, the CloudGen Firewall / Control Center will now send a report every 12 hours to the Tufin server.
Step 3. (optional) Modify the Reporting Period
- Log into the firewall / Control Center on box level.
- Go to CONFIGURATION > Configuration Tree > Box and expand the node Infrastructure Service.
- Double-click TUFIN Integration API Service.
- In the left menu area, click Switch to Advanced.
- The Tufin Integration section now displays edit fields associated with the advanced configuration mode.
- The reporting period is set to 12 hours by default.
- Click Lock.
- For
Tufin Report period [hour], enter the new period for sending reports to Tufin. - Optional: If you want to change the period when to start with reporting after registration, enter the required value for
Tufin Init period [min.]. - Click Send Changes / Activate.