

This guide describes how you can use the Barracuda Email Security Gateway web interface to:
- Check your quarantined messages
- Classify messages as Spam and Not Spam
- Manage Allow List and Block List for email addresses
- Modify your User Preferences
The guide also covers use of the Barracuda Microsoft Outlook Add-in for classifying messages as spam or not spam and encrypting outbound messages. The Add-in might be installed in your Microsoft Outlook mail client by your administrator or by you, depending on how the system is configured.
Some features covered in this guide may not appear on your system, depending on your level of permissions as set by your administrator.
Managing Your Quarantine Inbox
Receiving Messages from the Barracuda Email Security Gateway
The Barracuda Email Security Gateway sends you the following two types of messages:
- Greeting Message
- Spam Quarantine Summary Report
Greeting Message
The first time the Barracuda Email Security Gateway quarantines an email intended for you, the system sends you a greeting message with a subject line of User Quarantine Account Information. The greeting message contains the following information:
Welcome to the Barracuda Email Security Gateway. This message contains the information you will need to access your Spam Quarantine and Preferences.
Your account has been set to the following username and password:
Username: <your email address>
Password: <your default password>
Access your Spam Quarantine directly using the following link:
http://<barracuda system address or name>:8000
The Barracuda Email Security Gateway automatically provides your login information (username and password) and the link to access the quarantine interface. You should save this email because future messages from the system do not contain your login information.
Quarantine Summary Report
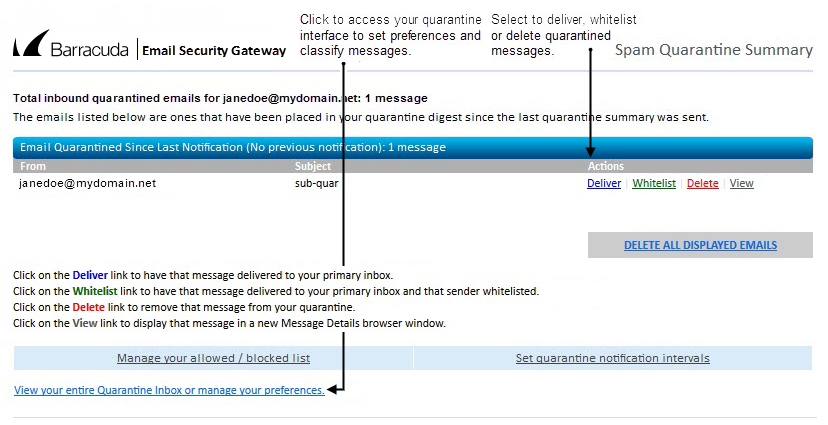
The Barracuda Email Security Gateway sends you a daily quarantine summary report so you can view the quarantined messages you did not receive. From the quarantine summary report you can also add messages to your Allow List, delete messages, and have messages delivered to your inbox.
The following shows an example of a quarantine summary report:
Figure 1: Example quarantine summary report ('digest').
Using the Quarantine Interface
At the end of every quarantine summary report is a link to the quarantine interface where you can set additional preferences and classify messages as spam and not spam.
Logging into the Quarantine Interface
If your administrator has configured automatic log-in for your quarantine inbox, you will see a link in your quarantine notification email message. You can click on that link and automatically log into the Barracuda Email Security Gateway to view your quarantine inbox and manage your settings. If this feature has NOT been enabled by your adminitrator, do the following to log in:
- Enter http://<barracuda system address or name>:8000 in your web browser to access the Barracuda Email Security Gateway web interface.
- Enter your username and password, and click Login. Your login information was included in the greeting message sent to you from the Barracuda Email Security Gateway.
Using your Quarantine Inbox
After logging into the quarantine interface, select the QUARANTINE INBOX tab to view a list of your quarantined messages. When you first start using the quarantine interface, you should view this list on a daily basis and classify as many messages as you can. Clicking on an email displays the message.
The Barracuda Email Security Gateway has a Bayesian learning engine which, if enabled by your administrator, learns how to deal with future messages based on the ones you classify as spam and not spam. The learning engine becomes more effective over time as you teach the system how to classify messages and as you set up rules based on your Allow List and Block List.
The following table describes the actions you can perform from this page.
| Action | Description |
|---|---|
| Deliver | Delivers the selected message to your standard inbox. Note: If you want to classify a message or add it to your Allow List, make sure to do so before delivering the message to your inbox. Once the Barracuda Email Security Gateway delivers a message, it is removed from your quarantine list. |
| Allow List | Allow List adds the selected message to your Allow List so all future emails from this sender are not quarantined unless the message contains a virus or banned attachment type. The Barracuda Email Security Gateway adds the sending email address exactly as it appears in the message to your personal Allow List. Note that some commercial mailings may come from one of several servers such as mail3.abcbank.com, and a subsequent message may come from mail2.abcbank.com. See the section on managing your Allow Lists and Block Lists for tips on specifying Allow List entries with greater effectiveness. |
| Delete | Deletes the selected message from your quarantine list. The main reason to delete messages is to help you keep track of which quarantine messages you have reviewed. You cannot recover messages you have deleted. |
| Classify as Not Spam | Classifies the selected message as not spam. Note: Some bulk commercial email may be considered useful by some users and spam by others. For this reason, classifying such messages may not be very effective because users may counteract each others’ classification. Instead of classifying bulk commercial email, it may be more effective to add it to your Allow List (if you wish to receive such messages) or Block List (if you prefer not to receive them). |
| Classify as Spam | Classifies the selected message as spam. |
Changing Your User Preferences
After logging into your quarantine interface, depending on your account permissions, you can use the PREFERENCES tab to change your account password, modify your quarantine and spam settings, and manage your Allow List and Block List.
Changing Your Account Password
To change your account password, do one of the following:
- On the quarantine interface login page, click Create New Password, or
- After logging into your quarantine interface, go to PREFERENCES > Password. This option is not available if single sign-on has been enabled via LDAP or Radius.
In the provided fields, enter your existing password and enter your new password twice. Click Save Changes when finished.
Changing Your Quarantine Settings
The following table describes the quarantine settings you can change from the PREFERENCES > Quarantine Settings page, depending on how the administrator has configured your account:
| Quarantine Setting | Description |
|---|---|
| Enable Quarantine | Whether the Barracuda Email Security Gateway quarantines your messages. If you select Yes, the Barracuda Email Security Gateway does not deliver quarantined messages to your general email inbox, but you can view these messages from the quarantine interface and quarantine summary reports. If you select No, all messages that would have been quarantined for you are delivered to your general email inbox with the subject line prefixed with [QUAR]:. The Barracuda Email Security Gateway administrator can modify this prefix. |
| Notification Interval | The frequency the Barracuda Email Security Gateway sends you quarantine summary reports. The default is daily. The Barracuda Email Security Gateway only sends quarantine summary reports when one or more of your emails have been quarantined. If you select Never, you can still view your quarantined messages from the quarantine interface, but you will not receive quarantine summary reports. |
| Notification Address | The email address the Barracuda Email Security Gateway should use to deliver your quarantine summary report. Leave this field blank to use the email address associated with your user account. |
| Default Language | The language in which you want to receive your quarantine notifications. This setting also sets the default encoding for handling unknown character sets during filtering. All email notifications from the Barracuda Email Security Gateway are in UTF8 encoding. |
Enabling and Disabling Spam Scanning of your Email
If you do not want the Barracuda Email Security Gateway scanning your emails for spam content, you can disable spam filtering from the PREFERENCES > Spam Settings page. From this page you can also change the default spam scoring levels that determine when your emails are tagged, quarantined or blocked.
When the Barracuda Email Security Gateway receives an email for you, it scores the message for its spam probability. This score ranges from 0 (definitely not spam) to 10 or higher (definitely spam). Based on this score, the Barracuda Email Security Gateway either allows, quarantines, or blocks the message.
A setting of 10 for any setting disables that option. The following table describes the fields on the PREFERENCES > Spam Settings page.
Adding Email Addresses and Domains to Your Allow LIst and Block List
The PREFERENCES > Allow List/Block List page lets you specify email addresses and domains from which you do or do not want to receive emails.
| List Type | Description |
|---|---|
| Allow List | The list of email addresses or domains from which you always wish to receive messages. The only time the Barracuda Email Security Gateway blocks a message from someone on your Allow List is when the message contains a virus or a disallowed attachment file extension. |
| Block List | The list of senders from whom you never want to receive messages. The Barracuda Email Security Gateway immediately discards messages from senders on your Block List. These messages are not tagged or quarantined and cannot be recovered. The sender does not receive a notice that the message was deleted, and neither do you. The only time a Block Listed email address is delivered is if the same email address also appears in your Allow List. |
To add senders to your Allow List or Block List, follow these steps:
- Go to the PREFERENCES > Allow List/Block List page.
- A list of the email addresses on your Allow List and Block List appears on this page.
- To delete an Allow List or Block List entry, click the trash can icon next to the address.
- To add an entry, type an email address into the appropriate field and click the Add button.
Tips on specifying addresses
When adding addresses to your Allow List and Block List, note the following tips:
- If you enter a full email address, such as johndoe@yahoo.com, just that user is specified. If you enter just a domain, such as yahoo.com, all users in that domain are specified.
- If you enter a domain such as barracudanetworks.com, all subdomains are also included, such as support.barracudanetworks.com and test.barracudanetworks.com.
- Mass mailings often come from domains that do not resemble the company’s website name. For example, you may want to receive mailings from historybookclub.com, but you will find that this website sends out its mailing from the domain hbcfyi.com. Examine the From: address of an actual mailing that you are trying to Allow List or Block List to determine what to enter.
Changing the Language of the Quarantine Interface
You can change the language of your quarantine interface by selecting a language from the drop-down menu in the upper right corner of the QUARANTINE INBOX and PREFERENCES tabs. Supported languages include Chinese, Japanese, Spanish, French, and others. The language you select is only applied to your individual quarantine interface. No other user’s interface is affected.
Microsoft Outlook Add-in for Classifying Messages
Instead of using your quarantine inbox to classify your email messages, you can download a client add-in that lets you classify messages from your MS Outlook application. Your Barracuda Email Security Gateway administrator may chose not to make this add-in available. If this is the case, you need to log into your quarantine inbox to classify your messages.
Downloading the Add-in
To download and install the client add-in that is needed to classify messages from MS Outlook:
- Go to the login page of the administration interface and click the link below the login information, as shown in the following figure:
Figure 2. The login page lets you download the client add-in if your administrator has made it available.
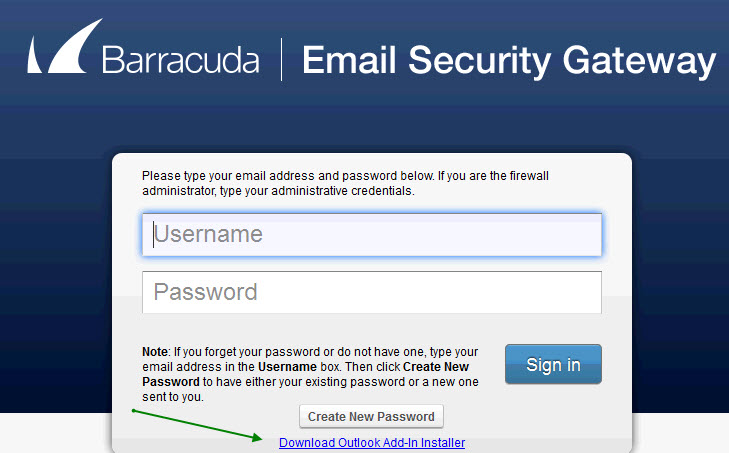
If this link does not appear, then your Barracuda Email Security Gateway administrator has configured the system to not make the add-in available and the next section will not apply to your configuration. - After clicking the link, you'll see a popup prompting you to save the executable file BsfOutlookAddIn.exe. Click Save File.
- Close MS Outlook on your system.
- Run the file and follow the instructions in the setup wizard to install the add-in on your local system or network.
- Re-start MS Outlook.
Using the Microsoft Outlook Add-in
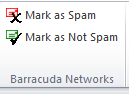
Classifying Messages as Spam or Not-Spam
After downloading and installing the add-in, you can begin classifying messages using the green checkmark and the red X buttons in your MS Outlook client. The green button marks messages as not spam and the red button marks messages as spam.
The MS Outlook add-in is configured to automatically:
- Add email addresses associated with sent messages and new contacts to the Allow List.
- Move spam-declared messages to the Deleted Items folder in your mail client.
- Add the 'From:' email address within 'Not-Spam'-declared messages to the Allow List.
Optional Message Encryption
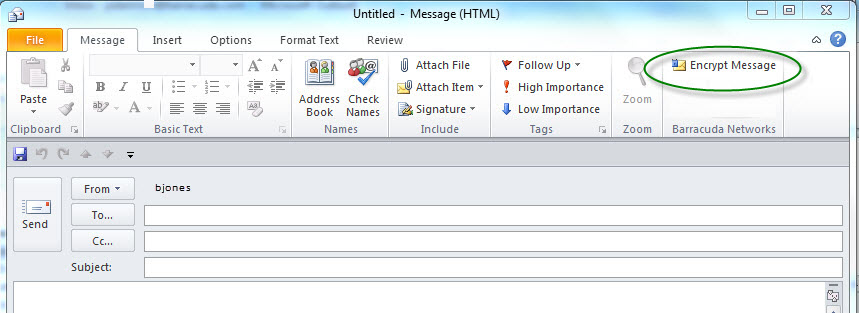
You can choose to encrypt any outbound message by clicking the Encrypt Message button that appears in the Outlook New Message window, as shown in Figure 3, when the add-in is installed. The recipient of the message will retrieve it from the Barracuda Message Center.
Figure 3. Encrypting a message from Microsoft Outlook.
You can change the default behavior of the Outlook Add-in by going to the Tools menu in your MS Outlook client and selecting Options | Email Security Gateway tab.