

The DHCP service can be used as both a stand-alone service and in conjunction with DNS. If you just want to assign IP addresses automatically to clients, you only need to configure the DHCP service.
However, if you want to keep track of your clients based on their individual FQDNs and their IP addresses, these names must be updated in the DNS database with their corresponding IP addresses. To do so, you must additionally configure the Dynamic DNS service so that changes in the DHCP database are synchronized with the DNS database.
This article contains a description of an example DHCP with Dynamic DNS configuration.
Use Case-Related Requirements and Constraints
- This article describes how to configure an internal domain
mydomain.internthat is managed by your internal DNS server for the clients on your LAN. - The DNS server will accept DNS queries from clients in the network 10.0.7.0/24 that will connect to the DNS server on the interface with the IP address 10.0.7.1.
- The DHCP server will provide DHCP IP addresses from the range of 10.0.7.40 to 10.0.7.60 to the clients.
- Dynamic DNS must be configured to contain all the required information for the associated DNS zone. This information will ensure that the DHCP and DNS databases are in sync with their associated data categories.
- The configuration will only cover IPv4 addresses.
Before You Begin
Ensure that...
- You have configured a network where you want your DNS to serve requests for client queries (in this case: 10.0.7.0/24).
- You have configured a Shared IP for the DNS listening service, e.g., 10.0.7.1.
- You have an FQDN that relates to your domain and to the clients within that domain. In this article, the name
mydomain.internwill be used as an example internal domain. - Each client device in the network has a unique hostname.
Configure the DNS Server Host Zone
Create a Primary Zone for Your Domain
For more information, see How to Configure a Zone.
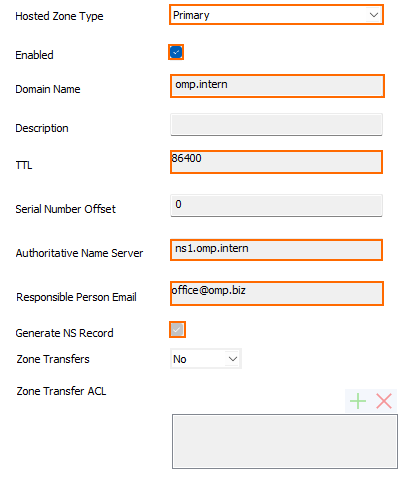
Use the following configuration data:
- Hosted Zone – Primary
- Zone Status – Enabled
- Domain Name –
mydomain.intern - TTL – 86400
- Authoritative Name Server –
ns1.mydomain.intern - Responsible Person Email –
office@mydomain.biz - Generate NS Record – Select the check box
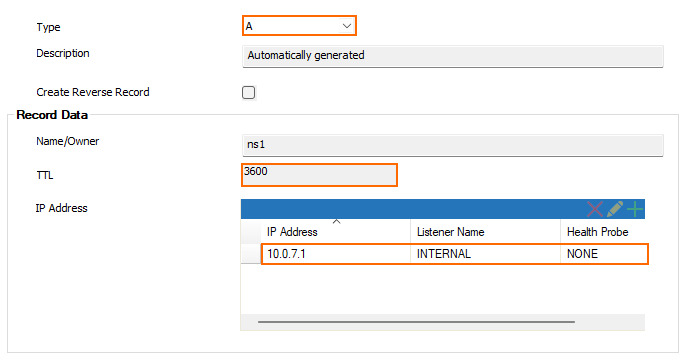
When required, enter the following data for the A record:
- Type – A
- TTL – 86400
- IP Address –
10.0.7.1 - Listener Name – INTERNAL
- Health Probe – NONE
The following image provides an overview of the configured values:

Create a Reverse DNS Zone for Your Domain
For more information, see How to Configure a Zone, Option 3: Configure a Reverse Zone.
Use the following configuration data:
- Hosted Zone Type – Reverse.
- Enabled – Select the check box.
- Domain Name – This field will be generated automatically when entering data into the field Network (see below).
- TTL – 86400
- Authoritative Name Server –
ns1.mydomain.intern.(You must include the trailing '.'!). - Responsible Person Email – office@mydomain.biz
- Network –
10.0.7.0/24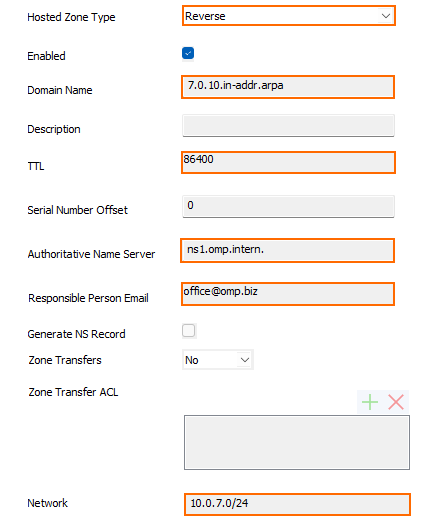
Create an NS Record for the Reverse Zone
For more information, see How to Create a DNS Resource Record.
Enter the following data:
- Type –
NS - Name/Owner –
@ - TTL –
3600 - Record Data –
ns1.mydomain.intern.
Create a PTR Record for the Reverse Zone
For more information, see How to Create a DNS Resource Record.
Enter the following data:
- Type –
PTR - Name/Owner –
2 - TTL –
3600 - Record Data –
ns1.mydomain.intern.

Configure a DNS Listener
For more information, see How to Configure a DNS Listener.
Enter the following data:
- Listener Name –
Intern - Listener IP –
10.0.7.1 - Classification –
INTERNAL - Recursive Lookup – Select the check box.
For your DNS forwarder, configure your preferred DNS server(s) to send queries to if the local DNS service cannot resolve the query.
This example uses the IP address 8.8.8.8 for the DNS forwarder.
Configure the DHCP Service
To make DHCP work with Dynamic DNS, you must configure an advanced pool for the IP addresses that are going to be leased by the client appliances.
Perform the following steps:
Step 1. Enable Advanced Pool Configuration
- Go to CONFIGURATION > Configuration Tree > Box > Assigned Services > DHCP Enterprise Configuration.
- Click Lock.
- Ensure that the Advanced Configuration Mode is activated. You can check this by clicking Configuration Mode at the bottom of the left navigation bar. If the sub-entry shows Switch to Advanced, click to do so.
- In the left navigation column, click Operational Setup IPv4 unless this menu entry is not already selected.
- For Enable DHCPv4, select yes to enable DHCP.
- For Interface Usage, select Shared IPs from the menu list.
- For Use Advanced Pool Configuration, select yes.
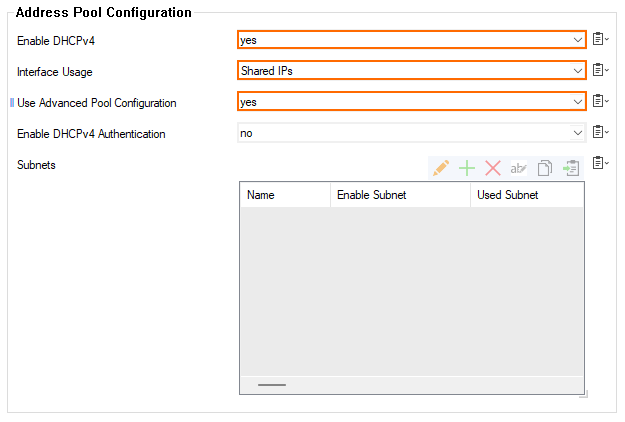
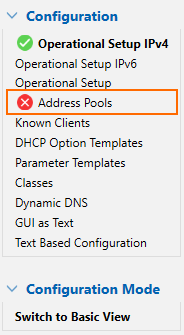
- The navigation column on the left side displays a red bullet with a white 'x' indicating that you must configure the IP address pool on the advanced level.
- A notification window is displayed:
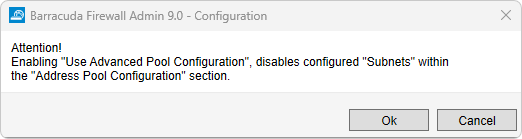
- Click Ok.
- The menu entry Address Pools in the left navigation column is highlighted in bold letters. This indicates that you must do the next configuration here.
Step 2. Configure Your DHCP Address Pool for Leasing IP Addresses to Requesting Clients
- Go to CONFIGURATION > Configuration Tree > Box > Assigned Services > DHCP Enterprise Configuration > Address Pools.
- Click the green '+' to add a subnet.
- The Advanced Subnets dialog window is displayed requesting you to enter the name for the address pool.
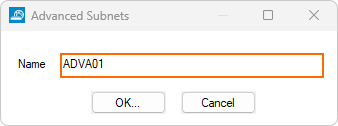
- Enter the name of your subnet.
- Click OK... .
- The Advanced Subnets configuration window is displayed.
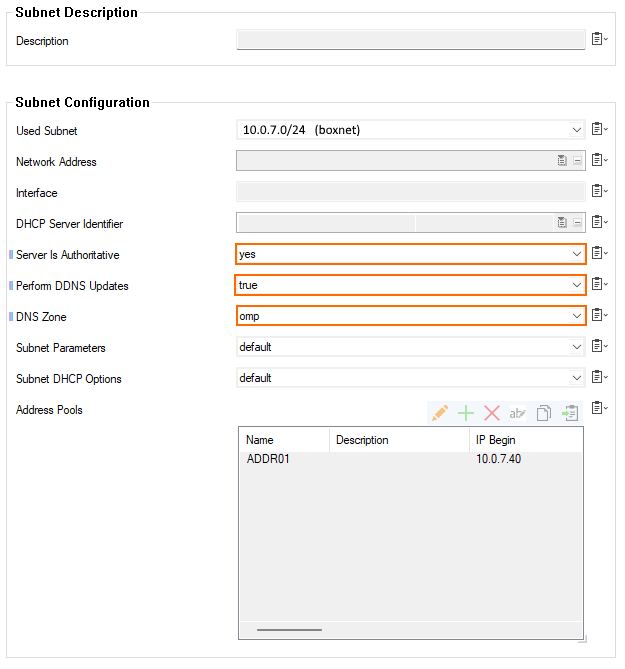
- For Description, enter the name of your subnet.
- For Used Subnet, select the network that the address pool for DHCP leasing addresses will be in.
- Select the values for the following configuration fields:
- Server is Authoritative – yes
- Perform DDNS Updates – yes. This is the parameter that will enable the communication between DHCP and DDNS.
- DNS Zone –
mydomain
- Click the green '+' for Address Pools.
- The Address Pools window is displayed.
- Enter the name of your new leasing IP address pool.
- Click OK... .
- Enter a name for the Description to give your new address pool a name.
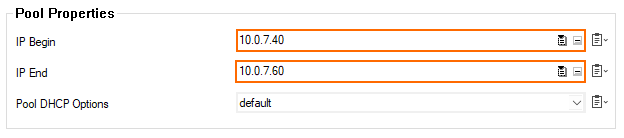
- In the section Pool Properties, enter the following values:
- IP Begin – Enter
10.0.7.40for the beginning of your IP address pool. - IP End – Enter
10.0.7.60for the end of your IP address pool.
- IP Begin – Enter
- For Pool DHCP Options, select default.
- Click OK.
- Click OK.
- Click Send Changes/Activate.
Step 3. Register Known Clients
If there are clients with a fixed IP address in the common network where DHCP IP addresses are dynamically assigned, you must register these appliances here.
- In the left menu column, click Known Clients.
- Click Lock.
- In the Known Clients Configuration section, click the green '+'.
- The Client Groups window is displayed.
- Click OK... .
- Click the green '+' in the Client Group Members section.
- The Clients window is displayed.
- For Description, enter the name of the new client.
- In the Client Match & Address Assignment section, enter the MAC address of your client for MAC Address.
- If you running an ethernet network, select ethernet for MAC Type.
Click on the green '+' for Fixed IP Addresses to add an IP address for the configured MAC address.
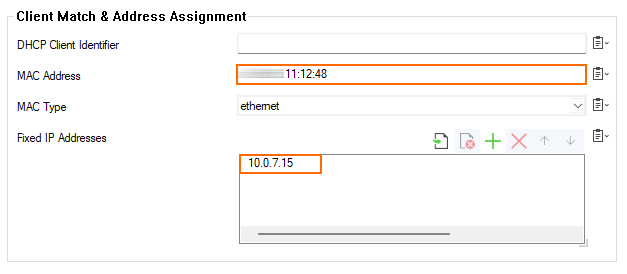
- Ensure that the following parameters are set as follows:
- Client DHCP Options – default
- Client Parameters – default
- Always Broadcast Reply – not-set
- Duplicate Policy – allow
- Click OK.
- Click OK.
- Click Send Changes/Activate.
Step 4. Configure DDNS
Finally, you must configure the DDNS to operate in the required mode.
- In the left menu column, select Dynamic DNS.
- Click Lock.
- For the DNS Update Scheme, select interim.
- For Client Updates, select allow.
- For DNS Zones, click the green '+' in the DNS Authentication section to add a zone.
- The DNS Zones dialog window is displayed requesting you to enter the name for the DynDNS zone to sync with the DHCP service.
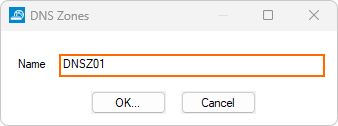
- Enter the name of the zone (e.g., mydomain).
- Click OK... .
- The DNS Zones configuration window is displayed.
- For Zone Type, select Both from the menu list.
- For the DNS Server IP, enter
10.0.7.1. - For Forward Zone Name, enter
mydomain.intern - For Reverse Lookup Net, enter
10.0.7.0. - For Reverse Lookup Netmask, select 24-Bit from the menu list.
- Click Ok.
- Click Send Changes/Activate.