

The documentation below outlines the requirements for the Barracuda XDR Security Orchestration, Automation, and Response (SOAR) for Barracuda CloudGen Control Center Firewall. When you've set this up, all required data is uploaded to the Customer Security Dashboard in the SOAR Settings > Firewalls section.
You'll have to do the following things to prepare your CloudGen Firewall for Barracuda XDR's Automated Threat Response:
- To enable the REST API for HTTPS
- To create a Custom Administrative Role to Access the REST API
- To generate an API token for authentication
- To create a Firewall Network Object for the Barracuda XDR Automated Threat Response
- To add the IP address to the Peer IP Restriction list
- To configure Barracuda XDR Dashboard
To enable the REST API for HTTPS
Reference: https://campus.barracuda.com/product/cloudgenfirewall/doc/96025925/rest-api/
- In Barracuda Firewall Control Center, navigate to CONFIGURATION > Configuration Tree > Box > Infrastructure Services > REST API Service.
- Click Lock.
- In the HTTP interface window, select Enable HTTPS interface.
- In the HTTPS Port field, enter the desired port for API calls.
- (Optional) To enable API calls via management IP addresses instead of the loopback interface, select Bind to Management IPs.
- Click New Key to create a private key of the desired length or import your personal private key.
- Click Ex/import to create a self-signed certificate or import an existing one.
- Click Send Changes and Activate.
- Provide the port number to the Barracuda XDR team.
To create a custom administrative role to access the REST API
- In Barracuda Firewall Control Center, go to CONFIGURATION > Configuration Tree > Multi-Range > Global Settings > Administrative Roles.
- Click Lock.
- In the Roles section, click + to create a new role.
- Enter a number for the role in the Name field and click OK.
The Roles configuration window opens. - Enter the Role Name: BarracudaXDRAdmin.
- (Optional) Enter a Description. Ex: Barracuda XDR Automated Threat Response.
- Scroll down to add the REST API access rights to the administrative role:
- In the REST API section, select the Access to REST API check box.
- Click Set/Edit to configure detailed permissions.
- Configure the Write Access – Provides write access on the selected interface.
- Click OK.
- Click OK.
- Click Send Changes and Activate.
To create an admin account to access the REST API
- In Barracuda Firewall Control Center, click the ADMINS tab.
- Do one of the following:
- Click + New Admin on the top right of the window.
- Right-click the list, and select Create New Admin.
The Create New CC Admin window opens.
- For local authentication, configure the username and password:
- Login - BarracudaXDRAdmin
- Full Name - BarracudaXDRAdmin
- Authentication Level - select Password. Click the cogwheel icon next to the Password field, define a password for the administrative user, and click OK.
- Configure the following additional settings:
- Assigned Range - This option, in combination with linked ranges, controls which entries an administrator can see in CONFIGURATION > State Info > Sessions, in the Configuration Sessions window.
- Login Event – Select Service Default.
- ACL - Add the IP address 44.209.49.222 to the Peer IP Restriction list.
This specify the IP address the admin can use to access the Barracuda CloudGen Firewall.
- After creating the Admin account, one or more specific scope(s) must be defined to be associated with the administrator.
- In the window, click the Administrator Scopes tab.
- Click + next to Instances.
A new instance of the category Global is displayed.
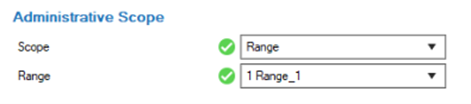
- Configure the Administrative Scope.
- Set the scope to Global, a specific Range, or Cluster. Alternatively, select Ranges and/or Clusters with the Global/Range Link option for the administrative scope.
- Click + to add selected nodes to the Links list.
The options Global Linked and Range Linked associate the configured administrative rights with any individually selected node (in the Links list) at or below a configured Global Linked or Range Linked node (in the Range list).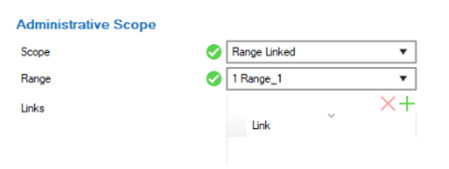
- Configure Administrative Rights.
- Configuration Level: A configuration level of 2 or lower means write access, 99 or lower means read access. Usually, the write level is lower than the read level. For more information on the configuration level: https://campus.barracuda.com/product/cloudgenfirewall/doc/96026459/control-center-admins.
- Assign Roles: Click + and add the role created in To Create a Custom Administrative Role to Access the REST API: BarracudaXDRAdmin.
- Shell Level: Select No.
- Click OK.
The CC admin user you just created can now access the REST API interface for the ranges and clusters assigned to the user.
To generate an API token for authentication
- In Barracuda Firewall Control Center, navigate to Configuration > Configuration Tree > Box > Infrastructure Services > REST API Service.
- Click Lock.
- In the left menu, click Access Tokens.
- Click + in the Access tokens section.
- Type the name BarracudaXDRAPI for the token and click OK.
The Access tokens window opens. - Click Generate new token.
- Enter the Admin name for the user used for authentication.
This is the name of the Admin Account previously created (BarracudaXDRAdmin) - In the Time to live field, enter the number of days the token should be valid for.
- Click OK.
- Click Send Changes and Activate.
- Make a note of the name of the API Token to give to the Barracuda XDR team.
To create a firewall network object for the Barracuda XDR Automated Threat Response
Barracuda XDR uses the Network Group to block IPs on the firewall. You must create a Firewall Network Object called Barracuda_XDR_Blocked_IPs.
- In Barracuda Firewall Control Center, go to Configuration > Configuration Tree > Multi-Range > (Global, Range, or Cluster Level) > Firewall Objects/Policies.
Based on the customer firewall set up, create a Firewall Network Object within the administrative scope that was chosen for the configuration. - Click Lock.
- In the left menu, scroll to Firewall Objects and click Networks.
- Click + in the Networks section to create a network object.
- For the Type, select Generic Network Object.
- Enter the name Barracuda_XDR_Blocked_IPs for the network object.
- (Optional) Enter a description for the Network, for example, Barracuda XDR Automated Threat Response.
- Click OK.
- Click Send Changes and Activate.
- Add the Network Object to any preexisting firewall policies created to block traffic to/from anomalous IP addresses.
- Send the Network Object Name to the Barracuda XDR team.
To add the IP address to the Peer IP restriction list
- For the Admin Account, add the IP address 44.209.49.222 to the Peer IP Restriction list.
To configure XDR dashboard
- In Barracuda XDR Dashboard, click SOAR Settings > Firewalls.
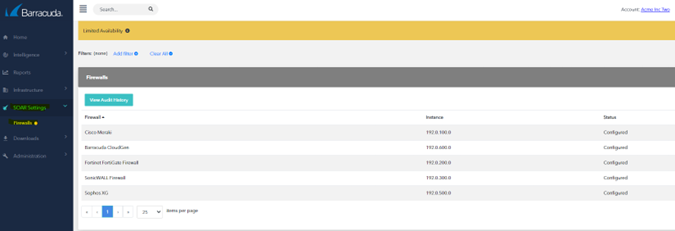
- Click Config.
- In the Edit Config dialog box, enter the following:
- External IP
- API Access Port
- Credential (API Key)
- Group Name
- Firewall Type
- Group Level
- Range Name
- Cluster Name
- Box Name
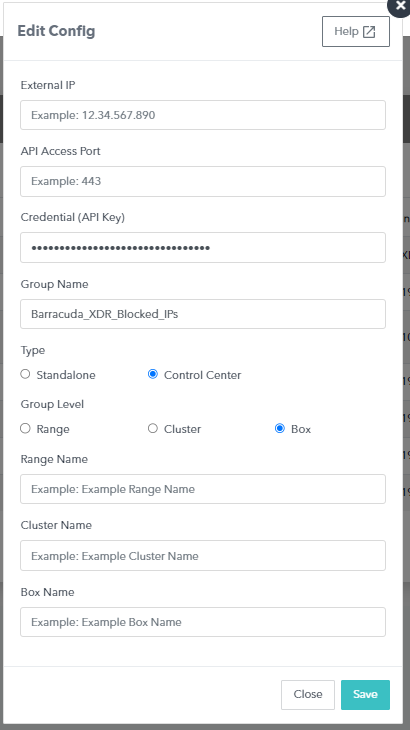
- Click Save.