

The documentation below outlines the requirements for the Barracuda XDR Security Orchestration, Automation, and Response (SOAR). When you've set this up, all required data is uploaded to the Customer Security Dashboard in the SOAR Settings > Firewalls section.
To set up SOAR for FortiGate Firewall, you must do the following:
- To create an Administrator profile
- To create a REST API Admin and generate an API token
- To obtain the HTTPS port number for API calls
- To create an Address Group
- To configure XDR Dashboard
To create an Administrator profile
- In FortiGate Firewall, click System > Admin Profiles > Create New.
- Create a new profile called
Barracuda XDR API Admin. - In the Access Permissions table, under Access Control, click the Custom icon next to Firewall, then do the following:
- Next to Policy, select Read/Write.
- Next to Address, select Read/Write.
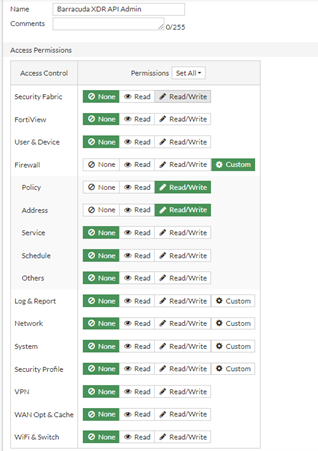
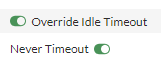
- Slide Override Idle Timeout to On. Then slide Never Timeout to On.
- Make a note of the profile name, to use when you create the REST API Admin.
- Click OK.
To create a REST API Admin and generate an API token
- In FortiGate Firewall, navigate to System > Administrators > Create New > REST API Admin.
- In Username, type the username
Barracuda XDR API Adminand select the Administrator Profile you created in Create an Administrator Profile,Barracuda XDR API Admin.

- In the Restrict logins to Trusted Hosts section, do the following:
- Slide the Trusted Hosts slider to on.
Type the IP address
44.209.49.222as a trusted host so the authentication is successful from the Barracuda side to be able to implement the IP Blocking.
Click OK.
Make a note of the API token.
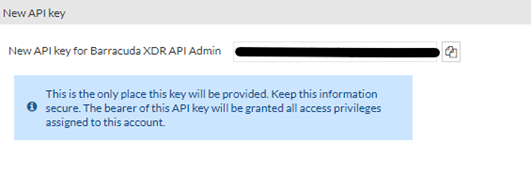
- Click Close.
- Send the API Token to the Barracuda XDR team.
To obtain the HTTPS port number for API calls
- If you are not using the default port (Port 443), for administrative access, please copy the correct port and the external IP address from the URL. For example, https://<IP Address>:<port>,
- The port can be found in the URL along with the external IP address. For example,
https://<IP Address>:<port>, where<IP Address>is the external IP address and<port>is the port to use for administrative access. - Provide the port number to the Barracuda XDR team.
To create an Address Group
Next, create an Address Group called Barracuda_XDR_Blocked_IPs. Barracuda XDR uses this group to automatically block IPs on the firewall. Add this group to any preexisting firewall policies that block traffic to/from anomalous IP addresses.
- In the left navigation menu, click Policy & Objects > Addresses.
- Click Create New > Address Group.
- In Group Name, type
Barracuda_XDR_Blocked_IPs. - In Type, select Group.
- Click OK.

- Send the Address Group name to the Barracuda XDR team.
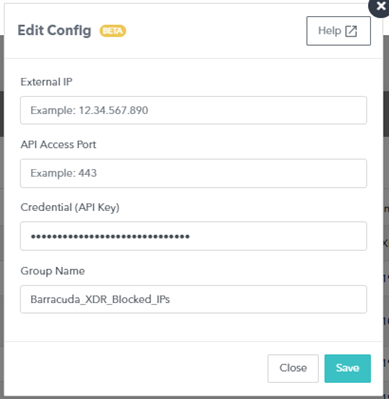
To configure XDR Dashboard
- In Barracuda XDR Dashboard, click SOAR Settings > Firewalls.
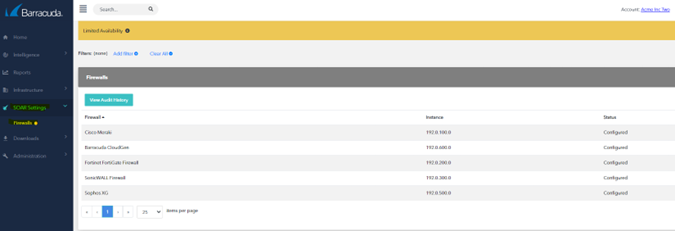
- Click Config.
- In the Edit Config dialog box, enter the following:
- External IP
- API Access Port
- Credential (API Key)
- Group Name
- External IP
- Click Save.