

The documentation below outlines the requirements for the Barracuda XDR Security Orchestration, Automation, and Response (SOAR) for Barracuda CloudGen Standalone Firewall. When you've set this up, all required data is uploaded to the Customer Security Dashboard in the SOAR Settings > Firewalls section.
To configure SOAR for Barracuda CloudGen Standalone Firewall, you must do the following:
- To send the External IP Address of the Standalone firewall to Barracuda XDR
- To enable the REST API for HTTPS
- To create an Admin Account for the REST API
- To generate an API Token for authentication
- To create a Firewall Network Object for the Barracuda XDR Automated Threat Response
- To add the IP address 44.209.49.222 to the Peer IP Restriction list for the REST API Admin
- To configure XDR Dashboard
To send the External IP Address of the Standalone firewall to Barracuda XDR
- Send the external IP address of the standalone firewall to the Barracuda XDR team.
To enable the REST API for HTTPS
Reference: https://campus.barracuda.com/product/cloudgenfirewall/doc/96025925/rest-api/
- In Barracuda CloudGen, navigate to CONFIGURATION > Configuration Tree > Box > Infrastructure Services > REST API Service.
- Click Lock.
- In the HTTP interface window, select Enable HTTPS
- In the HTTPS Port field, enter the desired port for API calls.
- (Optional) To enable API calls via management IP addresses instead of the loopback interface, select Bind to Management IPs.
- Click New Key to create a private key of the desired length or import your personal private key.
- Click Ex/import to create a self-signed certificate or import an existing one.
- Click Send Changes and Activate.
- Provide the port number to the Barracuda XDR team.
To create an Admin Account for the REST API
- Go to CONFIGURATION > Configuration Tree > Box > Administrators.
- Click Lock.
- In the Administrators section, click + to add an administrator account.
- Type the name BarracudaXDRAdmin for the account and click OK.
The Administrators window opens. This account name is used to log into the firewall. - Type the Full Name of the administrator or a description for the account (BarracudaXDRAdmin).
In the Assigned Roles table, add the Manager administrative role for the user.
- From the System Level Access list, select No OS Login.
- For the Authentication Level, choose Password.
- When using a password, select the corresponding scheme from the Password Validation list.
- Enter the password for the Barracuda Firewall Admin login. When creating an account, the new password must be entered in both the Current and New fields, even though the password has not yet been created. The password must be confirmed by re-entering it in the Confirm field.
Use the Peer IP Restriction table to set an access restriction on IP address and/or subnet level on which Barracuda Firewall Admin runs.
- From the Login Event list, select Service Default (default).
- Click Send Changes and Activate.
To generate an API Token for authentication
- Navigate to CONFIGURATION > Configuration Tree > Box > Infrastructure Services > REST API Service.
- Click Lock.
- In the left menu, click Access Tokens.
- In the Access Tokens section, click +.
- Type the name BarracudaXDRAPI for the token and click OK.
The Access Tokens window opens. - Click Generate new token.
- Enter the Admin name for the user used for authentication.
- This will be the name of the admin account created in To create an Admin Account for the REST API above (BarracudaXDRAdmin).
- In the Time to live field, enter the number of days the token should be valid for.
- Click OK.
- Click Send Changes and Activate.
- Send the API Token to the Barracuda XDR team.
To create a Firewall Network Object for the Barracuda XDR Automated Threat Response
Create a Firewall Network Object for Barracuda XDR Automated Threat Response, called Barracuda_XDR_Blocked_IPs. This Network Group is used by XDR for automatically blocking IPs on the firewall.
- Navigate to CONFIGURATION > Configuration Tree > Box > Assigned Services > NGFW (Firewall) > Forwarding Rules.
- Click Lock.
- In the left menu, scroll down to Firewall Objects and click Networks.
- In the Networks section, click + to create a network object.
- For the Type, select Generic Network Object.
- Type the name Barracuda_XDR_Blocked_IPs for the network object.
- (Optional) Enter a description for the Network.
- Click OK.
- Click Send Changes and Activate.
- Add the Network Object to any preexisting firewall policies created to block traffic to/from anomalous IP addresses.
- Send the Network Object Name to the Barracuda XDR team.
To add the IP address 44.209.49.222 to the Peer IP Restriction list for the REST API Admin
- For the Admin Account, add the IP address 44.209.49.222 to the Peer IP Restriction list.
To configure XDR Dashboard
- In Barracuda XDR Dashboard, click SOAR Settings > Firewalls.
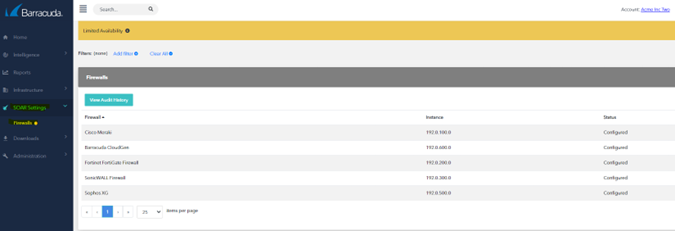
- Click Config.
- In the Edit Config dialog box, enter the following:
- External IP
- API Access Port
- Credential (API Key)
- Group Name
- Firewall Type
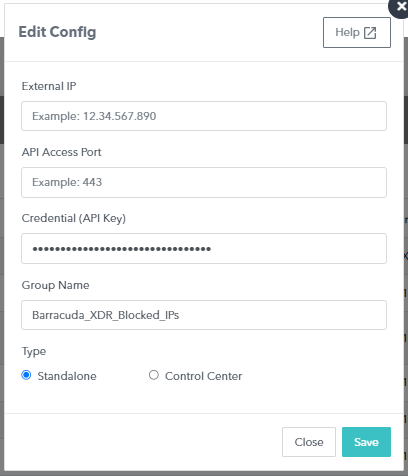
- Click Save.