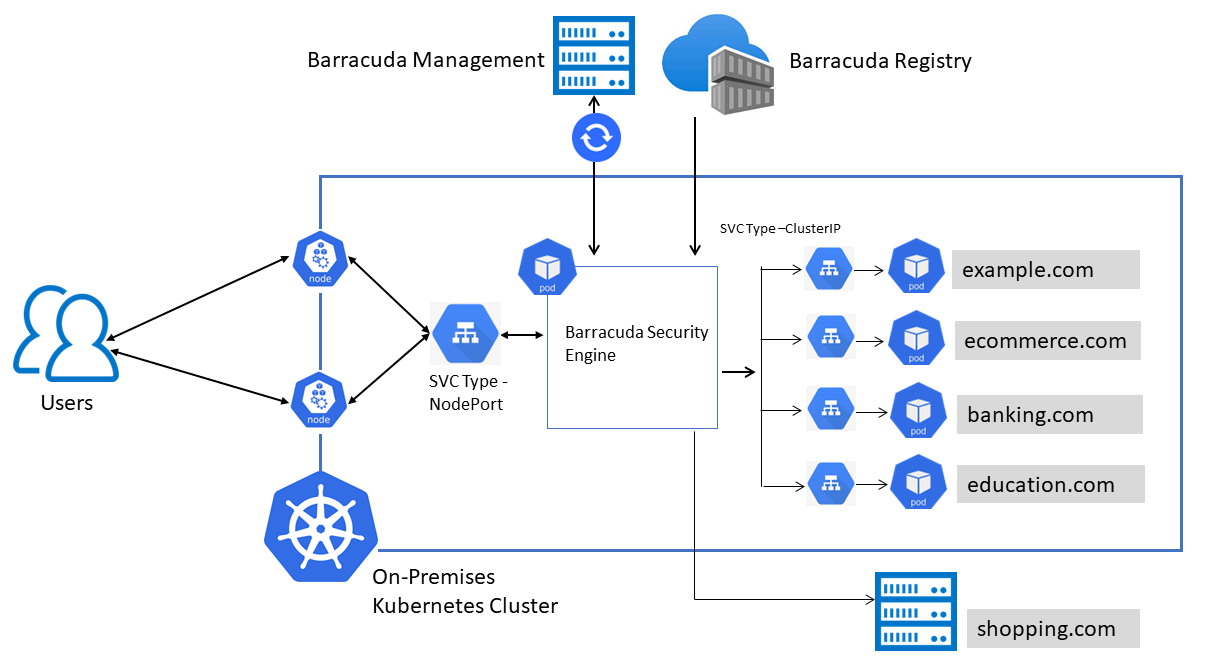
The traffic processing engine of WAF-as-a-Service can be deployed as a container on a Kubernetes cluster that is hosted and managed by the customer.

Prerequisites
You must have a WAF-as-a-Service account enabled for custom container deployment. This requires a signed NDA with Barracuda Networks. Contact your Barracuda sales representative for more information on signing an NDA.
You must have a running kubernetes cluster.
You must have permission to create the required resources in your Kubernetes cluster.
Kubernetes command line tool kubectl should be installed on the workstation that is used to manage your kubernetes cluster.
Allow access to the following domains from the Kubernetes cluster:
Hostname | Port | TCP/UDP | Direction | Purpose |
|---|---|---|---|---|
container-api.waas.barracudanetworks.com | 443 | TCP | Outbound | Update configuration settings |
waascontainerprod.blob.core.windows.net | 443 | TCP | Outbound | Storing troubleshooting information |
wafaas-prod-eh.servicebus.windows.net | 443 | TCP | Outbound | Storing access and firewall logs |
waas-iot-hub-proxy-func-prod.azurewebsites.net | 8883 | AMQP | Inbound/Outbound | Exchange of configuration and other statistics |
Configuring WAF-as-a-Service
Step 1. Create a Container Key
Navigate to https://waas.barracudanetworks.com/ and log in with your Barracuda account credentials.
If you do not already have a Barracuda account, click Free 30-Day Trial to sign up for a trial of WAF-as-a-Service.
On the WAF-as-a-Service web interface, click Resources > WAF Containers > Container Keys.
On the Container Keys page, click New Key.
On the Create new key window:
Key Name - Enter a name for the key.
Select an option to create the key.
If you select I will generate my own key and provide the public portion:
Copy the UNIX command from the window and paste it into your UNIX-like system: ssh-keygen -f barracuda-wafaas-container-key
Copy the contents of the barracuda-wafaas-container-key.pub file and paste them into the Public key box.
Click Create.
If you select I would like WAF-as-a-Service to generate a key for me:
The Barracuda WAF-as-a-Service generates a key for the container.
Click Download and download the key file.
Click Create.
Step 2. Create a Container
On the WAF-as-a-Service web interface, click Resources > WAF Containers > Container Management.
On the Container Management page, click Add Container.
On the Add Container window:
Name - Enter a name for the container.
Encryption Key – Select the key that you created in Step 1. Create a Container Key.
Google reCAPTCHA is available for the applications in your container. An advanced risk analysis engine and adaptive CAPTCHAs are employed to challenge suspicious clients and protect against spam, BOTS, and other threats. Clients failing the challenge will not be able to further use your application. To enable this protection you must provide your own reCAPTCHA keys. Refer to the Google documentation for creating reCAPTCHA keys.
If you leave these fields blank, or if reCAPTCHA is enabled, but the connection with Google is lost, WAF-as-a-Service's basic CAPTCHA will still challenge clients marked as suspicious.
Click Add.
Step 3. Add an Application
On the WAF-as-a-Service web interface, click Applications in the left panel.
On the Applications page, click Add Application.
On the Add Application window:
Websites
Application Name – Enter a name for the application.
Domain Name – Enter the domain name of the application.
Click Continue.
Backend Server reachable from public network (internet)
Backend Server Protocol - Select the protocol that needs to be used to access the server.
IP Address/Hostname - Verify the IP address/hostname of the backend server.
Port - Verify the port number on which the server is listening to.
Click Test Connection.
If the backend server is reachable, the following message is displayed:

Click Add.
If the backend server is not reachable from the public network, the following message is displayed:

Click Continue anyway and then click Add.
Click Close.
Step 4. Update the SSL Certificate
On the WAF-as-a-Service web interface, click Applications in the left panel.
On the Applications page, select the application that you created in Step 3. Add an Application.
Click Endpoints in the left panel.
On the Endpoint page:
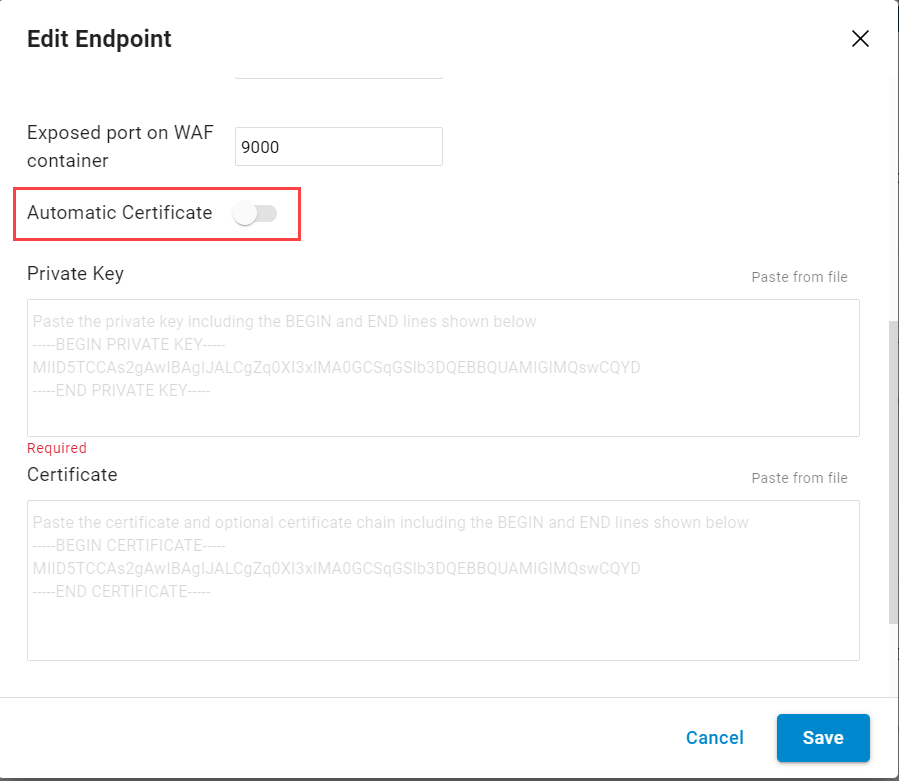
Click on the three dots next to the endpoint with port 443 and select Edit Endpoint.

On the Edit Endpoint page:
Scroll down and disable Automatic Certificate.
Paste the certificate private key in the Private Key text box.
Paste the certificate in the Certificate text box.

Click Save.
Step 5. Associate Applications to the Container
On the WAF-as-a-Service web interface, click Applications in the left panel.
On the Applications page, select the application that you created in Step 3. Add an Application.
Click Endpoints in the left panel.
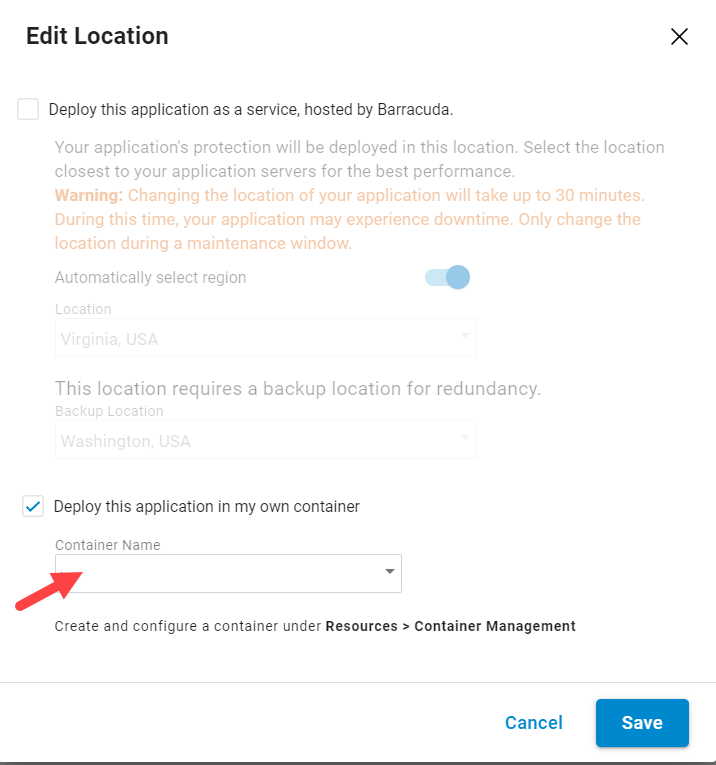
On the Endpoints page, click Edit in the Deployment Location section.
On the Edit Location window:
Select the Deploy this application to my own container checkbox.
Select the container you created in Step 2. Create a Container from the Container Name drop-down list.
Click Save.

Step 6. Download the YAML File
On the WAF-as-a-Service web interface, click Resources > WAF Containers > Container Management.
On the Container Management page:
Click the three dots under ACTION next to the container that you created in Step 2. Create a Container and select Deploy.
On the Container Deployment window:
Environment
Kubernetes is selected by default.
Click Continue.
Container Key
Select the option to associate the container key that you created in Step 1. Create a Container Key.
If you want to insert the container key manually, select Insert the key into the deployment file manually (recommended).
If you have downloaded the container key and want to upload it before the deployment, select Upload the container-keys key now.
If you want to paste the key content instead of uploading the file, select Paste the contents of the container-keys key now.
Click Continue.
Advanced Options - This section is optional. If you want to configure advanced settings, see Advanced Options Configuration.
Click Continue.
Download
Click Download YAML to download the deployment file that can be used to create the WAF container into your Kubernetes cluster.
Advanced Options Configuration
Following are the advanced settings for the container deployment:
DATAPATH VERSION
Select a Datapath Version. See Managing the datapath for more information.
CONFIG TOKEN
Select the Config Token to be used with this deployment. If you are not sure which token to use, select Token 1. See Rotating Container Config Keys for more information about using and rotating Config Token.
VIRUS SCANNING
Choose whether you want to include Virus Scanning with this deployment.
TROUBLESHOOTING
Disable diagnostic log collection – When selected, the diagnostic and deployment data is not sent to the Barracuda diagnostic center. If the option is not selected, the data is encrypted and stored in a secure location. It is only made available to support engineers for troubleshooting issues.
Do not send Access Logs and Firewall Logs to WAF-as-a-Service – When selected, Access Logs and Firewall Logs are not sent to Barracuda WAF-as-a-Service.
Disable handling of Scheduled Events when deployed on Microsoft Azure – When selected, the scheduled events are not handled when the container is deployed on Microsoft Azure.
Support Tunnel
Disable – When selected, the support tunnel access will not be available for the Barracuda support to troubleshoot issues.
Enable – When selected, the support tunnel access is made available to troubleshoot issues.
Allow tunnel to be opened remotely through the WAF-as-a-Service UI or API – When selected, the support tunnel is allowed to be accessed remotely through the WAF-as-a-Service web interface or API.
Allow tunnel to be opened only through a local kubectl command – When selected, the support tunnel access is allowed ONLY through the local kubectl command when the container is deployed in Kubernetes cluster.
Core Dump Collection
Disable – When selected, the state of the container (call stack and debug information) is not collected in case of a crash.
Enable – When selected, the state of the container (call stack and debug information) is collected in case of a crash. The collected information can be used when troubleshooting issues.
Allow collection to be opened remotely through the WAF-as-a-Service UI or API – When selected, the core dump collection can be enabled through the WAF-as-a-Service web interface or API.
Allow collection to be opened only through a local kubectl command – When selected, the core dump collection is allowed ONLY through the local kubectl command when the container is deployed in the Kubernetes cluster.
Kubernetes Resources in the Deployment File
The Kubernetes YAML file includes the following objects:
A Secret that communicates with the Barracuda container registry and pulls the WaaS container image from the registry.
A Service that routes the traffic from the public network to the container.
443 and 80 are external ports exposed on public IP
9000 and 9001 are internal ports used by containers to serve the traffic.
A Deployment downloads the container image from the Barracuda container repository and deploys 1 replica to your Kubernetes cluster. This container secures the deployed applications by inspecting the incoming traffic for attacks and anomalies.
A DaemonSet downloads the container image from the Barracuda repository and deploys 1 container on every worker node in the Kubernetes cluster. This container collects all information required for troubleshooting and the information is shared with the Barracuda diagnostic center for advanced analysis.
Deploy and Check the Application
On the management workstation where the kubectl is running, execute the following command to create the resources defined in the “waf-container.yaml” definition file:
Open the “waf-container.yaml” file and change the service type from LoadBalancer to NodePort.
kubectl apply -f <path>/waf-container.yamlHere, the <path> indicates the location where the YAML file is saved on your system.
you should see output that looks like the following, indicating your Kubernetes objects were created successfully:
secret/acr-secret created
service/svc-{Application Name}-9000 created
deployment.apps/cuda-tm created
daemonset.apps/ds-node-sys created
Run the following command to check the WaaS container deployment:
kubectl get deployment cuda-tmThe output should look like the following:
NAME READY UP-TO-DATE AVAILABLE AGE
cuda-tm 1/1 1 1 5m
Run the following command to verify if the troubleshooting container is up and running:
kubectl get daemonset ds-node-sysThe output should look like the following:
NAME DESIRED CURRENT READY UP-TO-DATE AVAILABLE NODE SELECTOR AGE
ds-node-sys 1 1 1 1 1 <none> 5m
Run the following command to know the public IP of the application:
kubectl get services svc-{Application Name}-9000The output should look like the following:
NAME TYPE CLUSTER-IP EXTERNAL-IP PORT(S) AGE
svc-{Application Name}-9000 NodePort {Private IP} <none> 443:31000/TCP,80:30347/TCP 5m
Verify if the application is accessible.
Open a browser and access your application using the node IP address:
For HTTP request: http://{NodeIP}:30347/
For HTTPS request: https://(NodeIP):31000/
For example, if you have 2 nodes with public IP addresses 123.4.5.6 and 12.3.4.5, and Kubernetes assigns your service port 31000, then the service will be accessible on both 123.4.5.6:31000 & 12.3.4.5:31000.
