The SecureEdge Connector is a small piece of software that can be installed on Windows or Linux servers to keep your devices secure by redirecting their traffic through a secure VPN connection. The Barracuda SecureEdge Manager allows administrators to configure the SecureEdge Connector, a software solution for establishing a connection between the service and a resource that cannot be reached via routing. Registration of the SecureEdge Connector is token based. You can generate a registration token for the SecureEdge Connector. With this registration token, you can configure the Connector service on a Linux client. Once enrolled, each Connector is assigned a single static IP address within the SecureEdge environment. The Connector supports all Edge Services including Private Edge Service and Edge Service for Virtual WAN. In addition, you can select a connection point as the Access Point of Presence.
The benefits of using the SecureEdge Connector are:
You can connect to numerous applications on Windows and Linux servers and in the cloud via one-click Connector deployments.
You can configure the Connector in both Inbound and Routed mode. Inbound mode does not require a license. However, Routed mode requires a valid license.
The SecureEdge Connector can be used for app-to-app communication between Connectors or between a Connector and the SecureEdge environment. This requires Routed mode to be activated. Note that if your Connector software license expires, updates are not automatically pushed to the Connector and you cannot edit or update the Connector in Routed mode. However, your Connector in Inbound mode will still work.
The Barracuda SecureEdge Connector establishes a secure VPN connection between the service and a resource that cannot be reached via routing. In addition, you can also configure a list of resources that the Connector can connect to. Each resource can be reached via the Barracuda SecureEdge Access Agent if permitted by an existing policy.
The Connector app can be used as source or destination for Network Access Control List policies as well as for other security policies including ZTNA resources. For more information, see Custom Applications.
Connector Deployment Modes
System Requirements | Inbound Mode | Routed Mode (app to app) |
|---|---|---|
License | No license required | Additional license required |
Supported Operating Systems |
|
|
Supported Architectures | X86 | X86 |
Minimal requirements | 1 Core 1GB RAM | 1 Core 1GB RAM |
For Linux distributions |
|
|
Step 1. Configure Connector IP Range
Go to https://se.barracudanetworks.com and log in with your existing Barracuda Cloud Control account.
The chosen Tenant/Workspace is displayed in the top menu bar.

Click the expandable drop-down menu and select the workspace your Connector should be assigned to.
Go to Infrastructure > Settings.
Expand the Settings menu on the left and select Connector.
The Connector page opens. In the Connector section, specify values for the following:
Connector IP Range – Enter the network IP pool range that will be used by the Connector clients.

Click Save.
Step 2. Create a SecureEdge Connector
Go to https://se.barracudanetworks.com and log in with your existing Barracuda Cloud Control account.
Select the workspace your Connector should be assigned to.
In the left menu, click the Infrastructure icon, and select Connectors.
The Connector page opens. All enrolled Connectors deployed in the selected workspace are displayed. Click Add.
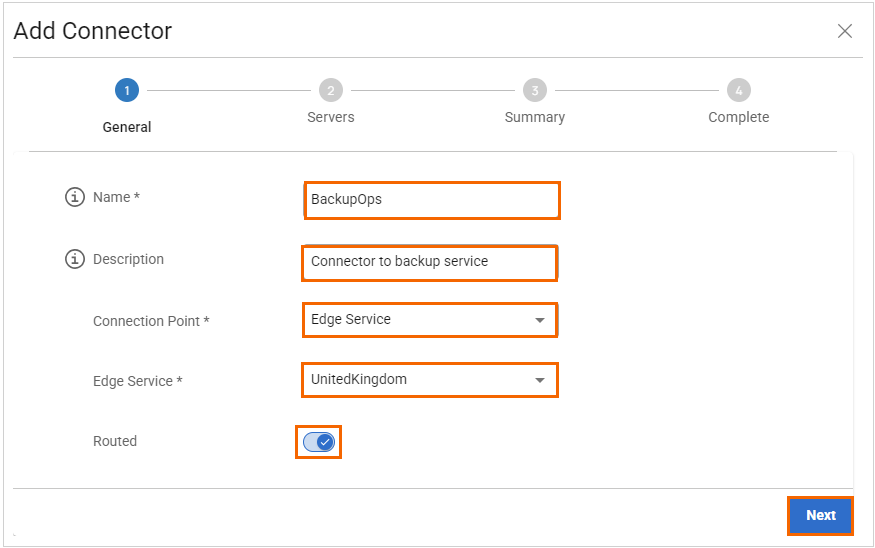
The Add Connector window opens. Specify values for the following:
Name – Enter a unique name for your Connector.
Description – Enter a brief description.
Connection Point – Select a Connection Point. You can choose between the following:
Access Point of Presence – Select the access PoP from the drop-down menu.
Edge Service – Select the Edge Service you wish to connect to from the drop-down menu. For example, in this case, select Edge Service.
Routed – Enable for app-to-app communication. Note: For Inbound mode, Routed is disabled.

Note: For the initial release, Connectors will be able to connect to only two providers or instances of the Edge Service they are attached to. For this reason, the first two static providers will be used and added under the WAN settings in the Private Edge. Any additional providers will be ignored. This is also true for cloud services when scale units are increased.
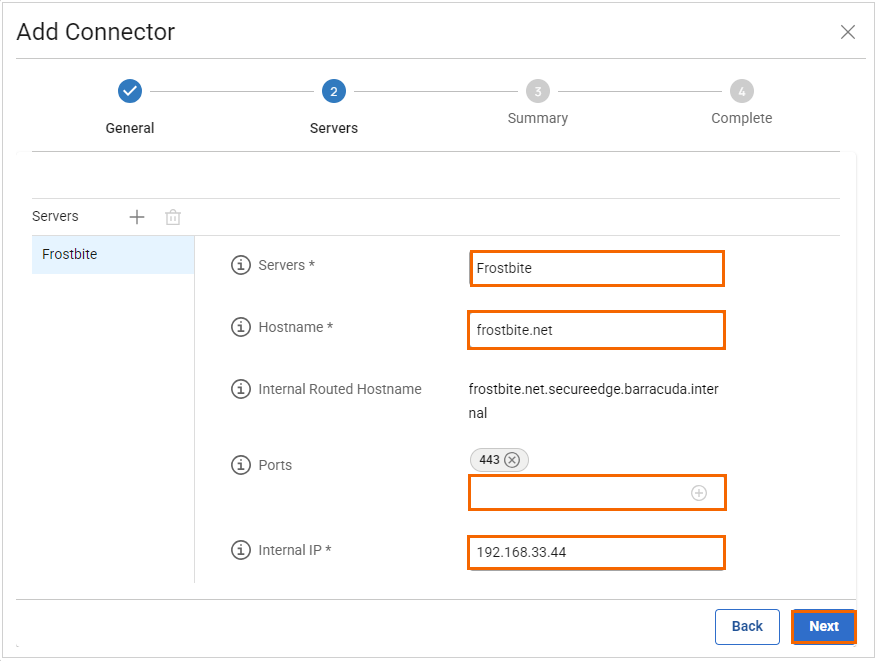
Click Next, and specify values for the following:
Servers – Enter the names of the servers. To add a server, click +. To remove a server, click on the trash can icon .
Hostname – Enter your unique hostname. Note: For Routed mode, the predefined internal DNS suffix
secureedge.barracuda.internalmust be used.Ports – Enter ports. You can enter ports as a single number, in ranges, or as a comma-separated list of these.
Internal IP – Enter the internal IP address on which the resource will be reachable.

Click Next.
The Summary page opens. Review your settings and click Save. The Connector status is now displayed.

Verify the status of the Connector and follow the instructions in the configuration window.
You can download and install the Connector for Linux. Click Finish.
After the configuration is completed, your Connector is created. On the Connector page, you will see a new Connector has been enrolled.

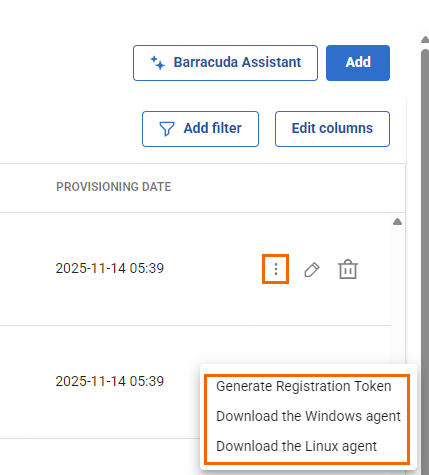
On the Connector page, click the icon with the three vertical dots.

You have three options:
Generate Registration token – To generate new registration token for the Connector, select Generate Registration token.
Download the Windows agent – To download the Windows agent, select Download the Windows agent.
Download the Linux agent – To download the Linux agent, select Download the Linux agent. For example, in this case, Download the Linux agent.
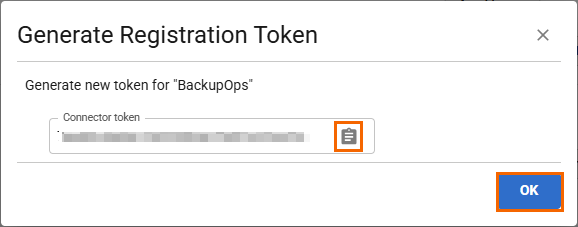
Click Generate Registration Token. The Generate Registration Token window opens. Copy the Connector token.

Paste the token into a text file.
Click OK.
Step 3. Configure the Connector on the Linux Client
Install the Barracuda Connector on your Linux device to provide secure connectivity to Barracuda SecureEdge. Note: If you have downloaded the Linux agent (e.g., Connector_x.x.x_Linux.zip) on your Windows machine, you must copy this file to the Linux client using commands such as scp and install the unzip utility to use command unzip to extract this file.
In Linux-based operating systems, the default storage location is /etc/barracuda. The user should have administrative permissions or will otherwise need to log in as root user.
To start the Connector in Linux :
Log in as root user.
To start the Connector, open the terminal.
To run the Connector, enter the token retrieved in Step 1.
# ./connector -t <Enter your token>Press Enter.
This will start the Connector, and all your resources will get exposed to the SecureEdge environment.
For more detailed information on using your Connector (for example, logfilepath, loglevel, verbosity, logsyslog, and configfile), enter the following command in your terminal:
# ./connector -h
Step 4. (Optional) Auto-Start Connector Settings
There are multiple methods for implementing the auto-start feature for the Connector. One common method is using the systemd service. You can configure the Connector service to start automatically after rebooting the server or closing the SSH terminal. In other words, the connection to the Connector is preserved.
Log in as root user and, to start the Connector, open the terminal.
Run the Connector using a token. Note: To receive a configuration, ensure that you have already run the Connector at least once using a token. In addition, make sure that the Connector binary is executable. If it is not, use
chmodto make it executable according to your needs, e.g.,chmod+x connector.After the configuration is complete, move your Connector binary to the /bin directory. Note: The Connector runs in the foreground. Use the Linux tools provided from your distribution to run it according to your requirements. For example, use
/bin/connector &, to run the Connector in the background.Create a service file in the directory /etc/systemd/system/connector.service.
The basic structure of a service file:
The [Unit] section defines general information about the service. The Description describes the unit.
The [Service] section defines the service. Note that you can create your service as per your requirement.
ExecStart specifies the full path of a command that will be executed to start a service.
To send the program's standard output and error, StandardOutput and StandardError are defined. For example, in this case, console output is sent to syslog.
The SyslogIdentifier is used to identify the service in syslog files. This will be used later to direct output to a separate file for the service. For example, in this case, connector.log.
The RestartSec specifies the amount of time to wait before attempting to restart the service if automatically restarting the service is enabled.
The Restart is set to on-failure. This will trigger a restart of a service on-failure.
The [Install] section is optional and is used to define the behavior of a unit if it is enabled or disabled.
Type the following content and Save the file:[Unit] Description=Barracuda Connector [Service] User=root ExecStart=/bin/connector -m TCP -p /var/log/connector.log WorkingDirectory=/var/log/ AmbientCapabilities=CAP_NET_ADMIN KillMode=process Restart=on-failure RestartSec=5 StandardOutput=syslog StandardError=syslog SyslogIdentifier=%n [Install] WantedBy=multi-user.target After=network.target
To reload the service, enter the following command in your terminal:
# sudo systemctl daemon-reloadTo start a service at boot, enter the following command in your terminal:
# sudo systemctl enable connector.serviceTo start the connector service, enter the following command in your terminal:
# sudo systemctl start connector.serviceTo query the connector status, enter the following command in your terminal:
# sudo systemctl status connector.service.
The console output of a service, i.e., StandardOutput or StandardError, is connected to system log and debug log. To view detailed information on logs, you can see the connector.log file in the direcorty /var/log.
Further Information
Firewall settings on the Connector
Ubuntu
The Connector will add ufw rules to allow everything that is coming from the Connector adapter and going out of the Connector.

CentOS
The Connector will add firewalld rules to allow everything that is coming from the Connector adapter and going out of the Connector.

