

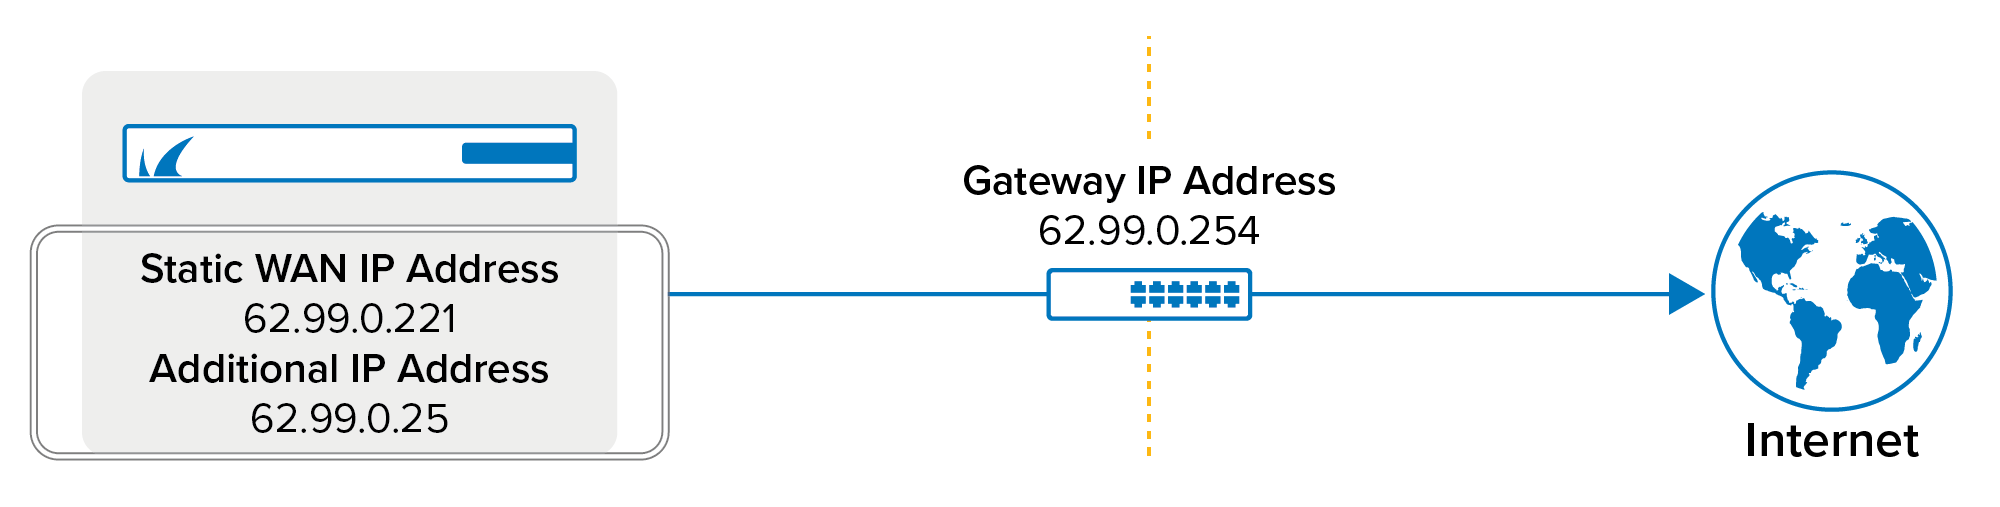
Barracuda SecureEdge now supports multiple IPs on a static WAN interface on a Site or a private Edge Service. The SecureEdge Manager allows you to configure additional WAN IPs in addition to the primary WAN IP. Static WAN interfaces can be configured either during deployment or later through the Sites / Private Edge Service configuration page. For more information on configuring during deployment, see How to Create a T/VT Site Configuration in Barracuda SecureEdge. For more information on different types of supported WAN connection, see WAN Connections.
Please note the following regarding this new feature:
- You can add additional IP addresses to a static WAN interface for both Sites and private Edge Services.
- You are not allowed to add an additional IP address outside the network defined by the primary IP and the netmask.
You cannot add the primary IP address or the gateway IP address as an additional IP address.
Static WAN Configuration
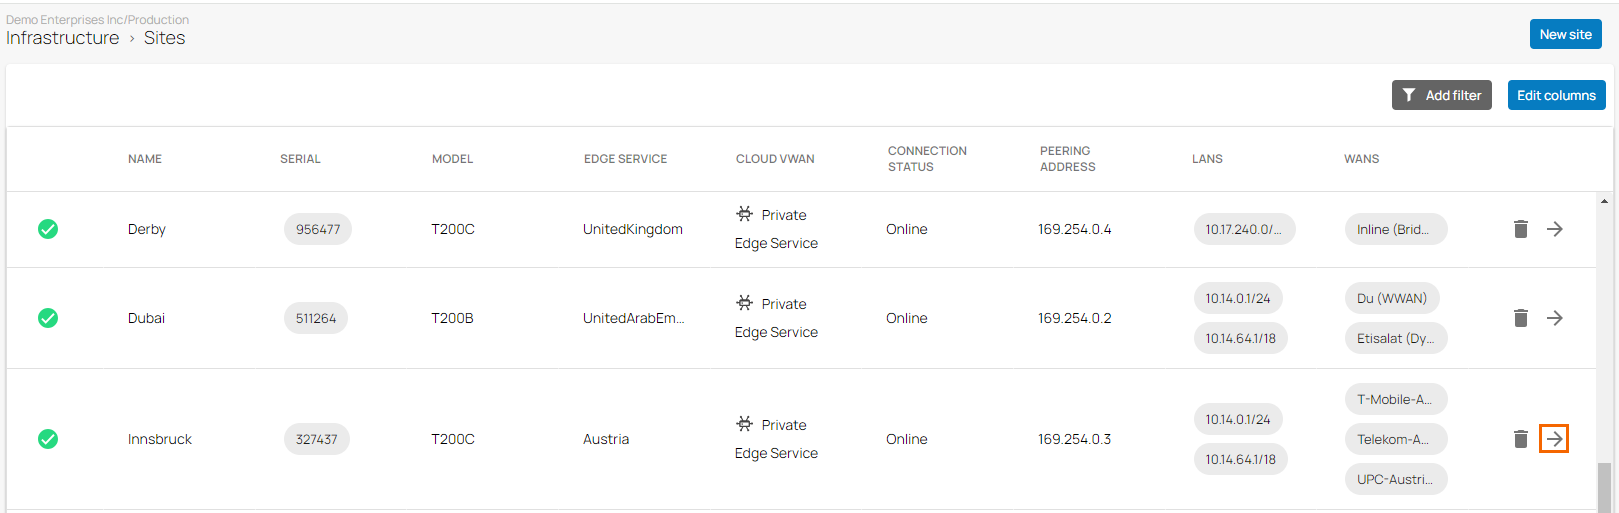
- Go to https://se.barracudanetworks.com and log in with your existing Barracuda Cloud Control account.
- Select the workspace containing your site.
- Go to Infrastructure > Sites. The Sites page opens.
- Select the site you want to edit. You can either search for the name or serial, or use filters to tailor the list of displayed sites. You can also simply scroll through the list. Click on the arrow icon next to the site you want to configure.
- In the site menu, go to Settings > WAN and click Add WAN Interface.
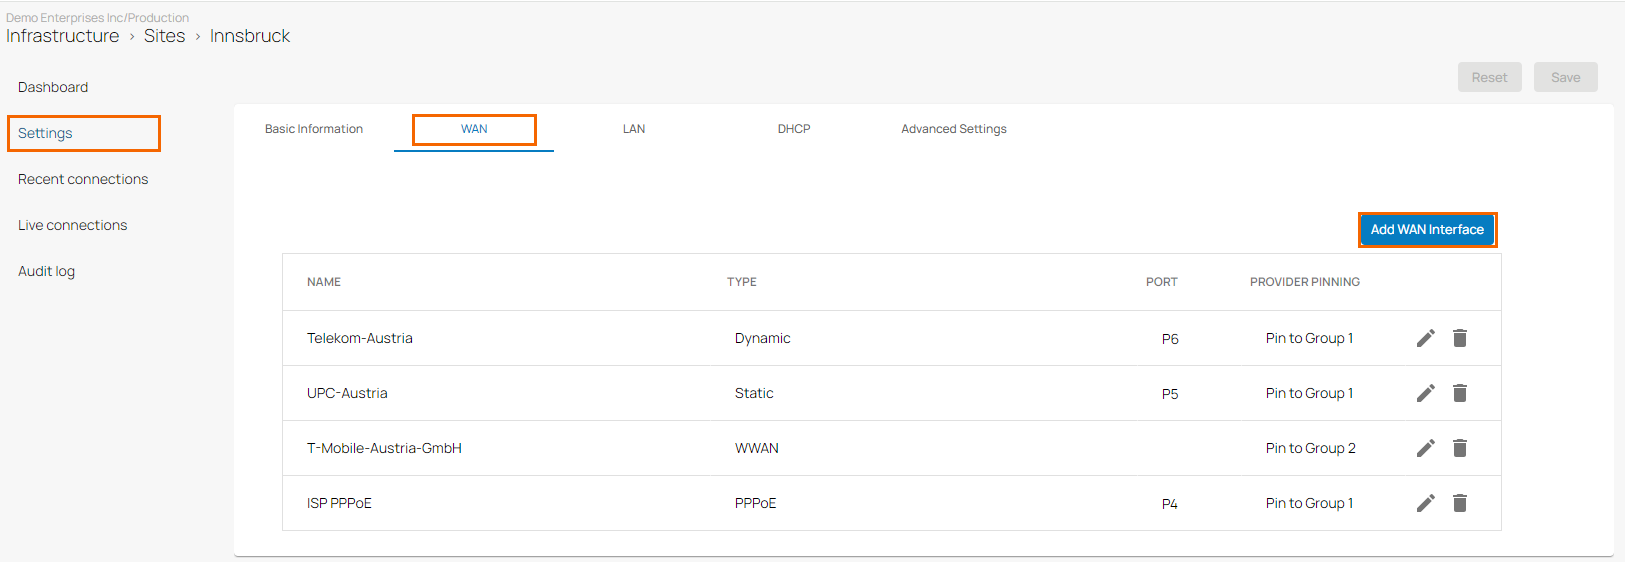
- The Add NEW WAN Interface window opens.
- In the BASIC tab, specify values for the following:
- Name – Enter a unique name for your uplink.
- Type – Select Static from the drop-down list as the network type.
- Port – Select the port where your uplink is connected to. Default for DHCP connections is p4. Note: Port 1 is reserved for High Availability
- Virtual LAN ID (Optional) – If required, enter the Virtual LAN ID this interface is connected to. Note: You can use if connecting to a switch with virtual LAN support.
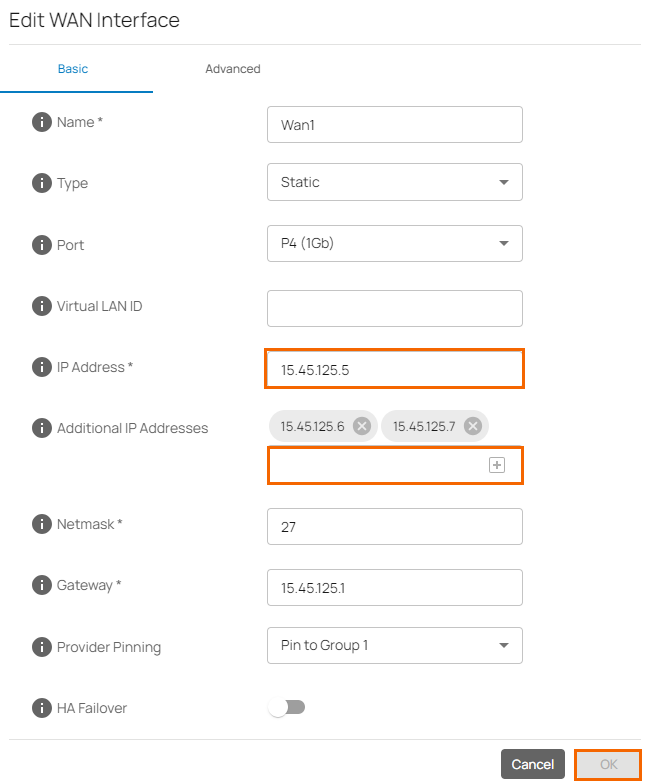
- IP Address – Enter the IP address assigned to your appliance.
- Additional IP Addresses – Enter one or more valid additional IP addresses and click +. Note: You must enter valid and distinct additional IP addresses.
- Netmask – Enter the CIDR netmask suffix.
- Gateway – Enter the gateway IP address.
- Provider Pinning – Select a provider classification from the drop-down list.
- HA Failover – Only available in a High Availability cluster. Click to enable. For more information, see How to Enable Interface Monitoring in a High Availability Cluster.
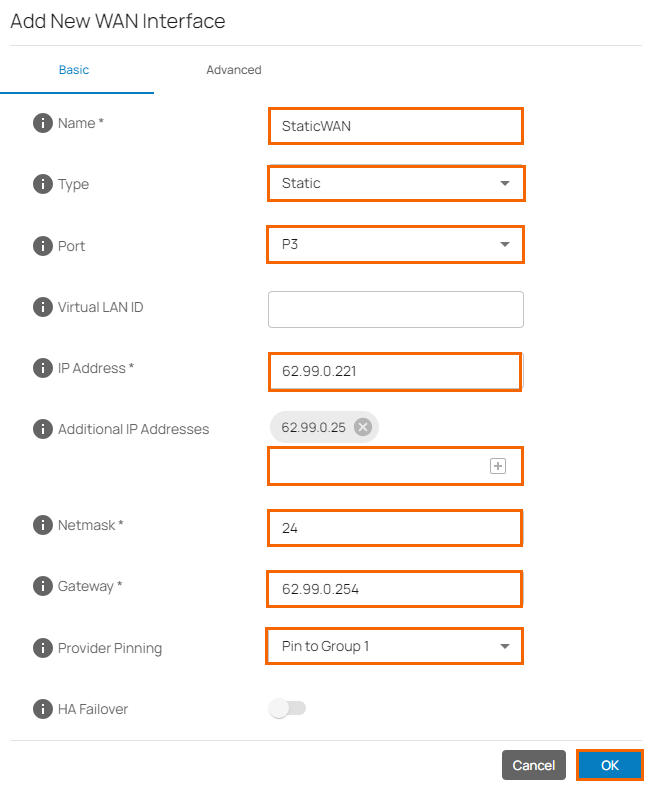
- Click OK.
- Click Save.
After the configuration is complete, you can verify that changes to the static WAN setting in the Audit Log have been made and that notifications have been sent.
Edit an Existing Static WAN Configuration
If you configure multiple IPs for a static WAN interface for a Site or a private Edge Service, you can change an existing static WAN interface either to be a primary IP address or an additional IP address for a selected Site or a private Edge Service:
- Go to https://se.barracudanetworks.com and log in with your existing Barracuda Cloud Control account.
- In the left menu, click the Tenants/Workspaces icon and select the workspace containing your private Edge Service.
- Go to Infrastructure > Edge Services. The Edge Services page opens.
- Select the private Edge Service you want to edit. Click on the arrow icon next to the private Edge Service you want to edit.
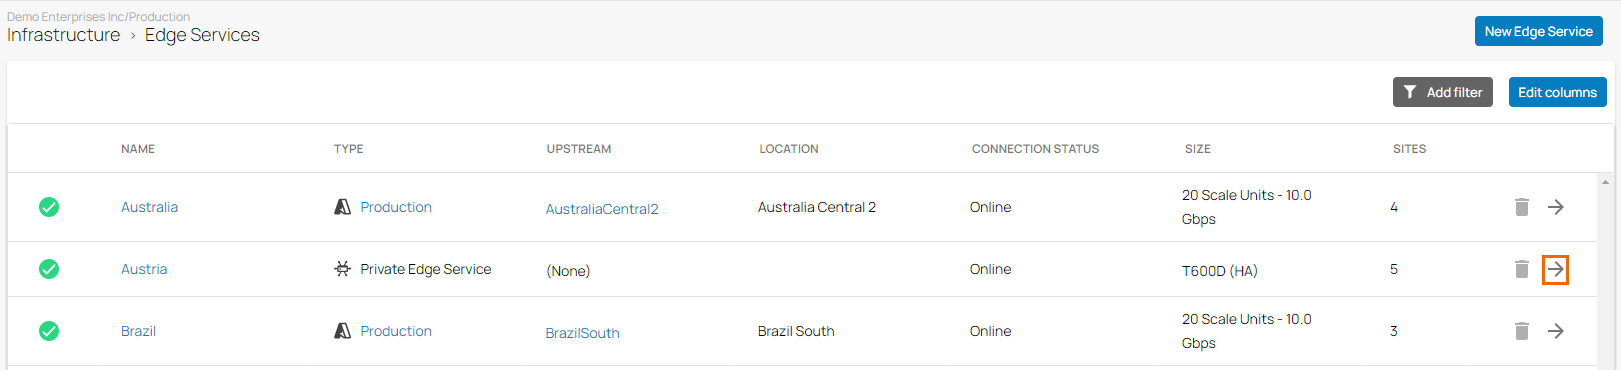
- In the Edge Services menu, go to Settings > WAN and click on the pencil icon next to the WAN interface you want to edit.
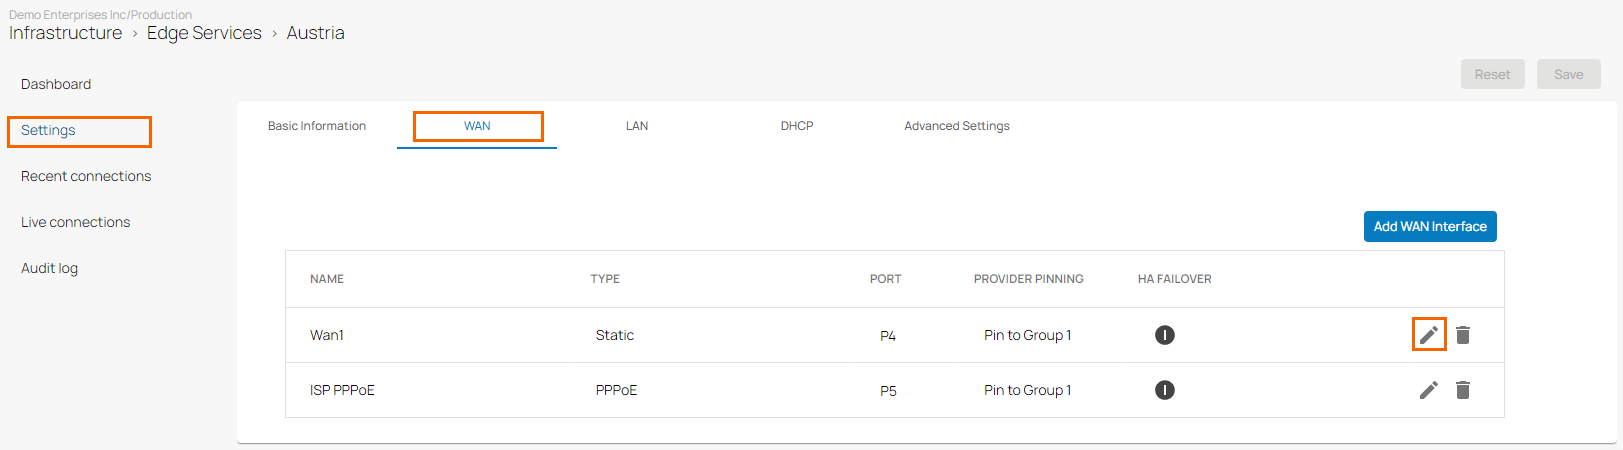
- The Edit WAN Interface window opens. Edit the value you are interested in. For example, for a static WAN configuration, you can edit the primary IP address and an additional IP address. When adding or removing additional IP addresses, click + or -x accordingly.
- Click OK.
- Click Save.
(Optional) Ingress NAT - Edit Static WAN Configuration
If you configure multiple IPs for a static WAN interface for a Site or a private Edge Service, you must select one of the IP addresses configured on the static WAN interface. In other words, you can select either a primary IP address or an additional IP address for a selected Site or a private Edge Service. By default, the primary IP address is used. For more information, see How to Create Ingress NAT Rules. To edit static WAN interface settings on an existing ingress NAT rule:
- Go to https://se.barracudanetworks.com and log in with your existing Barracuda Cloud Control account.
- Select the workspace containing your Site or private Edge Service, and click the Security Policy icon.
- Expand the Network ACL menu and select Ingress NAT.
- The Ingress NAT window opens. Click on the pencil icon next to the rule you want to edit.
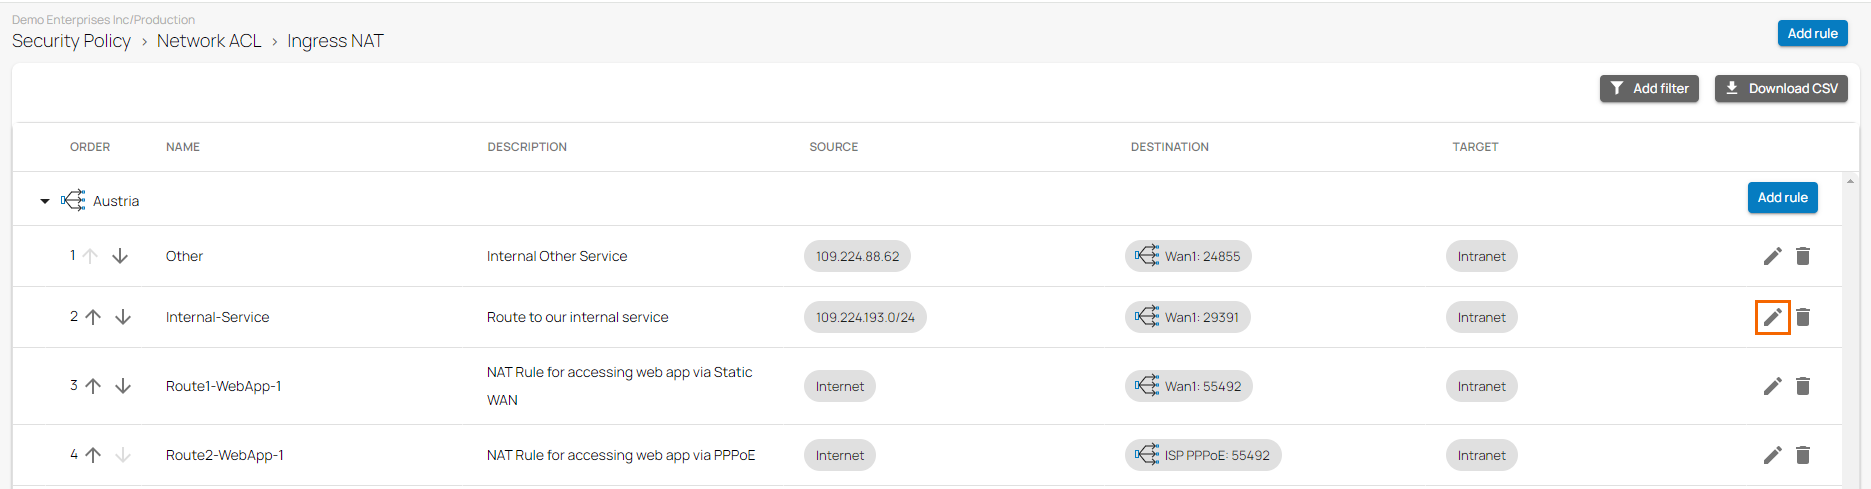
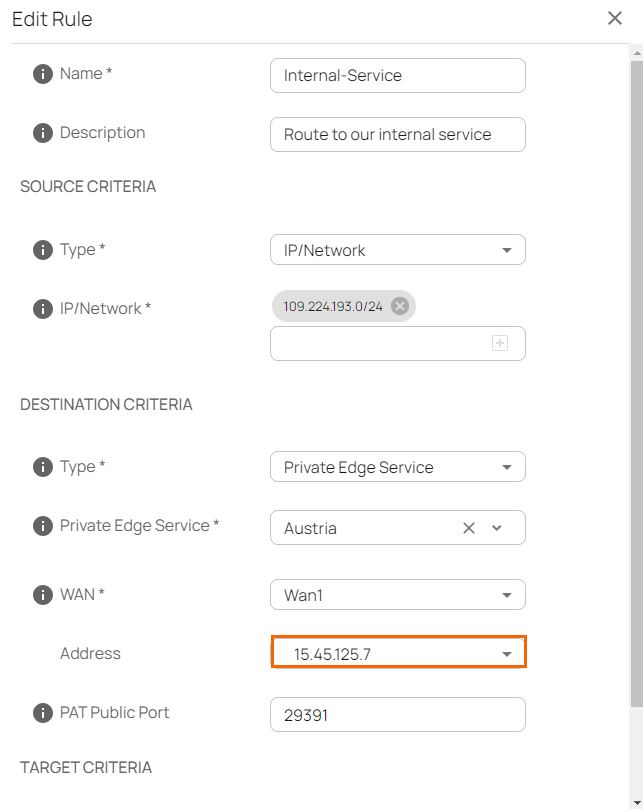
The Edit Rule window opens. Edit the value you are interested in.
Note that in the DESTINATION CRITERIA section of an ingress NAT rule, you can now choose either a Primary Address or Additional Addresses to be configured on this static WAN interface. In other words, when selecting a static WAN interface as the destination of an ingress NAT rule, you need to select a single IP configured on this static WAN interface: either the primary IP address or an additional IP address. For example, in this case, the selected Additional Address =
15.45.125.7.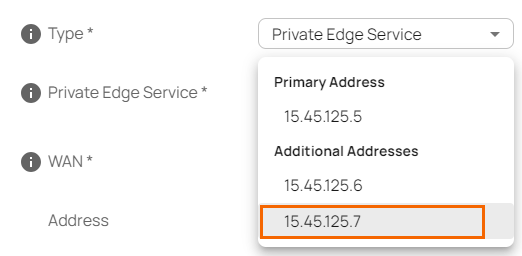
- Click Save.
(Optional) IPsec VPN Tunnel - Selection of an IP address for a Static WAN Configuration
If you configure multiple IPs for a static WAN interface for a Site or a private Edge Service, you must select one of the IP addresses configured on the static WAN interface. You can select either the primary IP address or an additional IP address on an IPsec VPN tunnel. By default, the primary IP address is used.
Go to https://se.barracudanetworks.com and log in with your existing Barracuda Cloud Control account.
- In the left menu, click the Tenants/Workspaces icon and select the workspace you want to configure the IPsec IKEv2 tunnel for.
Go to Integration > IPsec VPN.
- The IPsec VPN page opens. To add a tunnel, click Add IPsec Tunnel.
- The Create IPsec Tunnel window opens.
- After completing the General tab configuration, click Next.
In the Source/Destination tab, specify values for the following:
Enable BGP – Click to disable.
In the SOURCE section, specify values for the following:
Type – Select the type from the drop-down list. You can choose either Edge Service or Site.
Peer – Select the peer from the drop-down list.
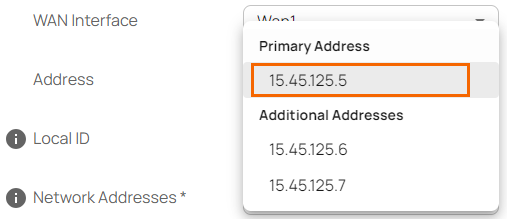
WAN Interface – Select the WAN interface from the drop-down list.
- If you select Static WAN, specify the value for the following:
Address – Select the address from the drop-down menu. You can choose either a Primary Address or Additional Addresses. For example, in this case, the Edge Service is a private Edge Service called Austria, the WAN Interface is Wan1, and the Primary Address is 15.45.125.5.
- If you select Static WAN, specify the value for the following:
- Local ID – Enter the local ID.
- Network Addresses – Add the IP address of the local network, and click +.
In the DESTINATION section, specify values for the following:
Remote Gateway – Enter a remote gateway.
Remote ID – Enter a unique ID. VPN tunnels without remote ID will not establish successfully.
Network Address – Add the IP address of the remote network, and click +.

- Click Next.
- Complete all remaining configuration steps for the Phases and Network tabs.
- Click Save.
After the configuration is complete, you can see a new IPsec tunnel is shown on the IPsec VPN page, and the status of the IPsec tunnel can be verified. For more information, see IPsec VPN.