

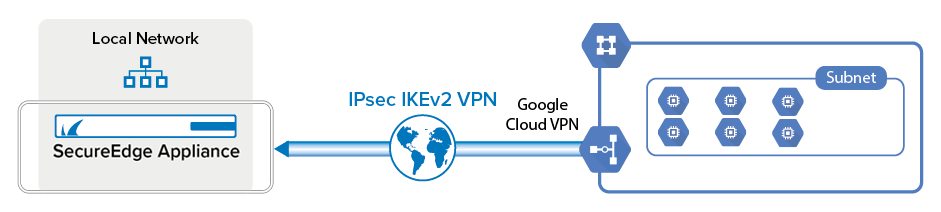
To connect to the Google Cloud VPN gateway, create an IPsec IKEv2 site-to-site VPN tunnel on your SecureEdge, and configure BGP to exchange information with the Google BGP peer.
Before You Begin
You will need the following information:
Public IP address of your SecureEdge Private Edge Service (on-premises)
(private) ASN number
Create a VPC network in Google Cloud.
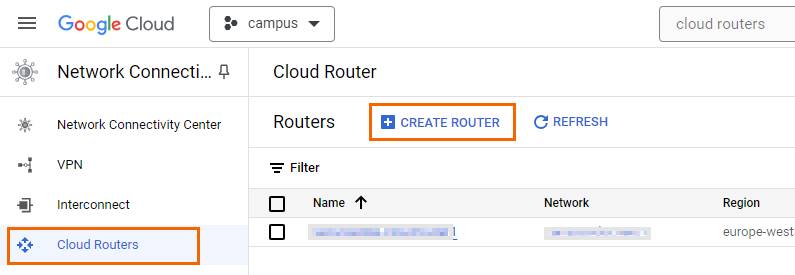
Step 1. Create a Google Cloud Router
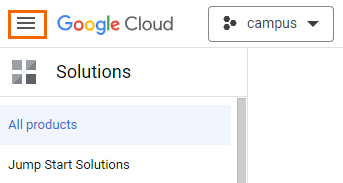
Click the hamburger menu in the upper-left corner.
In the Networking section, click Network Connectivity.
In the left menu, click + Cloud Routers.
In the main area, click CREATE ROUTER.
Configure the settings for the Google Cloud router:
Name – Enter a name for the cloud router.
Network – Select the network from the list.
Region – Select the region from the list.
Google ASN – Enter a private ASN. This ASN number must be unique in your network.
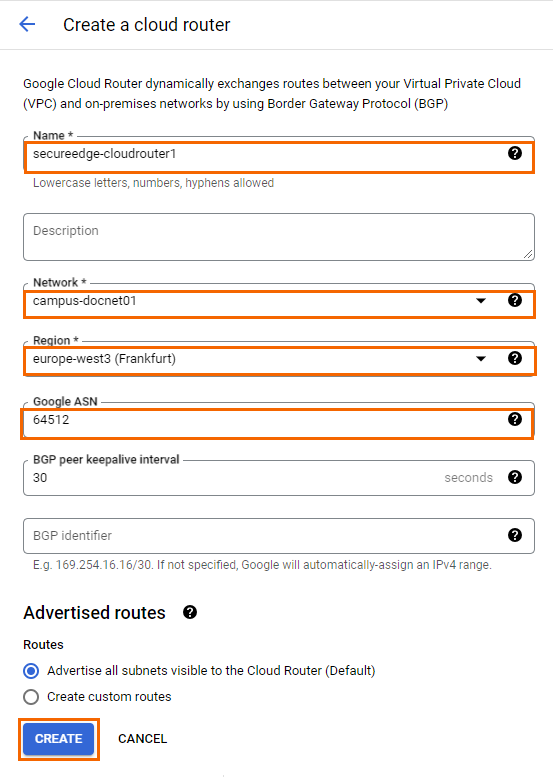
Click Create.

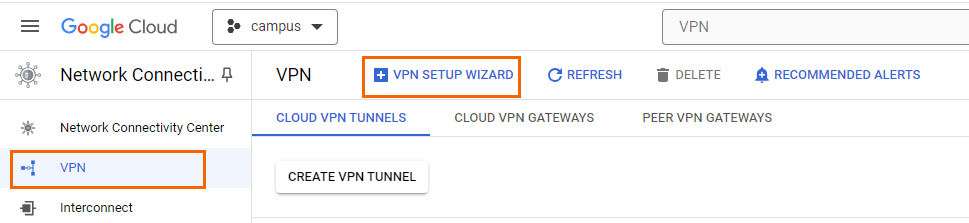
Step 2. Create a Google VPN
Click the hamburger menu in the upper-left corner.
In the Networking section, click Network Connectivity.
In the left menu, click VPN.
In the main area, click + VPN SETUP WIZARD.
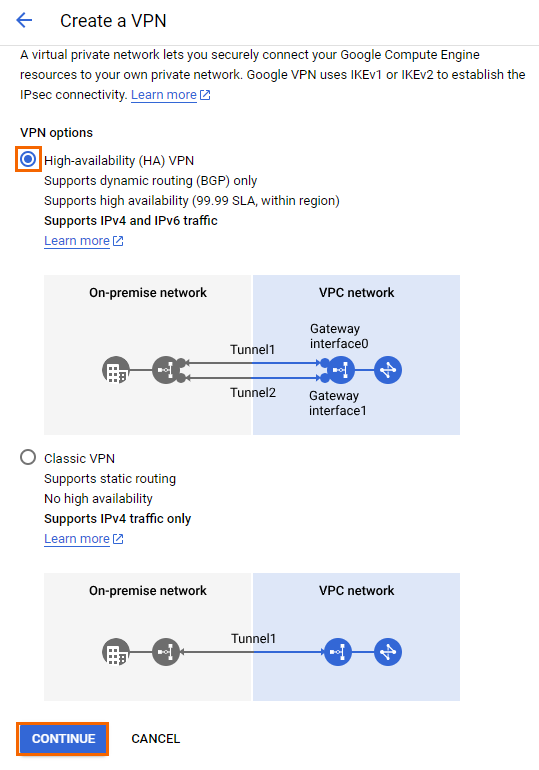
The Create a VPN page opens. Select High-availability (HA) VPN and click CONTINUE.
Configure the Create Cloud HA VPN gateway settings:
VPN gateway name – Enter a name.
Network – Select your Google Cloud network from the list.
Region – Select the region for the Google VPN gateway. Select a location close to your on-premises SecureEdge appliance.
VPN gateway IP version – Select an HA VPN gateway IP version. Note that the IP version of the HA VPN gateway and the peer VPN gateway must be the same.
VPN gateway IP stack type – Select a stack type for the VPN gateway.
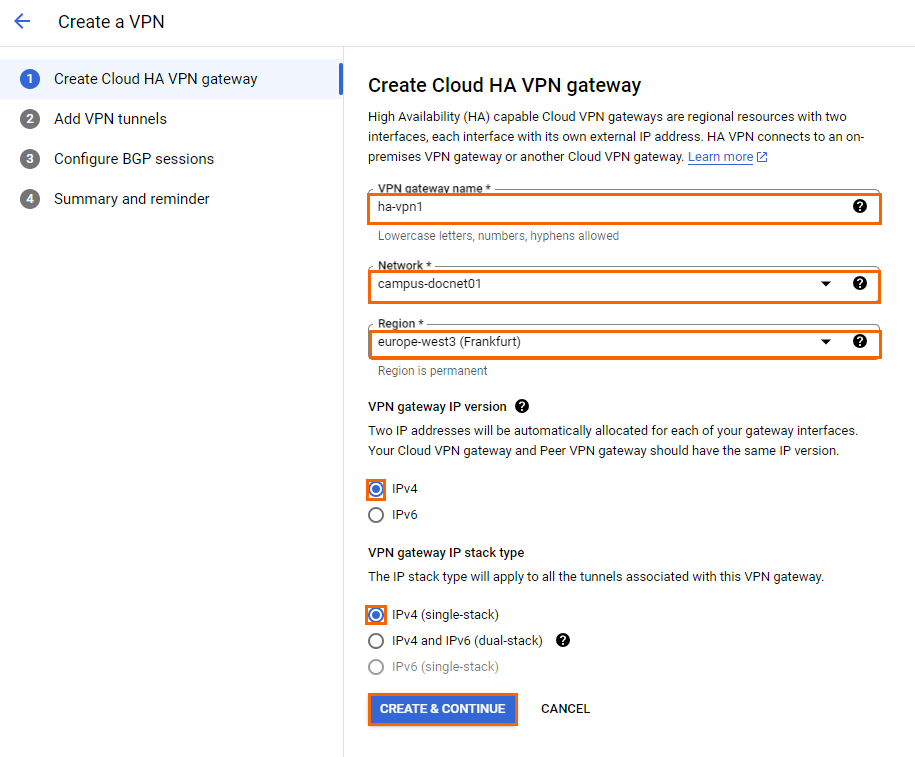
Click CREATE & CONTINUE.
You can see that two external IP addresses are automatically allocated for each of your gateway interfaces. Make a note of the details of your gateway configuration for future use.
Configure a VPN tunnel in the Add VPN tunnels settings:
Peer VPN gateway – Select On-prem or Non Google Cloud.
Peer VPN gateway name – Select an existing peer VPN gateway from the drop-down menu or click Create a new peer VPN gateway. Note: This peer VPN gateway resource represents your remote peer gateway. Under Peer VPN gateway interfaces, you can select one, two, or four interfaces, depending on the type of interfaces your peer gateway has, and specify the external IP address used for that interface. E.g.,
80.109.163.8.High Availability – Select Create a single VPN tunnel. Note: A single tunnel does not provide high availability. However, you can add more tunnels later when needed.
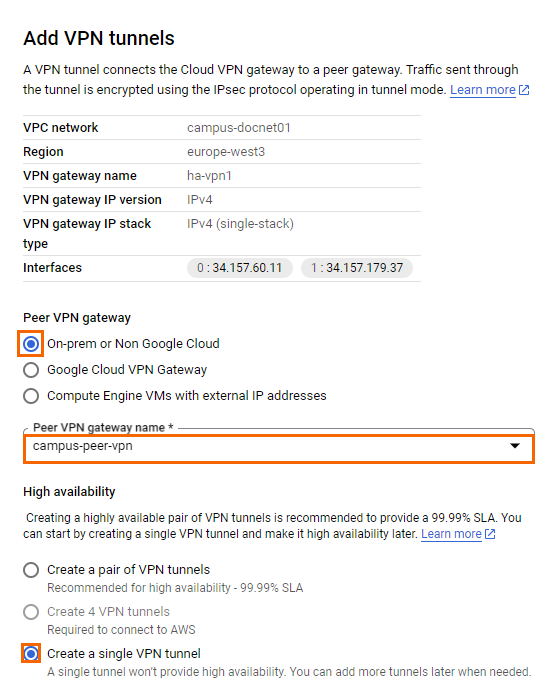
Verify that the Routing Options display as Dynamic (BGP).
Cloud router – Select the cloud router created in Step 1.
Name – Enter the name.
IKE version – Select IKEv2
IKE pre-shared key – Enter either a passphrase as the shared secret, or click GENERATE AND COPY. Note: Make sure you record the pre-shared key in a secure location.
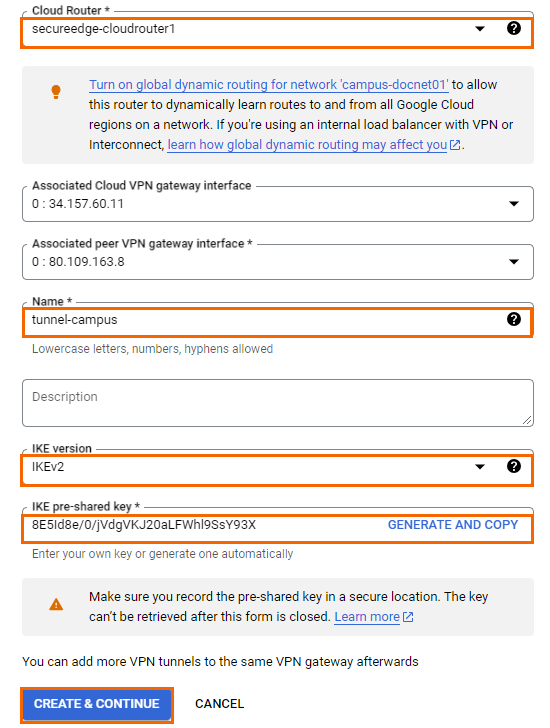
Click CREATE & CONTINUE.
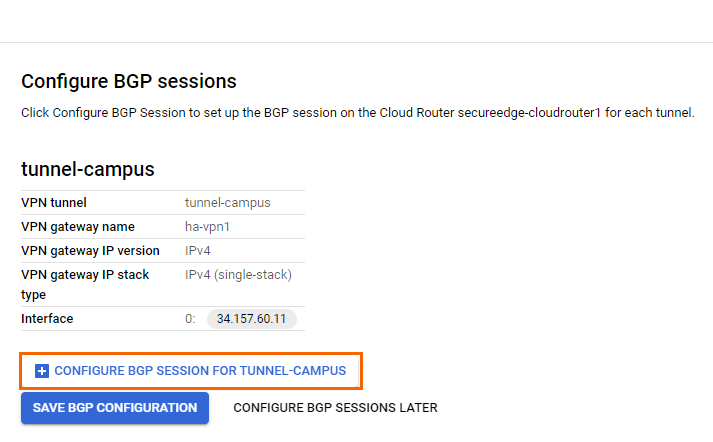
The Configure BGP sessions page opens.
Click CONFIGURE BGP SESSION FOR <TUNNEL-CAMPUS> to configure BGP session.
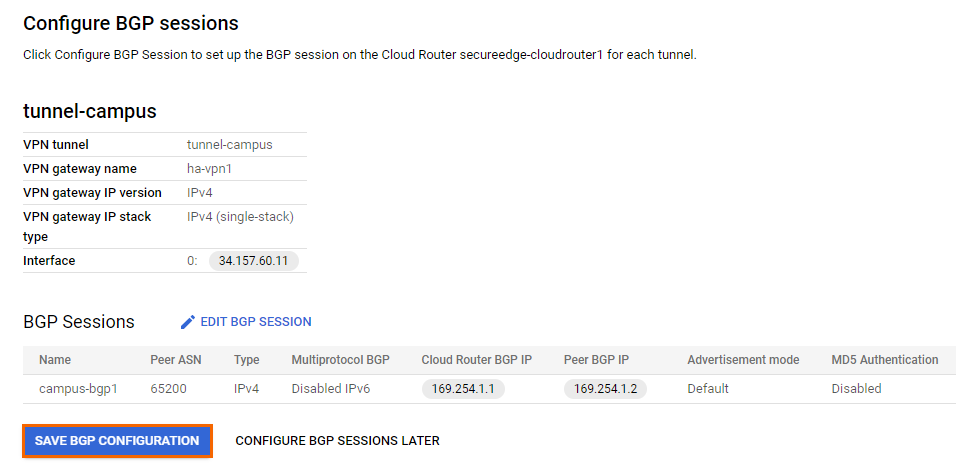
The Create BGP session page opens. Configure the BGP session for the cloud router:
BGP session type – Select IPv4 BGP session.
Name – Enter a name for the BGP configuration.
Peer ASN – Enter the ASN assigned to the on-premises SecureEdge appliance.
(optional) Advertised route priority – Enter a priority value. Routes with higher priorities are preferred.
Allocate BGP IPv4 address – Select Manually.
Cloud Router BGP IPv4 address – Enter the first IP address in a private /30 subnet. The IP address must be in the same /30 network as the peer BGP IP address: E.g.,
169.254.1.1Peer BGP IPv4 address – Enter the second IP address in the private /30 subnet used for the Google BGP IP address. E.g.,
169.254.1.2
Click SAVE AND CONTINUE.
Verify the BGP session you have configured and click SAVE BGP CONFIGURATION.
The Summary and reminder page opens.
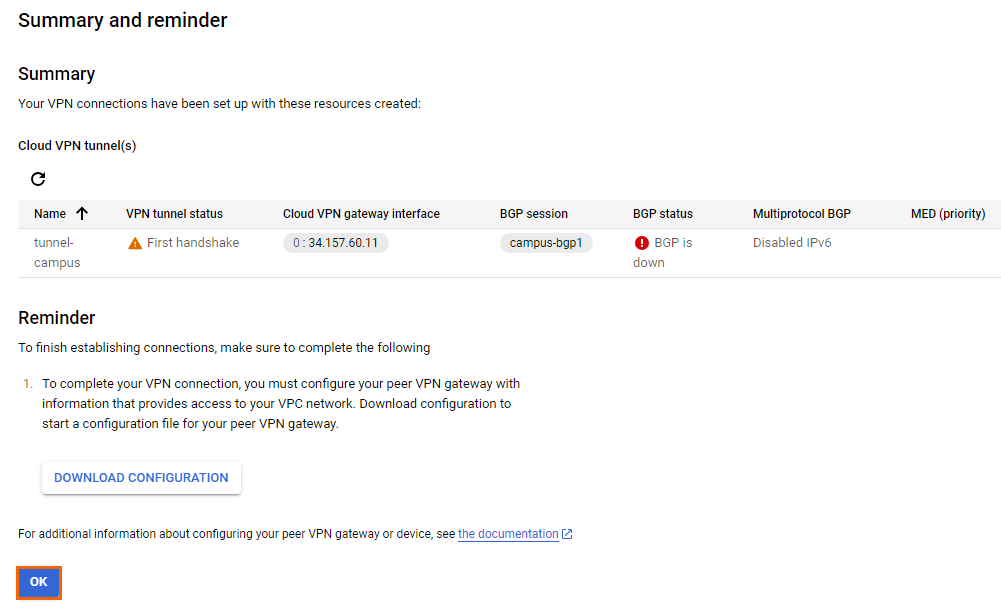
Click OK.
Wait for the VPN tunnel to be created.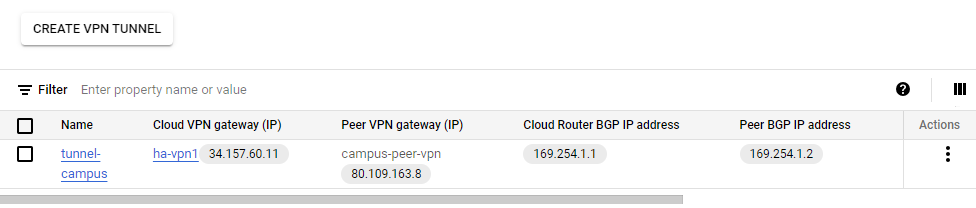
Step 3. Configure an IPsec IKEv2 Site-to-Site VPN on the SecureEdge
Go to https://se.barracudanetworks.com and log in with your existing Barracuda Cloud Control account.
The chosen Tenant/Workspace is displayed in the top menu bar.
Click the expandable drop-down menu and select the workspace you want to configure the IPsec IKEv2 tunnel for.
Go to Integration > IPsec VPN. The IPsec VPN page opens. To add a tunnel, click Add IPsec Tunnel.
The Create IPsec Tunnel window opens.
In the General tab, specify values for the following:
Enable – Click to enable.
Initiates – Click to enable.
In the GENERAL INFORMATION section, specify values for the following:
Name – Enter a unique tunnel name. E.g.,
SEtoGoogleVPNGatewayDescription – Enter a brief description.
In the AUTHENTICATION section, specify values for the following:
Authentication – Select Pre-shared key.
Shared Secret – Enter the Google IKE pre-shared key created in Step 2.
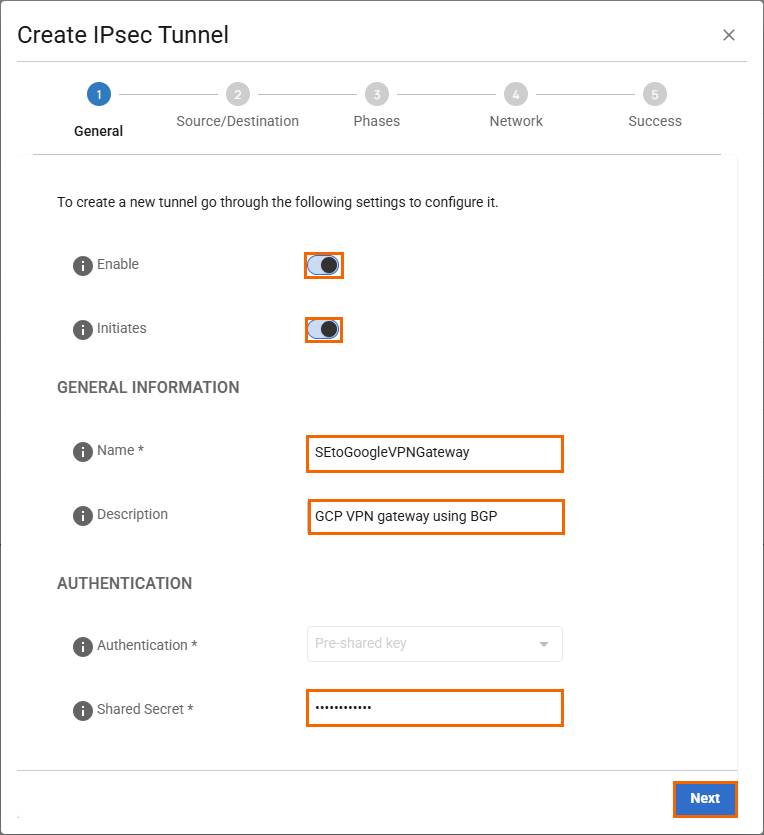
Click Next.
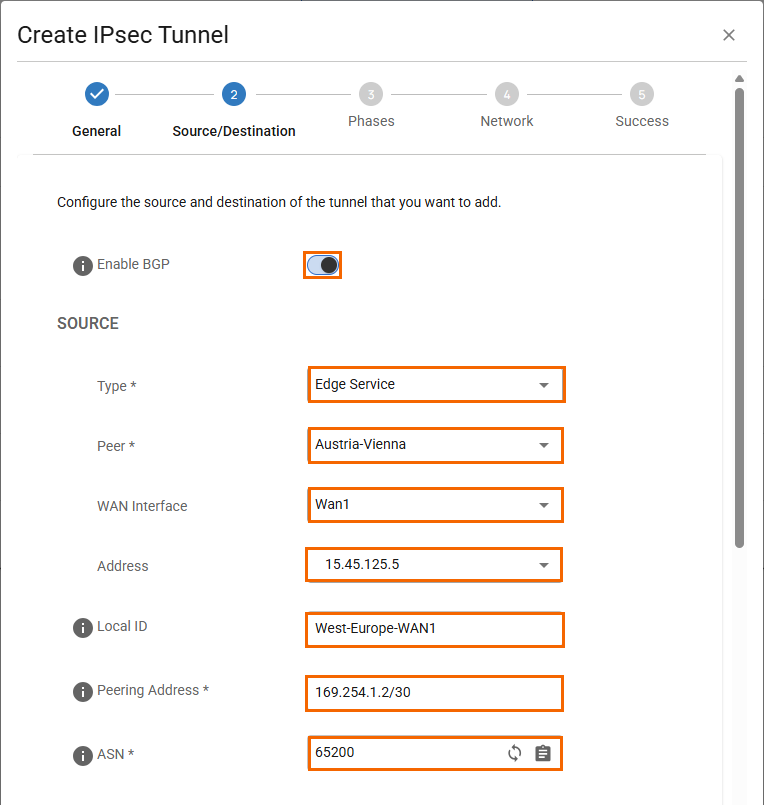
In the Source/Destination tab, specify values for the following:
Enable BGP – Click to enable.
In the SOURCE section, specify values for the following:
Type – Select Edge Service or Site.
Peer – Select peer. E.g., Austria-Vienna, a Private Edge Service.
WAN Interface – Select Wan1. Note : Wan1 is a static WAN interface, and a Primary Address = 15.45.125.5 is selected.
Local ID – Enter
West-Europe-WAN1.Network Addresses – Enter the peer BGP IP address from Step 2. E.g.,
169.254.1.2/30ASN – Enter 65200
In the DESTINATION section, specify values for the following:
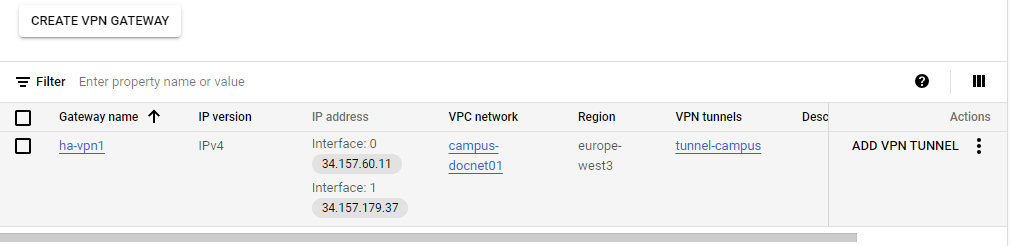
Remote Gateway – Enter the gateway IP address of the Google Cloud VPN. E.g.,
34.157.60.11Remote ID – Enter the gateway IP Address of the Google Cloud VPN. E.g.,
34.157.60.11Network Address – Enter the Google VPN IP address. E.g.,
169.254.1.1ASN – Enter 64512
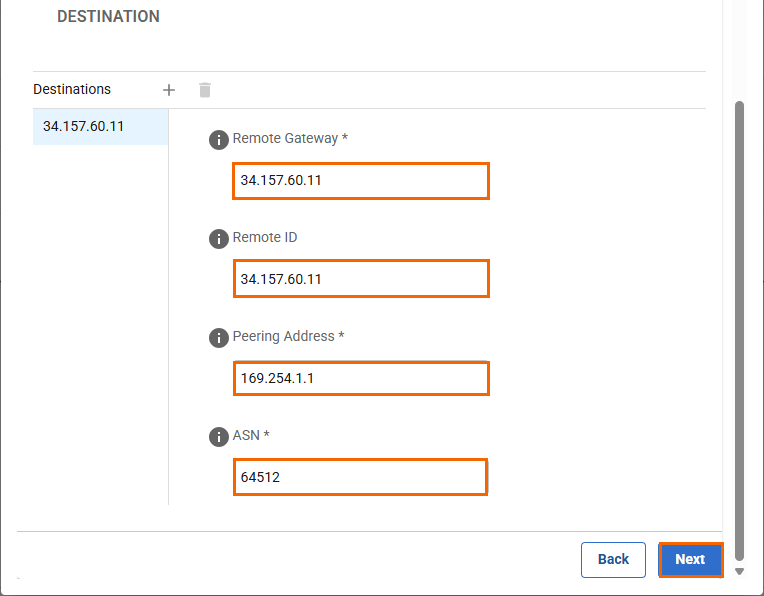
Click Next.
In the Phases tab, enter the Phase1 and Phase2 encryption settings:
PHASE 1
Encryption – Select AES.
Hash – Select MD5.
DH-Group – Select Group 2.
Proposal Handling – Select Strict.
Lifetime – Enter
28800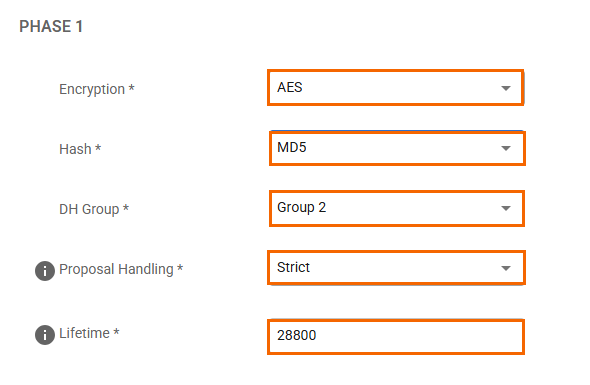
PHASE 2
Encryption – Select AES.
Hash – Select SHA.
DH-Group – Select Group 14.
Proposal Handling – Select Strict.
Lifetime – Enter
3600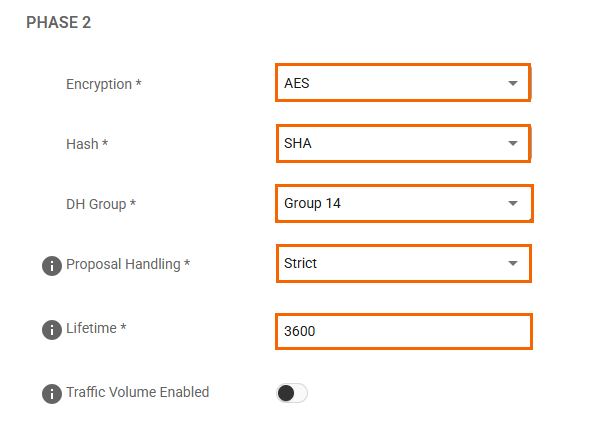
Click Next.
In the Network tab, specify the values for the following:
In the NETWORK SETTINGS section, specify the values for the following:Force UDP Encapsulation – Click to enable.
IKE Reauthentication – Click to enable.
In the DEAD PEER DETECTION section, specify the values for the following:
Action When Detected – Select Restart.
Delay – Enter
1800
Click Save.
Verify that your IPsec tunnel configuration has been created successfully and click Finish.