When deploying a virtual Barracuda CloudGen Firewall or a hardware version of the Barracuda CloudGen Firewall F-Series, basic settings must be configured before the system can be used in production. There are some differences, depending on the deployment option you choose (hardware, virtual, or public cloud).
Before You Begin
Make sure you completed the steps listed in the deployment articles, depending on which platform you are deploying the firewall on:
- Hardware – Complete Hardware deployment and the included Quick Start Guide. The Quick Start Guide is included in the box with every firewall. Your PC must be connected to the management port of the CloudGen Firewall F-Series and use an IP address in the 192.168.200.0/24 range on your local NIC while connecting to port 1. Do not use 192.168.200.200, this IP address is the default management IP address of the Barracuda CloudGen Firewall.
- Virtual (Vx) – Complete the deployment steps in Virtual Systems (Vx) for your hypervisor.
- Public Cloud – Complete the steps in Public Cloud for your public cloud provider.
Step 1. Prepare the Client
To connect to the firewall, you must use the Barracuda Firewall Admin application. The application is a stand-alone, portable executable. Always use the latest version of Barracuda Firewall Admin. You can download the version from the Barracuda Customer Portal.
For more information on the system requirements, and Barracuda Firewall Admin, see Barracuda Firewall Admin.
Step 2. Log into the Barracuda CloudGen Firewall
Connect to your firewall using Barracuda Firewall Admin:
- Launch the Barracuda Firewall Admin application.
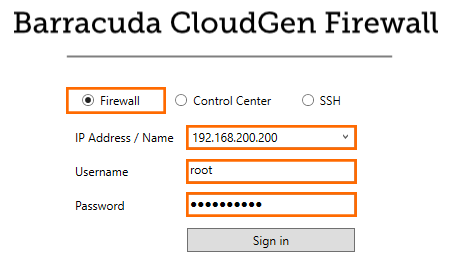
Select Firewall in the Log in window.
Provide Management IP, Username, and Password:
Management IP Address Username Default Password Hardware 192.168.200.200 root ngf1r3wall Virtual (Vx) Set during deployment root ngf1r3wall Public Cloud - Amazon AWS Elastic IP pointing to the Barracuda CloudGen Firewall instance root Instance ID of your Barracuda CloudGen Firewall instance E.g., i-0aaaa123 Public Cloud - Microsoft Azure <your cloud service>.cloudapp.net or Virtual IP (VIP) for the cloud service root - Set during deployment
- If not set during deployment: ngf1r3wall
Public Cloud - Google Cloud Static external IP address assigned to the firewall instance root Name of the instance Public Cloud - VMware vCloud Air Set during deployment root ngf1r3wall 
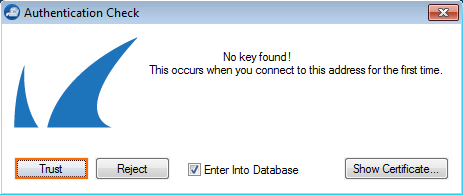
- Click Sign In. The Authentication Check window opens.
- Click Trust.

Step 3. Configure Basic Settings
The box wizard can only be used on hardware units. If you are deploying a virtual firewall, you must configure the time zone and change the password manually.
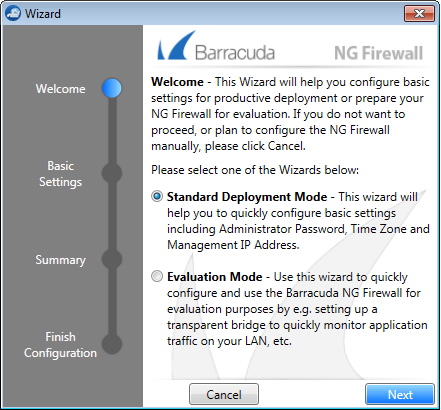
Step 3.1 Complete the Wizard for the Barracuda CloudGen Firewall
If you are using a hardware appliance, the wizard helps you configure basic settings during deployment. Follow the instructions for the Standard Deployment Mode. Skip this step if you are connected to a CloudGen Firewall in the public cloud because these settings were already configured during deployment.

Step 3.2 Configure the Time Zone and Change the Root Password for the Virtual Barracuda CloudGen Firewall
When using a virtual firewall, complete the following tasks:
| Task | Link |
|---|---|
| Password change | How to Change the Root Password and Management ACL |
| Set the time zone | Step 1 in How to Configure Time Server (NTP) Settings |
| (optional) Change the management IP address | How to Configure the Management Network, IP, and Shared IPs in the Management Network |
Step 4. Configure an Internet Connection
If you are deploying a firewall that must connect to the Internet via ISP, configure the Internet connection. Skip this step if your firewall can already access the Internet via the management interface. Hardware firewalls have a port preconfigured to receive the IP address via DHCP:
- F18 - F800 – DHCP client listens on port p4.
- F900 – DHCP client listens on port A4.
- F1000 – DHCP client listens on port D4.
Complete the configuration for your type of Internet connection:
| Internet connection type | Link |
|---|---|
| Static IP address | How to Configure an ISP with Static IP Addresses |
| DHCP | How to Configure an ISP with Dynamic IP Addresses (DHCP) |
| xDSL (PPP, PPPoE and PPTP) | xDSL WAN Connections |
| Wireless WAN | How to Configure an ISP using a WWAN Modem |
| ISDN | How to Configure an ISP with ISDN |
Step 5. Activate and License Your Barracuda CloudGen Firewall
For the firewall to get licensed, the Barracuda Firewall Admin application must be able to connect to the Internet directly or via proxy. For hardware appliances, you only need to activate the unit; licenses are automatically downloaded and installed afterwards. For virtual and public cloud systems, you must enter a license token before activating your unit. If you are licensing a CloudGen Firewall that is to be used in a high availability cluster, activate the secondary unit first. For more information, see How to Activate and License a Standalone High Availability Cluster.
| License Installation | Link | |
|---|---|---|
| Hardware |
| How to Activate and License a Stand-alone Hardware CloudGen Firewall Appliance |
| Virtual (Vx) + Public Cloud |
| How to Activate and License a Stand-Alone Virtual or Public Cloud Firewall or Control Center |
Step 6. Configure Administrative Settings
Configure the firewall to use your preferred DNS and NTP servers. To receive email notifications from selected services, you must configure a recipient email address.
| Link | |
|---|---|
| DNS Servers | How to Configure DNS Settings |
| NTP Servers | Step 2 in How to Configure Time Server (NTP) Settings |
| System Email Notification Address | How to Configure System Email Notifications |
Next Steps
Continue with the steps below to set up the system according to your needs.
| Link | |
|---|---|
| Configure VLANs and Routing; add additional network interfaces. | Network |
| Create and configure Services (e.g., Forwarding Firewall, VPN,...). | |
| Configure external authentication servers. | Authentication |
| Configure administrator accounts. | Managing Access for Administrators |
| Create a high availability cluster. | High Availability |
