To connect to your Azure virtual network with your on-premises CloudGen Firewall, Microsoft offers the Azure VPN Gateway in two different versions: static and route-based. The route-based VPN Gateway allows connection for up to 10 on-premises firewalls. To connect to the VPN Gateway, configure an IPsec IKEv2 site-to-site VPN tunnel on your CloudGen Firewall. The CloudGen Firewall must be configured as the active partner. The following instructions are for Azure Resource Manager deployments.

Before You Begin
- You will need the following information:
- VPN Gateway
- Public IP address of your on-premises CloudGen Firewall
- Remote and local networks.
- Install and configure Azure PowerShell 4.1.0 or higher.
Step 1. Create a Dynamic Microsoft Azure VPN Gateway Using Azure Resource Manager and PowerShell
Use Azure PowerShell to create a routed-based VPN Gateway.
- Open Azure PowerShell.
Connect to your Azure account:
Login-AzureRmAccount- Enter your Azure account credentials and click Login.
Create a resource group:
New-AzureRmResourceGroup -Name YOUR_RESOURCE_GROUP -Location YOUR_LOCATIONCreate the network configuration for the VPN gateway subnet and two Azure subnets. The VPN gateway subnet must use the name GatewaySubnet.
$vpnsubnet = New-AzureRmVirtualNetworkSubnetConfig -Name "GatewaySubnet" -AddressPrefix 10.2.1.0/28
$subnet1 = New-AzureRmVirtualNetworkSubnetConfig -Name "Subnet1" -AddressPrefix 10.2.2.0/24
$subnet2 = New-AzureRmVirtualNetworkSubnetConfig -Name 'Subnet2' -AddressPrefix 10.2.3.0/24
Create the virtual network:
New-AzureRmVirtualNetwork -Name VNET_NAME -ResourceGroupName YOUR_RESOURCE_GROUP -Location YOUR_LOCATION -AddressPrefix 10.2.0.0/16 -Subnet $vpnsubnet,$subnet1,$subnet2Create the local VPN Gateway configuration. Use the public IP address your firewall is using to connect to the Azure VPN Gateway. Replace the LOCAL_SUBNET variables with a list of the local subnets behind your firewall.
New-AzureRmLocalNetworkGateway -Name OnPremiseVPNGateway -ResourceGroupName YOUR_RESOURCE_GROUP -Location YOUR_LOCATION -GatewayIpAddress YOUR_PUBLIC_IP
-AddressPrefix @('LOCAL_SUBNET1','LOCAL_SUBNET2')
Create an Azure public IP address and store it in a variable for later use.
$gwpip = New-AzureRmPublicIpAddress -Name gwpip -ResourceGroupName YOUR_RESOURCE_GROUP -Location YOUR_LOCATION -AllocationMethod DynamicCreate variables for virtual network, VPN subnet, and gateway IP configuration.
    $vnet = Get-AzureRmVirtualNetwork -Name VNET_NAME -ResourceGroupName YOUR_RESOURCE_GROUP
    $vpnsubnet = Get-AzureRmVirtualNetworkSubnetConfig -Name 'GatewaySubnet' -VirtualNetwork $vnet
    $gwipconfig = New-AzureRmVirtualNetworkGatewayIpConfig -Name gwipconfig1 -SubnetId $vpnsubnet.Id -PublicIpAddressId $gwpip.Id
Create the routed-based (dynamic) VPN Gateway attached to the virtual network:
New-AzureRmVirtualNetworkGateway -Name VNET_GW_NAME -ResourceGroupName YOUR_RESOURCE_GROUP -Location YOUR_LOCATION -IpConfigurations $gwipconfig -GatewayType Vpn -VpnType RouteBasedCreate the VPN connection:
$gateway1 = Get-AzureRmVirtualNetworkGateway -Name VNET_GW_NAME -ResourceGroupName YOUR_RESOURCE_GROUP
$local = Get-AzureRmLocalNetworkGateway -Name OnPremiseVPNGateway -ResourceGroupName YOUR_RESOURCE_GROUP
New-AzureRmVirtualNetworkGatewayConnection -Name localtovpn -ResourceGroupName YOUR_RESOURCE_GROUP -Location YOUR_LOCATION -VirtualNetworkGateway1 $gateway1 -LocalNetworkGateway2 $local -ConnectionType IPsec -RoutingWeight 10 -SharedKey YOUR_PASSPHRASE
Creating the VPN connection can take up to 30 minutes to complete. You can now configure the on-premises firewall to connect to the Azure VPN Gateway.
Step 2. Get the VPN Gateway Public IP Address
Get the public IP address allocated for the Azure VPN gateway.
- Open Azure PowerShell
Get the IP address assigned to the VPN gateway:
Get-AzureRmPublicIpAddress -Name gwpip -ResourceGroupName YOUR_RESOURCE_GROUP
Step 3. Configure IPsec IKEv2 Site-to-Site VPN on the CloudGen Firewall
Configure a site-to-site IKEv2 VPN tunnel on the CloudGen Firewall. The firewall is configured as the active partner.
- Go to CONFIGURATION > Configuration Tree > Box > Assigned Services > VPN-Service > Site to Site.
- Click the IPSEC IKEv2 Tunnels tab.
- Click Lock.
- Right-click the table and select New IKEv2 tunnel. The IKEv2 Tunnel window opens.
- In the Tunnel Name field, enter your tunnel name.
- Set Initiates tunnel to Yes.
- Configure the Authentication settings:
- Authentication Method – Select Pre-shared key.
Shared Secret – Enter the passphrase you used when creating the virtual network gateway connection in Step 1.11.

- Configure the Phase 1 encryption settings:
- Encryption – Select AES-256.
- Hash Meth. – Select SHA.
- DH Group – Select Group 2.
- Lifetime – Enter 28800.
- Configure the Phase 2 encryption settings:
- Encryption – Select AES-256.
- Hash Meth. – Select SHA.
- DH Group – Select Disable PFS.
- Lifetime – Enter 3600.

In the Network Settings section, enable Universal Traffic Selectors to instruct the peer to route all traffic into the tunnel.
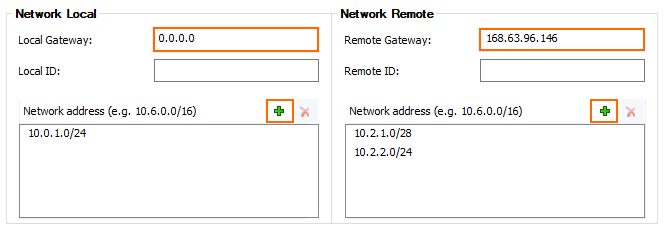
- Configure the Local Network settings:
- Local Gateway – Enter the public IP address the Azure VPN Gateway is connecting to, or use 0.0.0.0 if you are using a dynamic IP address or if the appliance is hosted in Azure, AWS, or GCP.
Network Address – Enter your local on-premise networks and click Add.
- Local Gateway – Enter the public IP address the Azure VPN Gateway is connecting to, or use 0.0.0.0 if you are using a dynamic IP address or if the appliance is hosted in Azure, AWS, or GCP.
- Configure the Remote Network settings:
- Remote Gateway – Enter the Gateway IP Address of the Azure VPN Gateway in Step 2.
- Network Address – Enter the Azure subnet(s) configured in the Azure Virtual Network and click Add.

- Click OK.
Click Send Changes and Activate.
Step 4. Create an Access Rule
Create a pass access rule to allow traffic from the local network to the remote network.
- Go to CONFIGURATION > Configuration Tree > Box > Assigned Services > Firewall > Firewall Rules.
- Click Lock.
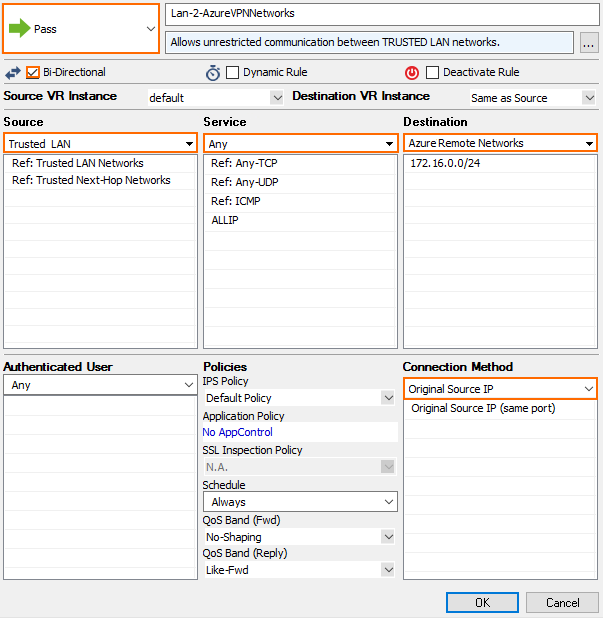
- Create a PASS access rule:
- Bi-Directional – Enable.
- Source – Select the local on-premises network(s).
- Service – Select the service you want to have access to the remote network, or select Any for complete access.
- Destination – Select the network object containing the remote Azure Virtual Network subnet(s).
- Connection Method – Select Original Source IP.

- Click OK.
- Move the access rule up in the rule list, so that it is the first rule to match the firewall traffic.
- Click Send Changes and Activate.
Your Barracuda CloudGen Firewall will now automatically connect to the Azure VPN Gateway.

