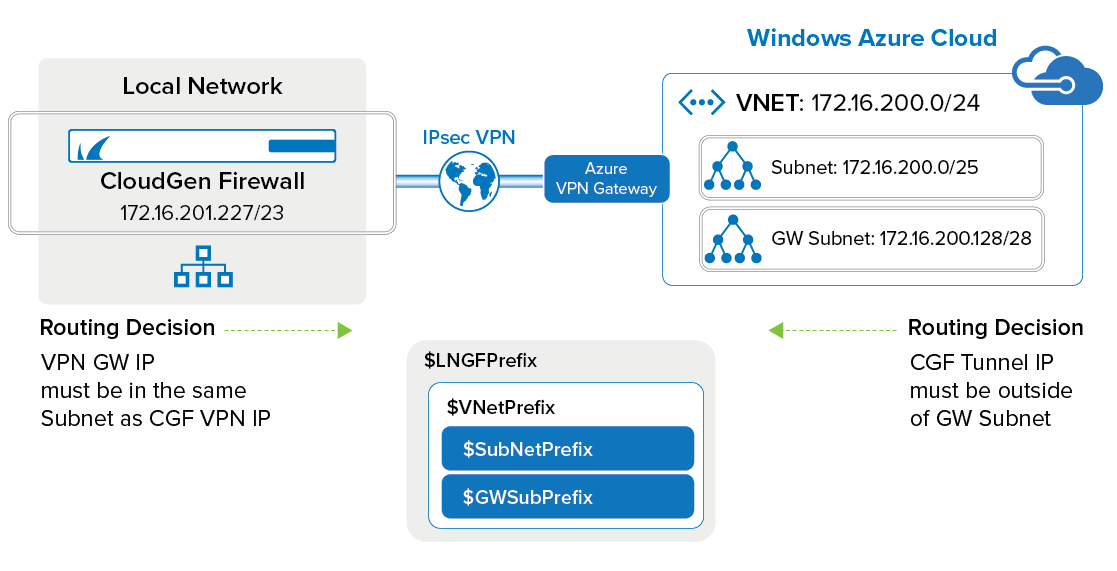
To connect to your Azure virtual network with your on-premises CloudGen Firewall, Microsoft offers the Azure VPN Gateway in three different versions: basic, standard, and high performance. Only standard and high performance SKUs offer the option to use BGP to learn the routes. It is possible to configure multiple parallel VPN connections up to the peer limit of the Azure VPN Gateway SKU. To connect to the VPN Gateway, configure an IPsec IKEv2 site-to-site VPN tunnel on your CloudGen Firewall and configure BGP to exchange information with the Azure VPN Gateway. The CloudGen Firewall must be configured as the active partner. The following private ASN numbers are reserved by Azure and cannot be used for the Azure VPN Gateway.
- Private ASNs: 65515, 65517, 65518, 65519, 65520
Before You Begin
- You will need the following information:
- Public IP address of your on-premises CloudGen Firewall
- (private) ASN number
- Install and configure Azure PowerShell 4.1.2 or higher.
PowerShell Script to Create Azure VPN Gateway
Use this script to create your Azure VPN gateway with BGP routing.
$RG = 'YOUR_RESOURCE_GROUP_NAME'
$Location = 'West Europe'
$VNetName ='YOUR_VNET_NAME'
$SubNet = 'frontend'
$GWSubName = 'GatewaySubnet'
$VNetPrefix = '172.16.200.0/24'
$SubNetPrefix = '172.16.200.0/25'
$GWSubPrefix = '172.16.200.128/28'
$VNet1ASN = 65513
$GWName = 'VNetGW'
$GWIP = 'VNetGWIP'
$GWIPconf = 'gwipconf'
$LNGFName = 'onpremise'
$LNGFPrefix = '172.16.201.227/23'
$LNGFIP = 'YOUR_ONPREMISES_PUBLIC_IP_ADDRESS'
$LNGFASN = 65514
$BGPPeerIP = '172.16.201.227'
$ConnectionName = 'AzureToHome'
$sharedKey='supersecretpassword'

#To find the SKU that meets your requirements, see https://docs.microsoft.com/en-us/azure/vpn-gateway/vpn-gateway-about-vpngateways.
$GatewaySKU = 'VpnGw1'

Write-Host 'Creating Resource Group'
New-AzureRmResourceGroup -Location $Location -Name $RG

Write-Host 'Creating Virtual Networks and Subnets'
$gwpip = New-AzureRmPublicIpAddress -Name $GWIP -ResourceGroupName $RG -Location $Location -AllocationMethod Dynamic
$front = New-AzureRmVirtualNetworkSubnetConfig -Name $SubNet -AddressPrefix $SubNetPrefix
$gwsub1 = New-AzureRmVirtualNetworkSubnetConfig -Name $GWSubName -AddressPrefix $GWSubPrefix
$vnet = New-AzureRmVirtualNetwork -Name $VNetName -ResourceGroupName $RG -Location $Location -AddressPrefix $VNetPrefix -Subnet $front,$gwsub1
#$vnet = Get-AzureRmVirtualNetwork -Name $VNetName -ResourceGroupName $RG
$subnet1 = Get-AzureRmVirtualNetworkSubnetConfig -Name $GWSubName -VirtualNetwork $vnet
$gwipconf = New-AzureRmVirtualNetworkGatewayIpConfig -Name $GWIPconf -Subnet $subnet1 -PublicIpAddress $gwpip

Write-Host 'Creating Azure VPN Gateway. This may take a long time...'
$vnetgw = New-AzureRmVirtualNetworkGateway -Name $GWName -ResourceGroupName $RG -Location $Location -Ipconfigurations $gwipconf -GatewayType Vpn -VpnType RouteBased -GatewaySku HighPerformance -Asn $VNet1ASN

$lnggw = New-AzureRmLocalNetworkGateway -Name $LNGFName -ResourceGroupName $RG -Location $Location -GatewayIpAddress $LNGFIP -AddressPrefix $LNGFPrefix -Asn $LNGFASN -BgpPeeringAddress $BGPPeerIP

Write-Host 'Waiting 10 seconds and then creating the VPN connection...'
Start-Sleep -Seconds 10

$vpnconnection = New-AzureRmVirtualNetworkGatewayConnection -Name $ConnectionName -ResourceGroupName $RG -VirtualNetworkGateway1 $vnetgw -LocalNetworkGateway2 $lnggw -Location $Location -ConnectionType IPsec -SharedKey $sharedkey -EnableBgp $true

Write-Host 'Azure VPN created. Retrieving configuration information... '
Write-Host ('Public IP Address for the Azure VPN Gateway: {0}' -f (Get-AzureRmPublicIpAddress -Name "VNetGWIP" -ResourceGroupName $RG).IpAddress )

$lnggw = Get-AzureRmLocalNetworkGateway -Name $LNGFName -ResourceGroupName $RG
$vnetgw = Get-AzureRmVirtualNetworkGateway -Name $GWName -ResourceGroupName $RG

# Retrieve required configuration settings
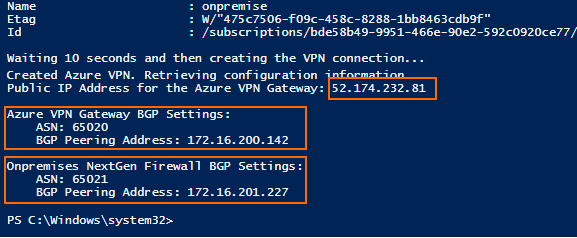
Write-Host "`nAzure VPN Gateway BGP Settings:"
Write-Host ("`tASN: {0}" -f $vnetgw.BgpSettings.Asn )
Write-Host ("`tBGP Peering Address: {0}" -f $vnetgw.BgpSettings.BgpPeeringAddress )
Write-Host "`nOnpremises NextGen Firewall BGP Settings:"
Write-Host ("`tASN: {0}" -f $lnggw.BgpSettings.Asn )
Write-Host ("`tBGP Peering Address: {0}" -f $lnggw.BgpSettings.BgpPeeringAddress )
Write-Host ("`nVPN Connection Status: " -f $vpnconnection.ConnectionStatus)
Step 1. Create a Dynamic Microsoft Azure VPN Gateway Using Azure Resource Manager and PowerShell
Use Azure PowerShell to create a routed-based VPN gateway.
- Open Azure PowerShell.
Connect to your Azure account:
Login-AzureRmAccount- Enter your Azure account credentials and click Login.
- Edit the PowerShell script to create an Azure VPN Gateway to match your needs.
Execute the PowerShell script to create the Azure VPN Gateway.

Write down the public IP address of the Azure VPN Gateway and BGP information for the local and remote BGP peers from the output of the PowerShell script.
Step 2. (optional) Get the VPN Gateway Public IP Address and BGP Settings
If you did not use the script to retrieve the public IP address and BGP peers, it is also possible to retrieve this information via PowerShell:
- Open Azure PowerShell.
Get the IP address assigned to the VPN gateway:
Get-AzureRmPublicIpAddress -Name PUBLIC_IP_NAME -ResourceGroupName YOUR_RESOURCE_GROUP_NAME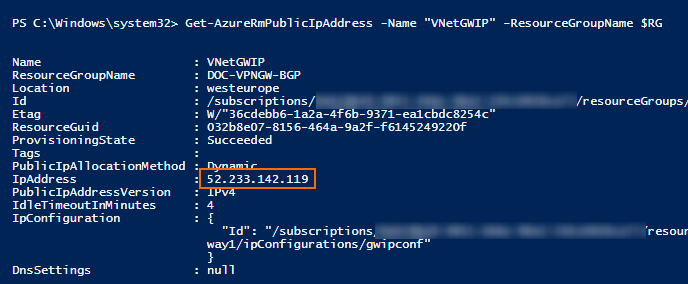
Get the BGP settings for the local VPN endpoint:
$lnggw = Get-AzureRmLocalNetworkGateway -Name LOCAL_GATEWAY_NAME -ResourceGroupName YOUR_RESOURCE_GROUP_NAME
$lngw.BgpSettingsText
Get the BGP setting for the remote VPN endpoint:
$vnetgw = Get-AzureRmVirtualNetworkGateway -Name AZURE_VPN_GATEWAY_NAME -ResourceGroupName YOUR_RESOURCE_GROUP_NAME
$vnetgw.BgpSettingsText
Step 3. Create VPN Next Hop Interfaces
- Go to CONFIGURATION > Configuration Tree > Box > Assigned Services > VPN-Service > VPN Settings.
- Click Lock.
- In the left navigation bar, click Routed VPN.
- Click Add in the VPN Next Hop Interface Configuration section.
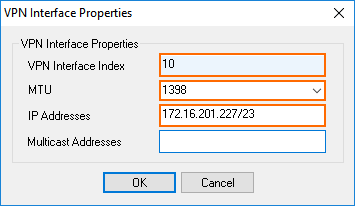
- VPN Interface Index – Enter a number between 0 and 99. Each interface index number must be unique.
- MTU – Enter
1398. - IP Addresses – Enter the BgpPeeringAddress for the local VPN endpoint retrieved in Step 2.
- Click OK.
- Click Send Changes and Activate.
Step 4. Add the VPN Next Hop Interface IP Address to the Shared IPs
Add the local BGP peering IP address as a Shared IP address:
- Go to CONFIGURATION > Configuration Tree > Box > Network.
- Click Lock.
- In the left menu, click IP Configuration.
- In the Shared Networks and IPs section, click +.
- Enter a name for the shared IP address, and click OK....
- The Shared Networks and IPs window opens.
Interface – Select other and enter
vpnr10.- Network Address – Enter the network address of the BgpPeeringAddress in CIDR Format e.g.
172.16.201.227/23. - Shared IPs in the Network – The Shared IPs in this Network window opens.
- IP Address – Enter the IP address for the BGP peering address for the local BGP neighbor retrieved in Step 2 without the subnet mask., e.g.,
172.16.201.227. - Alias for this IP– Select None.
- Responds to Ping– Select yes.
- Click OK to save these settings.
- IP Address – Enter the IP address for the BGP peering address for the local BGP neighbor retrieved in Step 2 without the subnet mask., e.g.,
- Trust Level – Select Unclassified.
- Active – Select yes.
- Click OK.
- Click Send Changes and Activate.
Step 5. Configure IPsec IKEv2 Site-to-Site VPN on the CloudGen Firewall
Configure a site-to-site IKEv2 VPN tunnel on the CloudGen Firewall. The firewall is configured as the active VPN endpoint.
- Go to CONFIGURATION > Configuration Tree > Box > Assigned Services > VPN-Service > Site to Site .
- Click the IPsec IKEv2 Tunnels tab.
- Click Lock.
- Right-click the table and select New IKEv2 tunnel. The IKEv2 Tunnel window opens.
- In the IKEv2 Tunnel Name field, enter your tunnel name
. - Set Initiates Tunnel to Yes.

- Configure the Authentication settings:
- Authentication Method – Select Pre-shared key.
Shared Secret – Enter the passphrase you used to create the virtual network gateway connection.

- Configure the Phase 1 encryption settings:
- Encryption – Select AES-256.
- Hash Meth. – Select SHA.
- DH Group – Select Group 2.
- Proposal Handling – Select Negotiate.
- Lifetime – Enter
28800.
- Configure the Phase 2 encryption settings:
- Encryption – Select AES-256.
- Hash Meth. – Select SHA.
- DH Group – Select Disable PFS.
- Proposal Handling – Select Strict.
- Lifetime (seconds) – Enter
3600. - LIfetime (KB) – Enter
0.

- In the Network Settings section, click the Advanced tab:
- One VPN Tunnel per Subnet Pair – Clear the check box.
- Universal Traffic Selectors – Select the check box.
- Force UDP Encapsulation – Clear the check box.
- IKE Reauthentication – Select the check box.
- Next Hop Routing – Enter the remote BGP peering address from Step 2.
- Interface Index – Enter the index of the VPN next hop interface created in Step 3.

- Configure the Local Network settings:
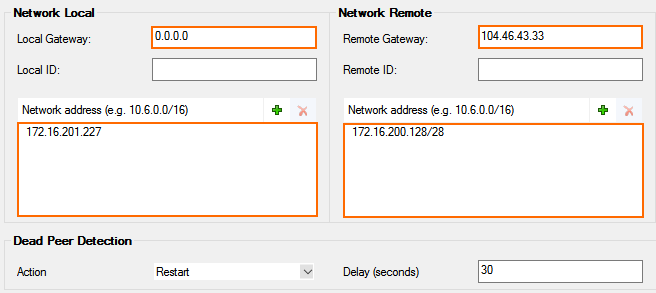
- Local Gateway – Enter the public IP address of the firewall, or use 0.0.0.0 if you are using a dynamic IP address or if the appliance is hosted in Azure, AWS, or GCP.
- Network Address – Click + and enter the IP address assigned to the VPN next hop interface without the subnet mask.
- Configure the Remote Network settings:
- Remote Gateway – Enter the gateway IP address of the Azure VPN Gateway in Step 2.
- Network Address – Click + and enter the Azure gateway subnet.
- Click OK.
Click Send Changes and Activate.
The VPN tunnel to the Azure VPN Gateway is now established.

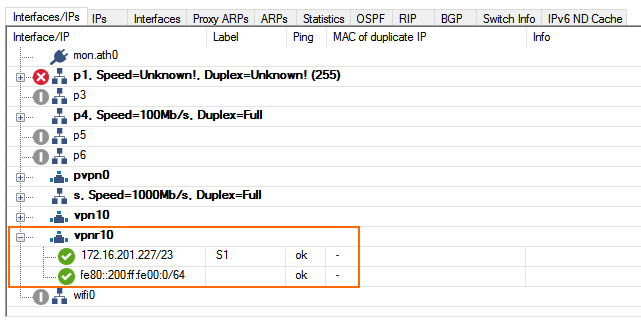
As soon as the the tunnel is up and running, the vpnr10 interface will show up in the Interface/IP tab list in the CONTROL > Network page.
Step 6. Configure the BGP Service
Configure BGP routing to learn the subnets from the remote BGP peer behind the Azure VPN Gateway on the other side of the VPN tunnels.
Step 6.1. Configure Routes to be Advertised via BGP
Only routes with the parameter Advertise set to yes will be propagated via BGP.
- Go to CONFIGURATION > Configuration Tree > Box > Network.
- Click Lock.
- (optional) To propagate the management network, set Advertise Route to yes.
- In the left menu, click Advanced Routing.
- Double-click the Routes you want to propagate, and set Advertise Route to yes.
- Click OK.
- Click Send Changes and Activate.
Step 6.2. Enable BGP
Configure the BGP setting for the BGP service on the firewall.
- Go to CONFIGURATION > Configuration Tree > Box > Assigned Services > OSPF-RIP-BGP-Service > OSPF/RIP/BGP Settings .
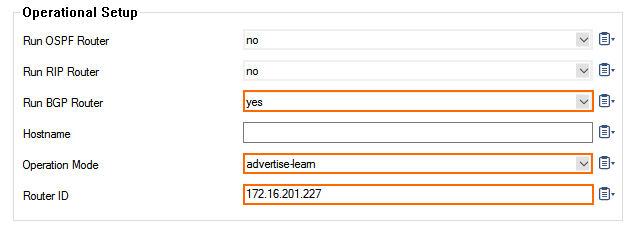
- From the Run BGP Router list, Select yes.
- From the Operations Mode list, select advertise-learn.
- Enter the local BGP peering IP address as the Router ID.
- In the left menu, click BGP Router Setup.
- Enter the AS Number for the local BGP peer as per Step 2.
- Enter the Terminal Password.

- In the left menu, expand Configuration Mode and click Switch to Advanced Mode.
- Click the Set button for the Advanced Settings. The Advanced Settings window opens.
- Set the Hold timer to
30seconds. - Set the Keep Alive Timer to
10seconds. - Click OK.
- Click Send Changes and Activate.
Step 6.3. Add a BGP Neighbor for the Azure VPN Gateway
To dynamically learn the routing of the neighboring network, set up a BGP neighbor for the Azure VPN Gateway.
- In the left menu of the OSPF/RIP/BGP Settings page, click Neighbor Setup IPv4.
- Click Lock.
- In the left menu, expand Configuration Mode and click Switch to Advanced Mode.
- Click + to add an entry to the Neighbors table. The Neighbors window opens.
- Enter a Name and click OK.
- In the Neighbors window, configure the following settings in the Usage and IP section:
- Neighbor IPv4 – Enter the remote BGP peer IP address.
- OSPF Routing Protocol Usage – Select no.
- RIP Routing Protocol Usage – Select no.
- BGP Routing Protocol Usage – Select yes.

- In the BGP Parameters section, configure the following settings:
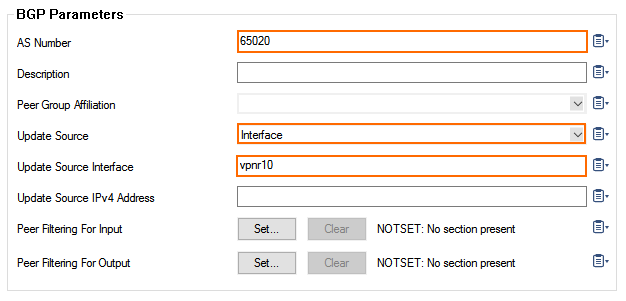
- AS Number: Enter the ASN for the remote network as per the information from Step 2.
- Update Source: Select Interface.
- Update Source Interface: Enter the vpnr interface. E.g.,
vpnr10
- Click OK.
- Click Send Changes and Activate
Go to CONTROL > Network > BGP. The firewall is now learning and advertising networks to the Azure VPN Gateway BGP peer.

Step 7. Create an Access Rule
Create a pass access rule to allow traffic from the local networks to the networks learned via BGP.
- Go to CONFIGURATION > Configuration Tree > Box > Assigned Services > Firewall > Firewall Rules.
- Click Lock.
- Create a PASS access rule:
- Bi-Directional – Enable.
- Source – Select the local on-premises network(s) advertised via BGP.
- Service – Select the service you want to have access to the remote network, or select ALL for complete access.
- Destination – Select the network object containing the learned networks.
- Connection Method – Select Original Source IP.
- Click OK.
- Move the access rule up in the rule list, so that it is the first rule to match the firewall traffic.
- Click Send Changes and Activate.
Additional References
For instructions on how to configure VPN using the Microsoft Azure UI, see:
