IPS policies control the behavior of the IPS when an attack is detected. You can define multiple IPS policies and apply them to individual access rules as needed.
Default IPS Policy
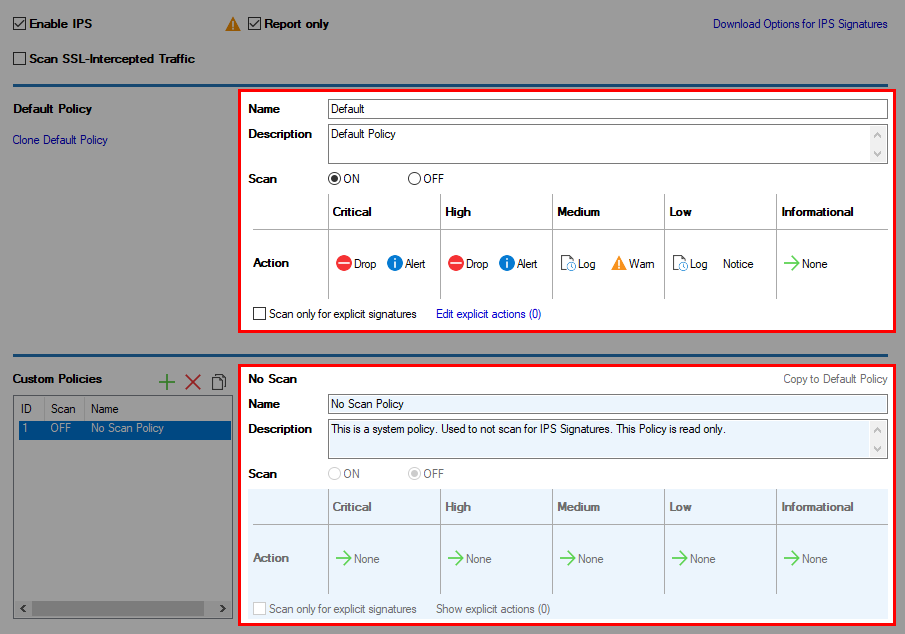
By default, all access rules use the default IPS policy. All traffic is scanned according to this policy while the IPS is enabled. To turn off IPS scanning for an individual access rule, choose No Scan Policy from the IPS Policy drop-down list. This makes sense for connections for which you want to avoid being blocked in case of an IPS misconfiguration.
Custom Policy Section
Within the Custom Policy section, it is possible to create and manage user-created IPS policies. Each of the created policies can be individually applied to access rules. The configuration interface for IPS policies is identical for the default policy and custom policies.
Policy Configuration
- Go to CONFIGURATION > Configuration Tree > Box > Assigned Services > Firewall > IPS Policies.
- Click Lock.
- Select Enable IPS.
If you want malicious traffic to be dropped, disable the Report only check box.
- Select Scan SSL-Intercepted Traffic if decrypted SSL traffic should be scanned. Only available with enabled Application Control 2.0 with SSL Inspection.
Configure the settings described in the following sections:

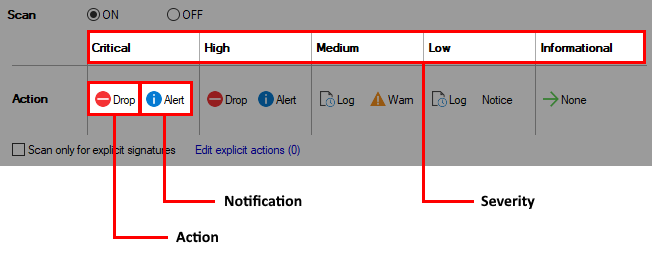
It may be necessary for system administrators to configure different IPS policy settings for the traffic source and destination.- Action – Describes the protection behavior of the IPS engine in case of detection of malicious traffic:
- Drop – Drops malicious network traffic.
- Log – Only informs about malicious network traffic according to the defined Notification.
- None – Malicious network traffic will be neither reported nor dropped.
Notification – Describes the warning behavior (Eventing) of the IPS engine in case of detection of malicious traffic:
- Alert – An Alert Event will be generated.
- Warn – A Warning Event will be generated.
- Notice – A Notice Event will be generated.
Severity – Detected malicious network traffic is classified by the IPS engine into the following severities:
- Critical
- High
- Medium
- Low
- Informational
IPS Policy Management

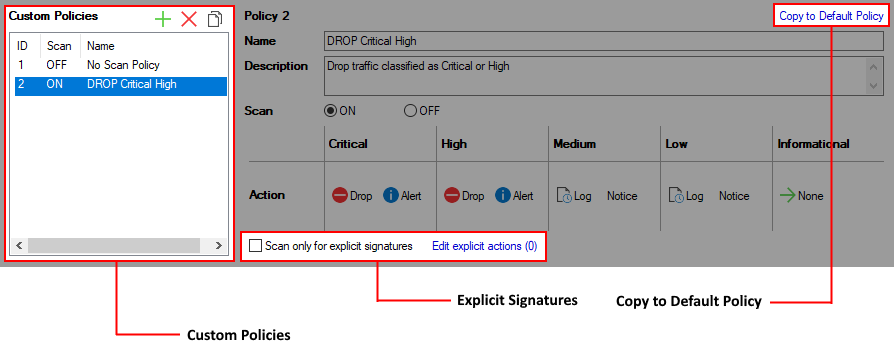
Custom Policies
- Click Add to create an IPS Policy with custom settings.
- Click Delete to remove the selected IPS Policy.
- Click Clone to copy the selected IPS Policy.
Copy to Default Policy – Changes the currently selected policy to the default policy.
Explicit Signatures – For each IPS policy, a set of custom signature actions can be defined and IPS scanning can be limited to this user-defined set.
Scan only for explicit signatures – If enabled, the IPS scanning will only be performed for IPS signatures that have been edited via the explicit action link.
Edit explicit actions – Click this link to modify the action of an IPS signature.
IPS Signatures – Explicit Actions:

- Edit – Select the desired IPS signature and click Edit Selected to modify the according to action. Click Edit All to change actions for all signatures currently displayed.
- Severity Filter – Select the desired severity to filter for.
- Policy Filter – Select the desired policy type:
- All – Display all available IPS signatures.
- Overwritten – Display only IPS signatures with custom actions.
- Default only – Display only IPS signatures with default actions.
- Click Send Changes and Activate.
Assign IPS Policy to Access Rules
As soon as a custom IPS policy is configured, it is selectable within an access rule. Open an access rule and select the desired IPS policy. Now, traffic that is handled by this access rule will be scanned according to the selected policy.
