Set up a login or ticketing system to temporarily grant access to guest users. Ticketing admins assign guest tickets to the users. The user credentials on these tickets are then used by the guest users when prompted to authenticate. Tickets expire after a set period of time determined by the ticket administrator.
Step 1. Create the SSL Certificate and Ticket Admin User
Create or upload an SSL certificate for the ticketing interface and create the ticketing admin user.
- Go to CONFIGURATION > Configuration Tree > Box > Assigned Services > Firewall > Forwarding Settings.
- In the left menu, select Authentication.
- Click Lock.
Import or create the Default HTTPS Private Key and Default HTTPS Certificate.
- In the left menu, click Guest Access.
- (optional) If you want to redirect the guest to a custom webpage:
- In the left menu bar, click Switch to Advanced.
- Navigate to the section Ticket Authentication Customization.
- Enter a custom Confirmation text for the ticketing interface.
- From the list Redirection URL, select Explicit.
- Enter a valid URL into the edit field for Explicit Redirection URL.
- In the Ticketing Administration User section, enter Username and Password for the ticketing admin. You can create only one ticket admin.

- (optional) Enter Max Days and Max Hours to limit the lifetime of the ticket the ticketing admin is allowed to grant. Enter
0to remove the limit. - Click Send Changes and Activate.
Step 2. Create an Access Rule to Access the Admin Ticketing Interface
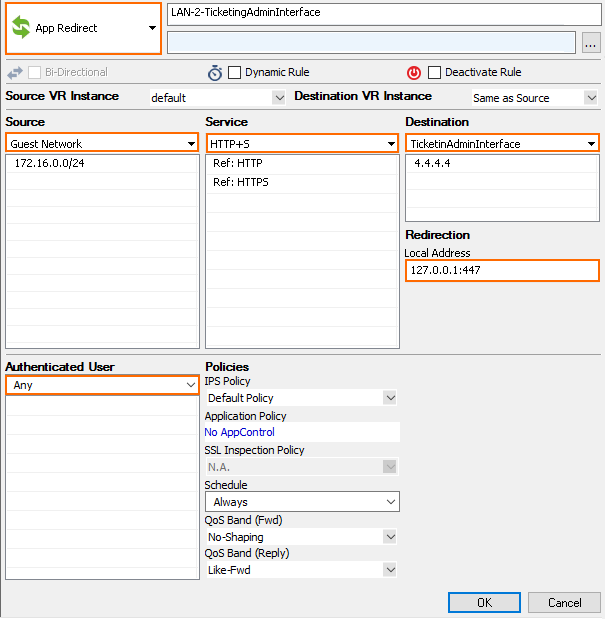
Create an app redirect access rule to access the ticketing system. This interface is used to create tickets for guest users.
- Go to CONFIGURATION > Configuration Tree > Box > Assigned Services > Firewall > Forwarding Rules.
- Click Lock.
- Create an App Redirect access rule:
- Action – Select App Redirect.
- Name – E.g.,
LAN-2-TicketingAdminInterface. - Source – Select the source network(s) allowed to access the ticketing system.
- Service – Select HTTP+S.
- Destination – Enter the IP address for the admin ticketing interface. You can use any free IP address or an IP address on the firewall that does not have a listener on port 80 and 443.
- Redirection – Enter
127.0.0.1:447
- Authenticated User – Select Any or a user object containing the users allowed to create guest tickets.
- Click OK.

- Place the access rule so that it is the first rule to match for HTTP+S traffic to the chosen ticketing system IP address.
- Click Send Changes and Activate.
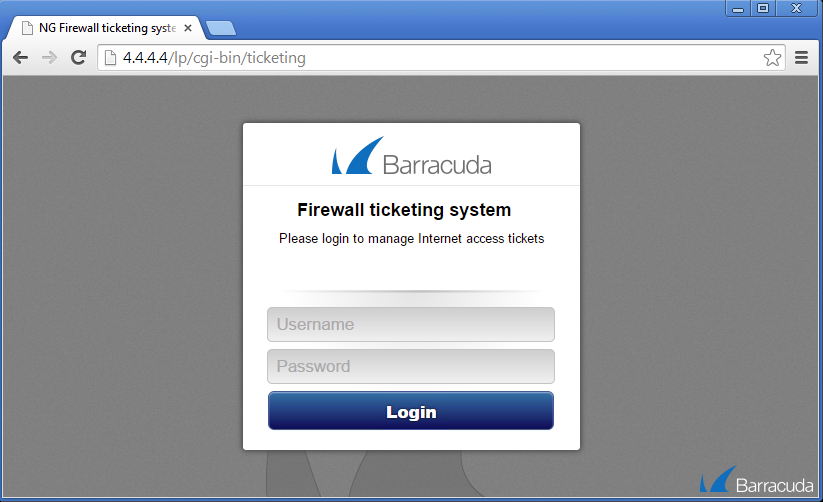
The admin ticketing interface is now reachable via https://4.4.4.4/lp/cgi-bin/ticketing (if you used 4.4.4.4 as the destination IP address in the access rule).

Step 3. Create an Access Rule to Redirect Users to the User Ticketing Login
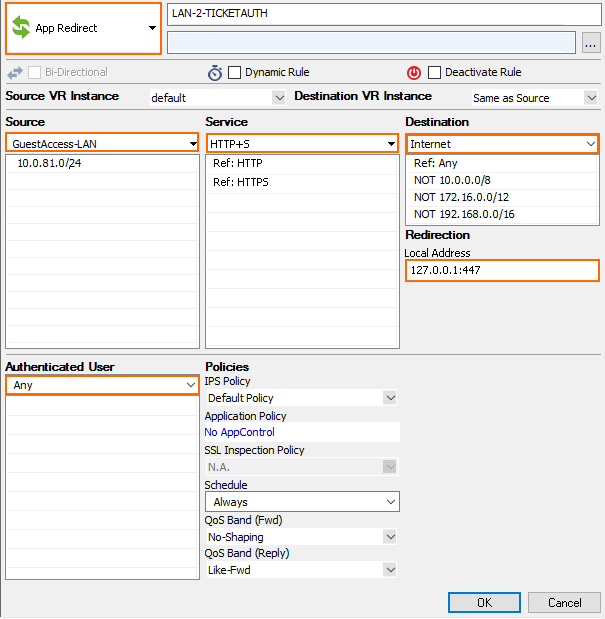
Create an app redirect access rule that redirects the user to the FWauth daemon on port TCP 447 on the firewall. FWauth on port 447 displays the ticketing login page.
- Go to CONFIGURATION > Configuration Tree > Box > Assigned Services > Firewall > Forwarding Rules.
- Click Lock.
- Create an App Redirect access rule:
- Action – Select App Redirect.
- Name – E.g.,
LAN-2-TICKETAUTH. - Source – Select the source network(s).
- Service – Select HTTP+S. Since the user must use a browser to access the confirmation page, limit the service to HTTP and HTTPS.
- Destination – Select the destination. E.g., Internet.
- Redirection – Enter
127.0.0.1:447 - Authenticated User – Select Any.
- Click OK.

- Place the access rule so that it is the first rule to match for HTTP+S and unauthenticated users for the source network, but after the rule allowing unauthenticated DNS access if the DNS server is not in the local network.
- Click Send Changes and Activate.
Step 4. Create an Access Rule for Redirecting an Authenticated User to the Desired Web Page
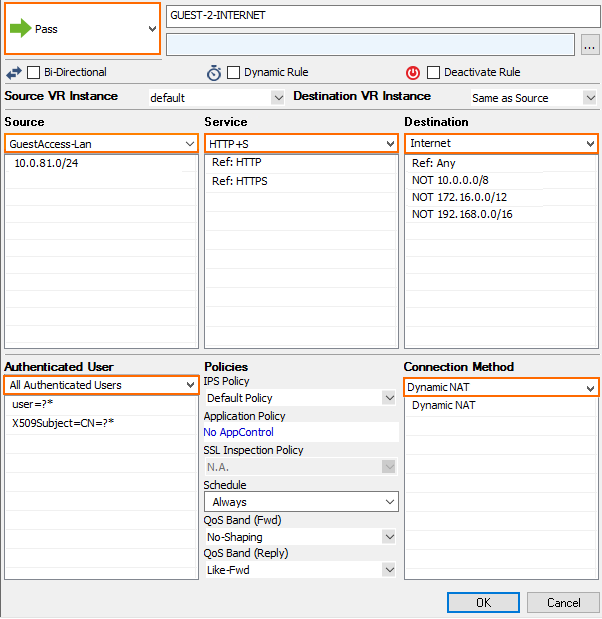
At this point, a user would still be directed to the ticketing login page even after a successful authentication. In order to pass the user to the desired web page, an access rule must be placed prior to the access rule in Step 3. This access rule passes users to the Internet if they are part of the set of All Authenticated Users. Consequently, the access rule in Step 3 will be evaluated only if the user is not logged in as an authenticated user.
- Go to CONFIGURATION > Configuration Tree > Box > Assigned Services > Firewall > Forwarding Rules.
- Click Lock.
- Create a PASS access rule:
- Action – Select PASS.
- Name – E.g.,
GUEST-2-INTERNET. - Source – Select the source network(s). E.g.,
GuestAccess-Lan. - Service – Select HTTP+S (or any other service that will be granted to the user).
- Destination – Select the destination. E.g., Internet.
- Connection Method – Enter
Dynamic NAT. - Authenticated User – Select All Authenticated Users.
- Click OK.

- Place the access rule prior to the access rule from Step 3.

- Click Send Changes and Activate.
Unauthorized users accessing the Internet or restricted network resources from the source network are redirected to the user ticketing login page. After entering the ticketing user and password, they are automatically forwarded to the website they originally wanted to visit. A TKT-<IP address> user is created and valid for 20 minutes until you need to re-authenticate. Open the Firewall > Users page to see the authenticated users.

Next Steps
For more information on how to create guest user tickets and use them to log in, see How to Manage Guest Tickets - User's Guide.
