

Virus scanning covers V2 and V3 for SMB. While a scan is running, data transfer on the session is stopped completely. If malware is found, the whole TCP session is terminated. Content Detection is performed on all files.
Step 1. Configure the Virus Scanner Engine
Enable and configure the virus scanner. Barracuda CloudGen Firewall F18 and larger support the Avira AV engine.
- Go to CONFIGURATION > Configuration Tree > Box > Assigned Services > Virus-Scanner > Virus Scanner Settings.
- Click Lock.
- Enable Avira AV by selecting Yes from the Enable Avira Engine list.
- Click Send Changes and Activate.
Step 2. Enable the Virus Scanner to Scan SMB Related Traffic
- Go to CONFIGURATION > Configuration Tree > Box > Assigned Services > Firewall > Security Policy.
- Click Lock.
- Scroll down to the section Virus Scanner Configuration.
- Select the check box for SMB.
- Click Send Changes.
- Click Activate.

Step 3. Edit an Access Rule to Enable Virus Scanning for Session-Related SMB Traffic
Virus scanning can be enabled for all Pass and Dst NAT access rules.
- Go to CONFIGURATION > Configuration Tree > Box > Assigned Services > Firewall > Forwarding Rules.
- Click Lock.
- Double-click to edit the PASS or Dst NAT access rule.
- Click Application Policy link and select:
- Application Control – required.
- TLS Inspection – optional.
- Virus Scan – required.
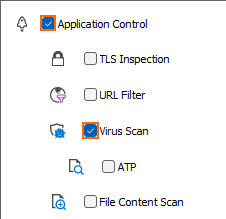
- If configured, select a policy from the SSL Inspection Policy drop-down list. For more information, see TLS Inspection in the Firewall.
- In the left menu inside of the Edit Rule window, click Advanced.
- Navigate to the first entry Generic TCP Proxy in the TCP Policy section.
- For the Generic TCP Proxy entry, click in the second column and select ON.
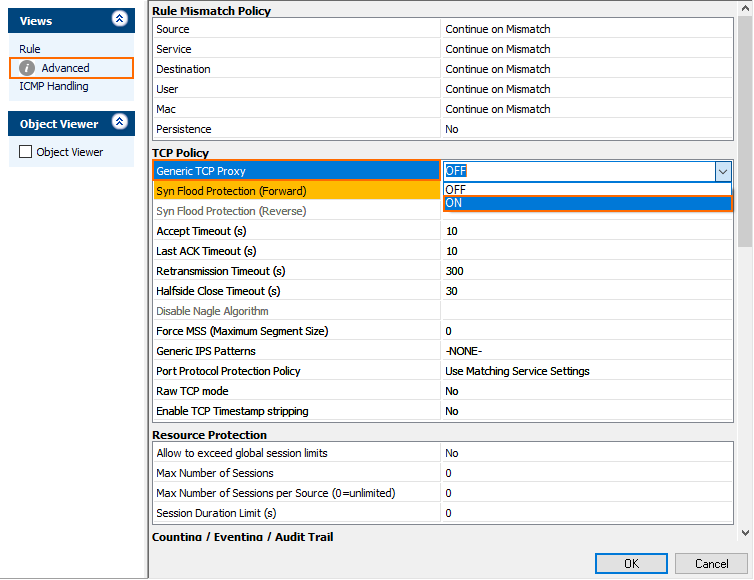
- Click OK.
- Click Send Changes and Activate.