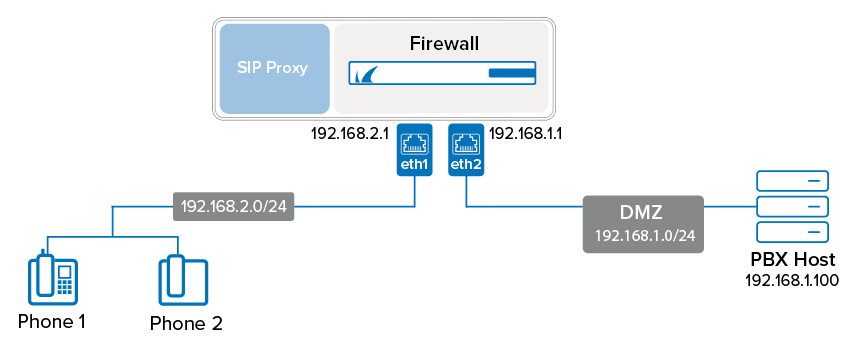
To allow SIP-based VoIP communication to pass the firewall, you can configure the built-in SIP proxy for the Barracuda CloudGen Firewall. The SIP proxy dynamically opens all necessary RTP ports for successful SIP communication through a Barracuda CloudGen Firewall. You must also create a forwarding firewall rule that redirects traffic to the SIP proxy.

Step 1. Create an App Redirect Firewall Rule
Create an App Redirect rule to forward all SIP traffic to the SIP proxy service. For example, to create this rule for the example setup that is displayed in the illustration above, use the following settings. Note that the network ranges the SIP phones reside in must be 10.0.0.0/8, 172.16.0.0/12 or 192.168.0.0/16.
Action – App Redirect
Source –
192.168.2.0/24(The subnet that the SIP phones reside in)Service – SIPcf
Destination –
192.168.1.100(The IP address of the PBX host)Redirection Local Address –
192.168.2.1:5060(The listening IP address for the firewall of the subnet that the SIP phones reside in)
For more information on creating an App Redirect firewall rule, see How to Create an App Redirect Access Rule.
Step 2. Configure the SIP Proxy
In the forwarding firewall settings, configure the SIP proxy.
Go to CONFIGURATION > Configuration Tree > Box > Assigned Services > Firewall > Forwarding Settings.
In the left menu, select VoIP/SIP.
Click Lock.
In the SIP Proxy Settings section, select the Enable the SIP Proxy check box.
Configure the remaining SIP Proxy Settings. For more information on these settings, see the following SIP Proxy Settings section.
Click Send Changes and Activate.
Step 3. SIP Proxy Settings
Setting | Description | ||||||||||
|---|---|---|---|---|---|---|---|---|---|---|---|
Enable the SIP Proxy | The SIP proxy is disabled by default if the appliance is newly installed or updated from a firmware version that did not offer the feature. | ||||||||||
Allowed Destinations | The IP addresses, IP ranges, and domain names that the user agents are allowed to contact. Alternatively, you can leave this field empty and restrict the destinations through forwarding rules. For domain names, you can use wildcard characters such as asterisks (*), question marks (?), and square brackets ([ ]). Entering | ||||||||||
Default Destination | SIP requests addressed to the SIP proxy will be redirected to the specified IP. If this field remains empty (which is the default), related requests will be discarded. | ||||||||||
Trust Connection IP | Specifies whether the SIP proxy trusts the IP address in the connection IP field contained within the SDP header of SIP packets. This header field usually contains the source IP address for the packet. However, this IP address can be invalid in NAT'd networks, which would effectively block the SIP traffic. You can select one of the following modes:
| ||||||||||
Allow Registrations From WAN Addresses | Specifies if user agent clients (UACs) from WAN IP addresses are allowed to register on the SIP proxy. For security reasons, Barracuda Networks recommends that you disable this feature. | ||||||||||
Private Networks | Add all networks that should be handled by the SIP proxy to this list. By default, all SIP connections from 10.0.0.0/8, 192.168.0.0/16 and 172.16.0.0/16 are accepted by the SIP proxy. | ||||||||||
No. of Child Processes | The number of SIP processes to be created for each available network port and interface. For example, the Barracuda CloudGen Firewall F400 has seven network ports and the number of child processes is set to 4, so the SIP proxy starts four processes for each port. Because SIP requires TCP and UDP sessions for communication, there will be a total of 56 active SIP proxy processes (7 x 4 x 2 = 56). | ||||||||||
Server Signature | The custom signature to be encapsulated into SIP packets. | ||||||||||
Debug Log Level | race the SIP proxy's operations in one of three available granularity levels. If you encounter SIP proxy issues with VoIP communications, Barracuda Networks recommends that you increase the log level for further troubleshooting.
The log output is written to LOGS > your firewall service > sipproxy. |
