A Control Center can manage multiple clusters with each cluster using a different firmware version. However, the Control Center can only manage firewalls running the same or older firmware versions as the firmware version of the Control Center. Therefore, you cannot configure 7.2.0 features with a Control Center that is running firmware older than 7.2.0. It is also not possible to mix different major firmware versions in a cluster. If required, update your Control Center before updating your managed firewalls to a newer firmware version. After major version updates, the cluster version on the Control Center must be migrated to match the new firmware version.
The Control Center checks every hour for updates relevant to the configured cluster versions. It can take up to one hour for the updates, hotfixes, and patches to be displayed when a new cluster with a previously unused cluster version is created.
Before You Begin
If you are using SSL Inspection on your border firewall, you must add dlportal.barracudanetworks.com and d.barracudanetworks.com to the SSL Inspection Domain Exceptions on the your CloudGen Firewall > Assigned Services > Firewall > Security Policy page. To use SSL Inspection the Feature Level of the Forwarding Firewall must be set to 7.2 or higher. For more information, see SSL Inspection in the Firewall .

Step 1: Verify the Compatibility of the Control Center Firmware with the Managed Firewalls
Before updating a managed firewall to a higher firmware version, verify that the Control Center is running a firmware version that is equal to or higher than the highest firmware version used by a managed firewall after the update.
For more information, see Updating CloudGen Firewalls and Control Centers.
Step 2. Download the Update Package to the Control Center
Download the update package to the Control Center.
- Log into the Control Center.
- Go to CONTROL > Firmware Update.
- In the lower half of the screen, click the Download Portal tab.
- Move the mouse over the desired update package to display the download icon.

- Click the download icon, and select Download.

After the download finishes, the update package is available in the Files on Control Center tab.

Step 3. (optional) Create Update Groups
- Go to CONTROL > Firmware Update.
- In the ribbon bar, click Edit Groups.

- Click New Group. A new update group is created in the list.
- Hover over the new group and click the edit icon.

- Enter a name for the update group.
- (optional) Use the Filter options to display the firewalls you want to add to this group.

- Select, then drag and drop firewalls to the new user group.
- Click Save Changes.

Step 3. Schedule the Firmware Update File Transfer
- Go to CONTROL > Firmware Update.
- Double-click each firewall and/or update group. The firewalls are added to the Selected Firewall Update List.

- In the Files on Control Center tab, select the update package.
- Click Schedule File Transfer. The New Update Task window opens.

- (optional) Select the Scheduling Mode and Schedule Time to schedule a time for the file transfer.
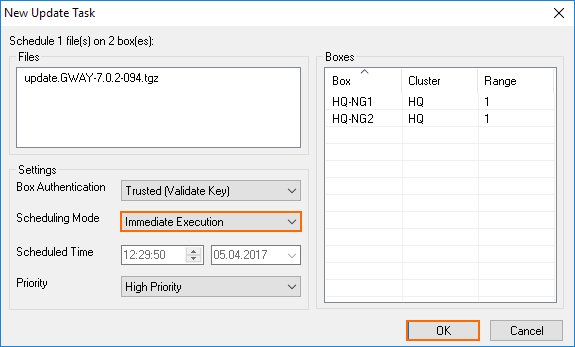
- Click OK.
The update packages are now copied to the selected remote systems.
Step 4. Execute the Update Package
- Go to CONTROL > Firmware Update.
- In the File Transfer Status column, select Completed Transfer. The list of firewalls with completed transfers is displayed.
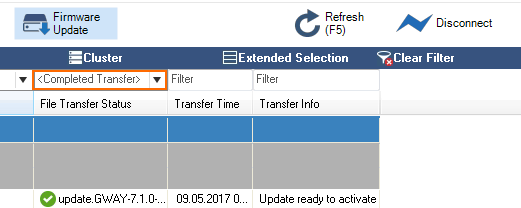
- Select the firewalls to perform the update. Select multiple firewalls by holding down the CTRL (Strg) key.
- Right-click the selected firewalls and click Perform Update. The Schedule Task window opens.

- (optional) Configure the time and authentication settings for the update:
- Box Authentication – Select Trusted (Validate Key).
- Scheduling Mode – Select Immediate Execution to update immediately, or Delayed Execution to set the time the update is triggered
- Priority – When multiple tasks are configured for execution, the priority setting determines the execution order.
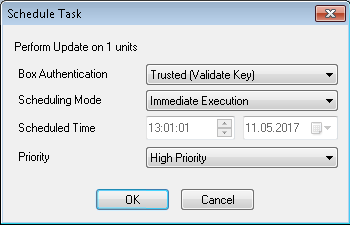
- Click OK.
Wait for the update to finish. Depending on the system hardware, the process can last anywhere from 15 minutes (for a fast system) to 60 minutes (for flash appliances).
Step 5. Migrate the Configuration Version of the Cluster
If you are updating to a new major version (e.g., 6.0 to 6.2, or 6.2 to 7.1), migrate the cluster version to the new major version after the update has completed. Multiple migrations may be required to reach the cluster version matching the firmware version.
Update the Clusters Individually
- Go to CONFIGURATION > Configuration Tree > Multi-Range > your range > your cluster .
- Right-click the cluster and select Lock.
- Right-click the cluster and select Migrate Cluster.
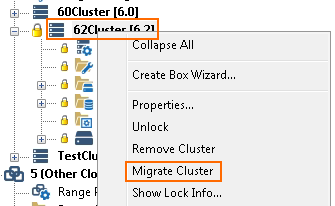
- Select the new Release version.
- Click OK.
- Click Activate.
Update All Clusters in a Range
If all clusters in the range are on the same firmware version, you can migrate all clusters simultaneously.
- Go to CONFIGURATION > Configuration Tree > Multi-Range > your range .
- Right-click the range and select Lock.
- Right-click the range and select Migrate Range.
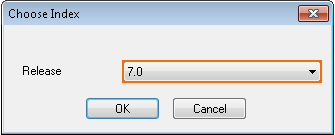
- Select the new Release version.
- Click OK.
- Click Activate.
Migrating the cluster version may have to be done multiple times if the firmware update skipped major firmware versions. E.g., When updating from 6.0 to 7.0.
Troubleshooting / Logs
After the update process, review the Box\Release\update or Box\Release\update_hotfix log for each system to verify that it was successfully updated. To view a system log, you must connect directly to the firewall and go to the Logs tab.
