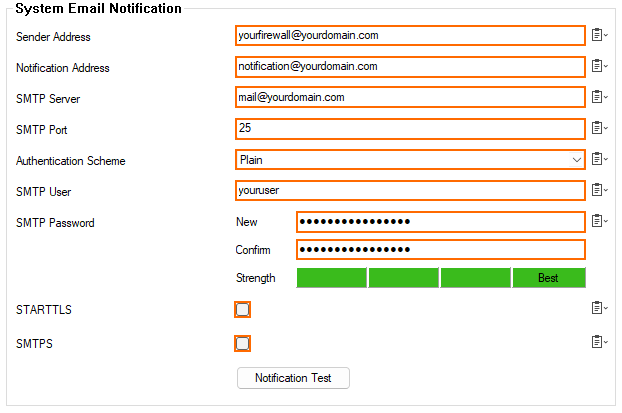
Some services on the CloudGen Firewall can be configured to send email notifications.
Services Using System Email Notifications
- Virus Scanning service
- Advanced Threat Protection (ATP)
- Events
Configure Email Notification
- Go to CONFIGURATION > Configuration Tree > Box > Administrative Settings.
- Click Lock.
- In the left menu, select Notifications.
- For Sender Address, enter the email address that you want to send the email from.
- For Notification Address, enter the address where all email notifications should be sent.
- In the SMTP Server field, enter the hostname or IP address of the SMTP server that should be used when sending email notifications.
- The SMTP Port is the port that the SMTP server uses to send notifications. This field is already preset with the default value of 25. You can change this value to match your requirements.
- For the Authentication Scheme, select one of the following options:
- None – No authentication scheme will be used.
- Plain – User and password will be transferred to the mail server in a common string which is BASE64 encoded and unencrypted.
- Login – User and password will be transferred to the mail server in two separate strings where each one is BASE64 encoded and unencrypted.
- Configure authentication credentials for the SMTP server:
- SMTP User – Enter the username.
SMTP Password – Enter the password for the SMTP server.
- (optional) If you want your notifications to be sent encrypted, select the check box STARTTLS or SMTPS.
The evaluation is done in all fields regardless of whether STARTTLS and/or SMTPS or none of them are activated. SMTP Port is not evaluated if SMTP Server already includes the port number.
STARTTLS tries to establish an encrypted connection, and if this fails, an unencrypted connection is used. SMTPS enforces an encrypted connection and refuses any unencrypted connection. SMTPS uses port 465.
- Example for O365
- For SMTP Port, enter
587. - For Authentication Scheme, enter
Login. - Select the check box for STARTTLS.
- For SMTP Port, enter
- Example for O365
- (optional) If you want to test your configuration, click the button Notification Test.
- Check your email account. If the message has been sent successfully to the configured mail server, you will see a mail with the following attributes:
- Subject text –
Test Notification. Message content –
Testing the Notification.
- Subject text –
- Click Send Changes and Activate.
All services that are configured to send notifications will now send emails to the specified address if required.
