In some cases, Barracuda Networks Technical Support may ask you to make a BIOS update on your CloudGen Firewall. Barracuda Networks Technical Support will send you an email containing a BIOS update ZIP file for your model. To make a BIOS update on your CloudGen Firewall, create a bootable FreeDOS USB drive, copy the BIOS update file to the USB drive, and trigger the update from the command line.
Before You Begin
- Download Rufus: https://rufus.ie/
Step 1. Create a Bootable FreeDOS USB Drive
You must create a bootable FreeDOS USB drive to be able to update the BIOS.
Plug in your USB drive.
- Launch Rufus.
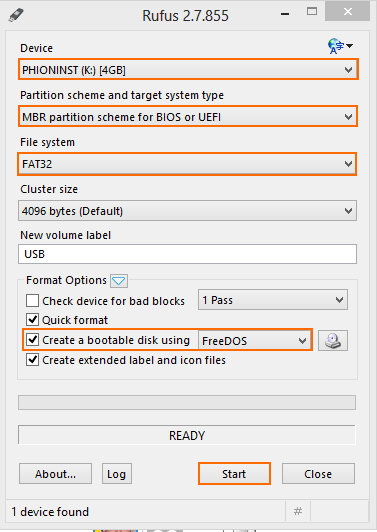
- Configure a bootable FreeDOS USB drive:
- Device – Select your USB drive.
- Partition scheme – Select MBR partition scheme for BIOS or UEFI.
- File system – Select FAT32.
- Select Create a bootable disk and select FreeDOS from the drop-down list.

- Click Start.
Step 2. Copy the BIOS Update File to the USB Drive
Unpack the ZIP file containing the BIOS update and copy the content to the USB drive.
Step 3. Boot from USB Stick and Update the BIOS
Boot your firewall with the USB stick, and then trigger the BIOS update from the command line.
- Shut down the Firewall.
- Plug the USB stick into the appliance
- Boot the appliance.
- At the prompt, change into the directory with the BIOS update.
- Enter
FLASH.BAT - Reboot the firewall.
The BIOS of your firewall is now updated.
