The Control Center manages the distribution and update process for Secure Connector firmware updates. The admin must first update the firmware package to the Control Center and select the Secure Connectors from the list. The Control Center then distributes the file. Afterwards, the admin can trigger the update process and monitor the progress of the update. Firmware updates can be performed via Control Center and the web interface.
Perform a Firmware Update via the Control Center
Before You Begin
Verify the compatibility of the Secure Connector with the Control Center firmware. The Control Center firmware version must support the target Secure Connector firmware version. If necessary, upgrade the Control Center before updating the managed Secure Connectors. For more information, see Updating CloudGen Firewalls and Control Centers.
Step 1. Download the Update Package from the Download Portal
Download the update package from the Barracuda Download Portal: https://dlportal.barracudanetworks.com.
Step 2. Import the Update Package into the Control Center
Import the update file to the Control Center.
- Log into the Control Center.
- Go to CONTROL > Firmware Update.
- In the lower half of the screen, click the Files on Control Center tab.
- Click Import local File and select the update package you downloaded in Step 1.

The file is copied to the Control Center and displayed in the Files on Control Center tab.
Step 3. Send the Update Package to the Systems
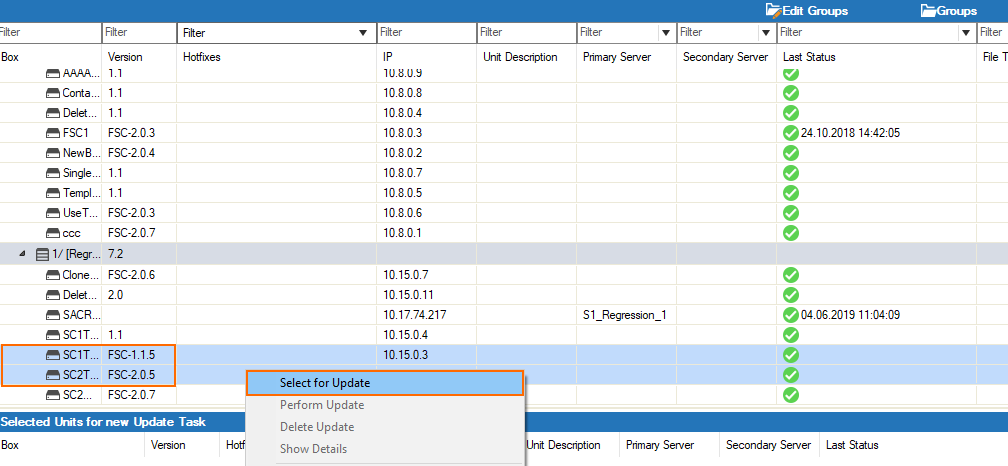
- On the Firmware Update page, select the Secure Connectors you want to update.
- Right-click the selection and click Select for Update.

- The Secure Connectors are now listed under Selected Units for new Update Task.

- In the Files on Control Center tab, select the update package.
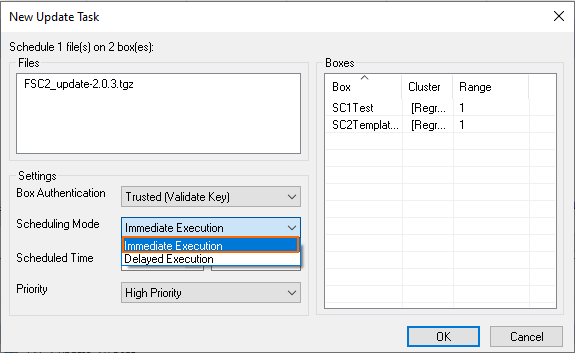
- Click Schedule File Transfer. The New Update Task window opens.
- (optional) Select the Scheduling Mode.

- Click OK.
The update packages are now copied to the selected remote systems. The File Transfer Status column shows the progress.
Step 4. Execute the Update Package
After the update package has been copied to the Secure Connector, trigger the update.
- In the Selected Units for new Update Task column, a green icon is displayed that verifies that the update package was sent successfully.
- Right-click the selected Secure Connector and select Perform Update.
- In the Schedule Task window, select Immediate Execution from the Scheduling Mode list and click OK.

Wait for the update to finish.
Step 5. Migrate the SC Release Version
If you are updating to a new major version Secure Connector firmware, you must migrate the Secure Connector editor to the new version.
- Go to CONFIGURATION > Configuration Tree > Multi-Range > your range > your cluster > Cluster Settings.
- Right-click Secure Connector Editor and select Lock.
- Right-click Secure Connector Editor and select Migrate SC Release.
- Select the new Release version.
- Click OK.
- Click Activate.
Troubleshooting / Logs
To troubleshoot updates on the Secure Connector, you must enable persistent logging and review the /var/phion/logs/installUpdate.log file. Do not permanently enable persistent logging because it impacts the lifespan of the SD card.
Perform a Firmware Update via Web Interface
Before You Begin
Verify the compatibility of the Secure Connector with the Control Center firmware. The Control Center firmware version must support the target Secure Connector firmware version. If necessary, upgrade the Control Center before updating the managed Secure Connectors. For more information, see Updating CloudGen Firewalls and Control Centers.
Step 1. Download the Update Package from the Download Portal
- In your web browser, go to
https://<management IP address of your Secure Connector> - Sign in using your Secure Connector Username and Password. The web interface opens showing the Dashboard tab.
- Click Retrieve Lock in the upper-right corner of the Dashboard window.
- In the Firmware Update section, click Download Update.
The update package is now downloaded as backup.conf file from the Barracuda Download Portal.
Step 2. Apply the Firmware Update
- On the Dashboard page, click Choose File in the Firmware Update section.
- Select the backup.conf file containing the firmware update
- Click Apply Backup. The backup gets now installed.
- Wait until this process has finished, then click Release Lock in the upper-right corner of the Dashboard window.
The update package has now been applied to your Secure Connector and gets recognized by the managing Control Center.
