You can change the serial number and model of CloudGen Firewall appliances configured as stand-alone units or as a High Availability cluster. Changing the serial number is necessary when you receive a new license for a different model, for example when upgrading from a level 2- to a level 4 firewall in the cloud.
Before You Begin
- (new appliances only) Locate the license token in the email you received from Barracuda Networks Customer Services after purchasing your CloudGen Firewall license, and activate the license. For more information, see How to Activate and License a Stand-alone Hardware CloudGen Firewall Appliance and How to Activate and License a Stand-Alone Virtual or Public Cloud Firewall or Control Center.
Step 1. Adjust Model and Serial Number
Log into the Barracuda CloudGen Firewall using your credentials. For HA deployments, log into the primary unit.
- Go to CONFIGURATION > Configuration Tree > Box > Properties.
- Click Lock.
- Select the Product Type and Hardware Model according to the update license.
- To change the serial number,
- Expand the Configuration Mode menu and select Switch to Advanced View.
- Replace the Serial Number of the update license.
- For HA deployments, enter the Secondary Serial Number.
- Click Send Changes and Activate.
Step 2. Remove Old Licenses
- Go to CONFIGURATION > Configuration Tree > Box Licenses.
- Click Lock.
- Select all outdated licenses and click Delete.
- Click Send Changes and Activate.
Step 3. Restart the Firmware and Activate the Network Configuration
- Go to CONTROL > Box.
- In the left menu, expand the Operating System section and click Firmware Restart. This may take some time. If required, click Reconnect.
- In the left menu, expand the Network section and click Activate new network configuration.
- Select Failsafe as the activation mode.
- In the left menu, expand Operating System.
- Click Reboot Box.
Step 4. (HA cluster only) Update the Secondary Firewall
When the primary CloudGen Firewall is updated, create a PAR file and apply the changes to the secondary unit.
Step 4a. Create a PAR File on the Primary Firewall
- Log into the primary firewall.
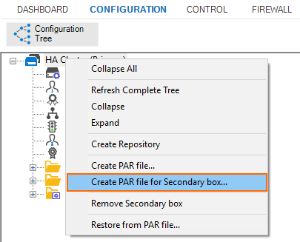
- Go to CONFIGURATION > Configuration Tree.
- Right-click HA-Cluster (Primary).
- From the drop-down list, select Create PAR file for Secondary box.

- Save the PAR file.
Step 4b. Import the PAR File on the Secondary Firewall
- Log into the secondary firewall.
- Go to CONFIGURATION > Configuration Tree.
- Right-click HA-Cluster (Secondary).
- In the list, click Restore from PAR file.
- Click Activate.
- Go to CONTROL > Box.
- In the left menu, expand Network and click Activate new network configuration.
- Select Failsafe as the activation mode.
- In the left menu, expand Operating System.
- Click Reboot Box.
After the configuration has been updated, you can check the status under Control > Licenses.
