

As of firmware 9.0.1, it is possible to link a repository node to its name-related Default Box node.
This article can be used for a scenario where you must create a large number of managed boxes based on the configuration of a Default Box node, and where you must switch the configuration of that Default Box node between multiple repository nodes with different configurations that can be used for other groups of identically configured boxes.
Note that regardless of the following example of linking to a Default Box node, this article generally explains how to work with repositories.
Before You Begin
- This example requires you to have a Control Center running.
- This example assumes that each cluster represents a specific location for multiple boxes.
- One box in each cluster will be representative of the most common box configurations for the other boxes in that cluster.
- The 'Administrative Settings' node of two existing firewalls will be used here to illustrate the use case.
- The 'Administrative Settings' node on the cluster level will be used as a reference for configuring new firewalls in Cluster 1.
- The 'Administrative Settings' node on the global repository level will be used as a reference for configuring new firewalls in Cluster 2.
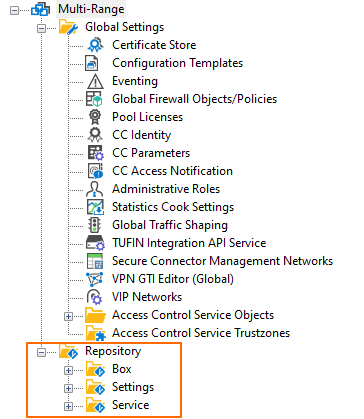
Create Repositories
For this example, you must create repositories in your Control Center if not already present.
Step 1. Create a Global Repository
- Log into your Control Center.
- Go to CONFIGURATION > Configuration Tree.
- Right-click Multi-Range.
- In the menu list, select Create Repository.
- The configuration tree will be created.
- Click Activate.
Step 2. Create a Repository in a Cluster that Contains Your Firewalls
- Go to Multi-Range > your range > your cluster.
- Right-click
<your cluster>. - In the menu list, select Create Repository.
- Click Activate.
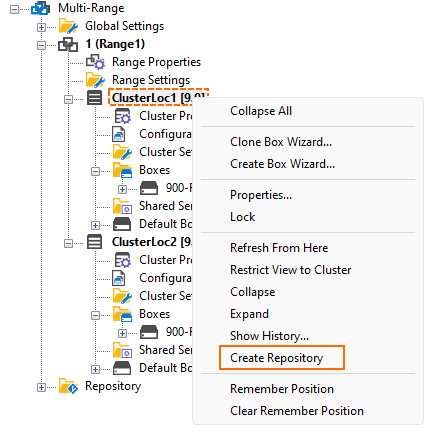
Optionally, repeat the steps above for a second cluster.
The following image shows the clusters created on the global and cluster level:
Saving Important Configurations to a Repository
To re-use specific configurations, you have two options:
- Configurations that are stored in the Default Box node:
- This node is unique to a specific cluster on a Control Center.
- Configurations in a Default Box node cannot be used in any other cluster than its own.
- Each sub-node of the Default Box node can hold just one (=1) name-related node of its type.
- Configurations that are stored in repositories:
- Depending on the level of the repository (cluster, range, or global), the node is unique to the level created.
- Each sub-node in a repository node of a specific type can hold multiple sub-nodes of the same type and originate from multiple appliances of the same level (cluster, range).
- The only differentiating element is the name of the repository entry, which can be freely chosen when a specific configuration is copied to its related repository node.
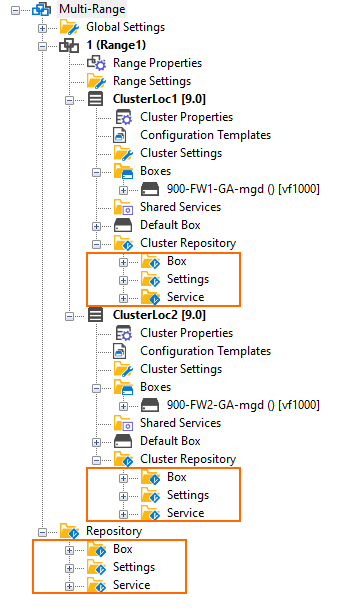
The advantage of the Default Box node is that every new firewall that is created from scratch in a cluster will contain the configuration of the Default Box. This can reduce configuration times, especially in cases when boxes in a cluster vary only slightly. The advantage of a repository is that it can hold multiple configurations of the same type from different appliances in a node of the same type.
Due to the new option that a Default Box sub-node can be linked to any node of the same type in a repository, you can now set up larger numbers of appliances with almost identical configurations that can even be combined from different configuration sources in the repositories. The following steps will illustrate this by using the example of the Administrative Settings node. For this, all new firewalls in Cluster 1 will only share Essential Health and System Data, and all new firewalls in any other cluster will share Full System Diagnostics and Analytics without having to reconfigure this option on each new firewall after the deployment.
Step 1. Create a Referential Firewall Configuration in Cluster 1
In this example, all new firewalls in Cluster 1 must only share Essential Health and System Data. The first step is to create a configuration for this:
- Go to CONFIGURATION > Configuration Tree > Multi-Range > Range 1 > Cluster 1 > Boxes > your box > Administrative Settings.
- Click Lock.
- For Share Telemetry Data, select Essential Health and System Data.

- Click Send Changes.
- Click Activate.
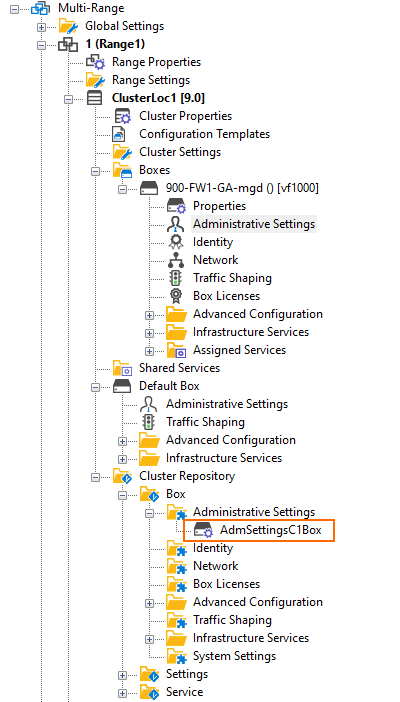
Step 2. Copy the New Configuration to the Cluster 1 Repository
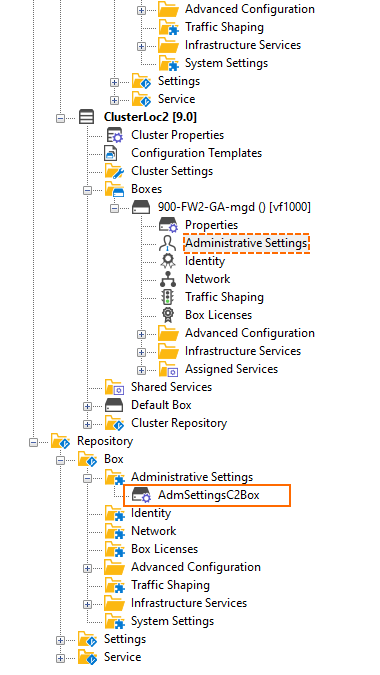
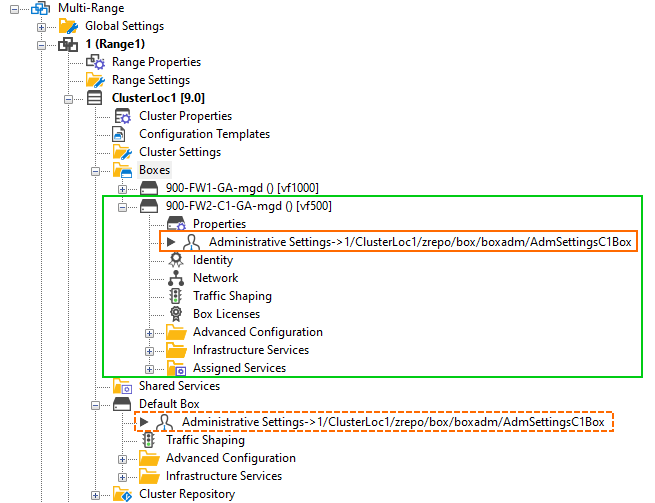
- Go to CONFIGURATION > Configuration Tree > Multi-Range > Range 1 > Cluster 1 > Boxes > your box.
- Right-click Administrative Settings.
- Select Copy to Cluster Repository... from the menu list.
- The Select Object window is displayed.
- Enter the name of the new repository object:
AdmSettingsC1Box. - Click OK.
- The new repository object
AdmSettingsC1Boxwill be inserted below the node CONFIGURATION > Configuration Tree > Multi-Range > Range 1 > Cluster 1 > Cluster Repository > Box > Administrative Settings. - Click Activate.
Step 4. Copy the Administrative Settings Node of Custer 2 to the Global Repository
Assuming that the Administrative Settings node was not changed in Cluster 2, the default value for the Telemetry Data is Full System Diagnostics and Analytics. These settings will be used as a reference in the global repository.

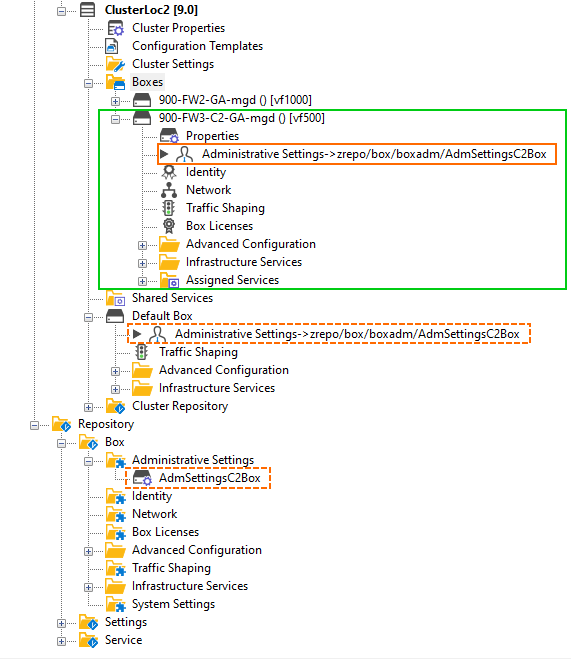
- Go to CONFIGURATION > Configuration Tree > Multi-Range > Range 1 > Cluster 2 > Boxes > your box.
- Right-click Administrative Settings.
- Select Copy to Cluster Repository... from the menu list.
- The Select Object window is displayed.
- Enter the name of the new repository object:
AdmSettingsC2Box. - Click OK.
- The new repository object
AdmSettingsC2Boxwill be inserted below the node CONFIGURATION > Configuration Tree > Multi-Range > Range 1 > Cluster 2 > Cluster Repository > Box > Administrative Settings. - Click Activate.
Preparing Repositories for an Accelerated Deployment of Firewalls
The new option of linking a Default Box sub-node to a specific repository node provides innumerable combinations of configurations with different settings. Depending on your individual requirements, you can now combine links from a global, range, or cluster repository into the Default Box node, which will serve as a concentrator for configurations based on the most commonly used presets for new firewalls.
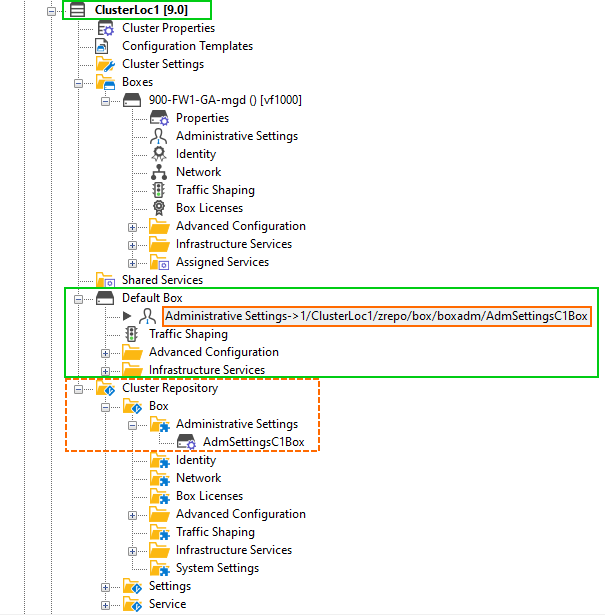
Step 1. Preparing the Default Box Node in Cluster 1 to Use Configuration Settings of the Repository in Cluster 1
The following steps illustrate the principle of how to configure the Default Box node to provide the most common configuration settings to all firewalls yet to be configured in Cluster 1. In this example, the Administrative Settings node in the Default Box node will be linked to the type-related node in the Cluster 1 repository.
- Go to CONFIGURATION > Configuration Tree > Multi-Range > Range 1 > Cluster 1 > Boxes > Default Box.
- Right-click Administrative Settings.
- Click Lock.
- Right-click Administrative Settings.
- From the menu list, select Link from Cluster Repository... .
- The Select Object window is displayed.
- Select AdmSettingsC1Box.
- Click OK.
- The Activate Changes window is displayed.
- Click Activate.
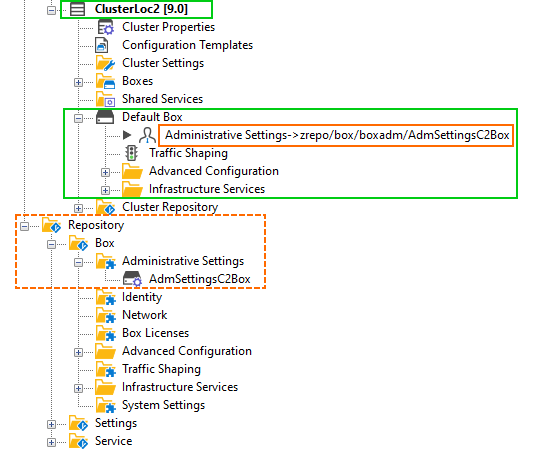
Step 2. Preparing the Default Box Node in Cluster 2 to Use Configuration Settings of the Global Repository
As in Step 1, the Administrative Settings node in the Default Box node of Cluster 2 will be linked to the type-related node in the global repository.
- Go to CONFIGURATION > Configuration Tree > Multi-Range > Range 1 > Cluster 2 > Boxes > Default Box.
- Right-click Administrative Settings.
- Click Lock.
- Right-click Administrative Settings.
- From the menu list, select Link from Repository... .
- The Select Object window is displayed.
- Select AdmSettingsC2Box.
- Click OK.
- The Activate Changes window is displayed.
- Click Activate.
Create New Firewalls in the Control Center Based on the Cluster-Specific Configuration Settings of the Default Box Node
Now that the configuration in the Default Box node is prepared, you can quickly create additional firewalls because the creation process takes the linked data from the Default Box node.
The following steps illustrate how the Control Center takes the configuration settings from the Default Box node.
Step 1. Create a New Firewall in Cluster 1
- Go to CONFIGURATION > Configuration Tree > Multi-Range > Range 1 > Cluster 1.
- Click the '+' icon to expand the Boxes node.
- Right-click Boxes.
- In the menu list, click Lock.
- Right-click Boxes.
- In the menu list, click Create Box...
- The Create Box window is displayed.
- Enter the data into the fields that best describe your new firewall, e.g.:
- Appliance Name –
900FW2-C1-GA-mgd - Product Type – Select
VF500from the menu list.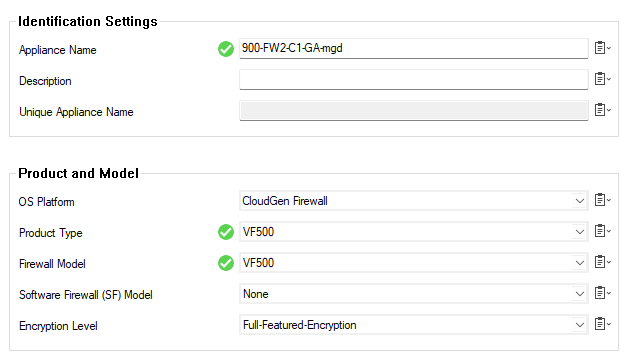
- Appliance Name –
- Click Finish.
- Click Activate.
- After the new firewall is created, you can see that the Administrative Settings node references the
AdmSettingsC1Boxnode in the Default Box node. - Repeat the previous steps for each additional firewall that you want to create. Note that the name of the new appliance and its type will be the only new data that you must enter. All other configuration values depend on your individual presets.
Step 2. Create a New Firewall in Cluster 2
- Go to CONFIGURATION > Configuration Tree > Multi-Range > Range 1 > Cluster 2.
- Click the '+' icon to expand the Boxes node.
- Right-click Boxes.
- In the menu list, click Lock.
- Right-click Boxes.
- In the menu list, click Create Box...
- The Create Box window is displayed.
- Enter the data into the fields that best describe your new firewall, e.g.:
- Appliance Name –
900FW3-C2-GA-mgd - Product Type – Select
VF500from the menu list.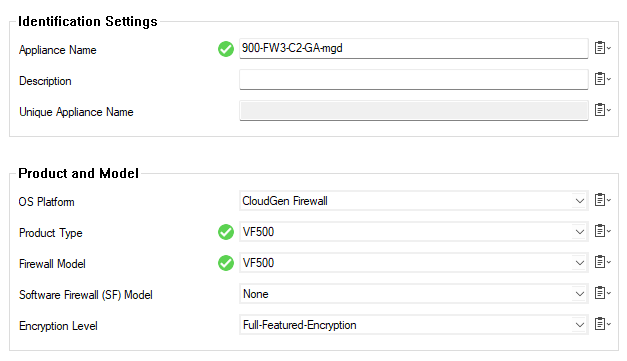
- Appliance Name –
- Click Finish.
- Click Activate.
- After the new firewall is created, you can see that the Administrative Settings node references the
AdmSettingsC2Boxnode in the Default Box node. - Repeat the previous steps for each additional firewall that you want to create. Note that the name of the new appliance and its type will be the only new data that you must enter. All other configuration values depend on your individual presets.
If you want to create another bunch of firewalls based on a different commonly used configuration, continue below.
Switching Quickly Between Different Configuration Setups
As you have seen above, the new firewalls have been created based on the configuration stored under the Default Box node. The Administrative Settings node provided an example of how a configuration located in a specific repository serves as a configuration preset that is referenced by the Default Box node. In order to take advantage of such a quick setup with different configuration settings, perform the following steps:
- Create another example firewall that contains all relevant nodes with the settings correctly configured. This will be your reference setup.
- Store each individually modified configuration setting in this newly configured firewall into one of the repositories (cluster, range, or global). Think of a self-explanatory name for the repository entry so that you can easily identify the required repository entry later.
- Depending on the cluster in which you want to create new firewalls, remove all existing repository links in the Default Box node.
- Create all necessary repository links in the Default Box node of the cluster where you want to create your new firewalls and refer to the repository entry where you have stored your reference configuration settings (cluster, range, or global).
- After your new Default Box node is configured, create your new firewalls as described above.
Transforming a Firewall into a Distinct Appliance (optional)
All new firewalls that have been created based on the Default Box node will also contain the same repository link(s). Keeping these links of all newly created firewalls will have the advantage that you can change the configuration of all firewalls with just a single change of the related repository node. However, in certain situations, it can be useful to maintain a firewall on its own. For this, you must remove all contained repository links of the affected firewall.
To turn a firewall into a distinct appliance, perform the following steps:
- Go to CONFIGURATION > Configuration Tree > Multi-Range > your range > your cluster > Boxes > your box.
- Right-click the node that references a specific repository entry.
- From the menu list, select Remove Link and keep settings.
- Click Activate.
- The Activate Changes window is displayed.
- Click Activate.
The firewall will now take over the last values from the repository-linked configuration node and copy them to its native Administrative Settings node. You can now maintain this firewall as a distinct appliance.