What ATR does
ATR determines whether an alert is malicious.
If the alert is identified as malicious, the IP Address is automatically added to the firewall or network security solution block list, depending on how malicious ATR determines it to be.
For more information about Automated Threat Response (ATR), see Setting up ATR.
Setting up ATR
The documentation below outlines the requirements for the Barracuda XDR Automated Threat Response (ATR). When you've set this up, all required data is uploaded to the Customer Security Dashboard in the ATR Settings > Firewalls section.
To set up ATR for FortiGate Firewall, you must do the following:
To create an Administrator profile
In FortiGate Firewall, click System > Admin Profiles > Create New.
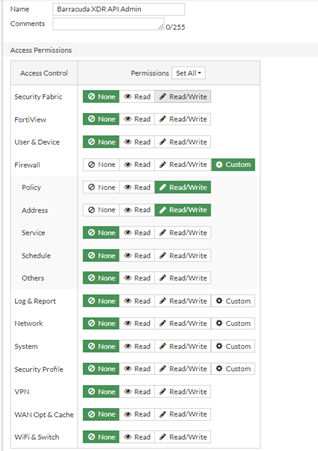
Create a new profile called
Barracuda XDR API Admin.In the Access Permissions table, under Access Control, click the Custom icon next to Firewall, then do the following:
Next to Policy, select Read/Write.
Next to Address, select Read/Write.

Slide Override Idle Timeout to On. Then slide Never Timeout to On.

Make a note of the profile name, to use when you create the REST API Admin.
Click OK.
To create a REST API Admin and generate an API token
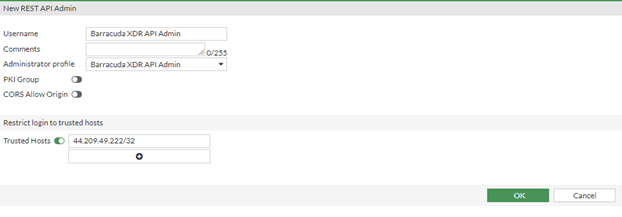
In FortiGate Firewall, navigate to System > Administrators > Create New > REST API Admin.
In Username, type the username
Barracuda XDR API Adminand select the Administrator Profile you created in Create an Administrator Profile,Barracuda XDR API Admin.
In the Restrict logins to Trusted Hosts section, do the following:
Slide the Trusted Hosts slider to on.
Type the IP addresses 35.155.74.247 and 44.239.173.232 as trusted hosts so the authentication is successful from the Barracuda side to be able to implement the IP Blocking.
NOTE Adding both 35.155.74.247 and 44.239.173.232 as trusted hosts is necessary so the authentication is successful from the Barracuda side to be able to implement the IP Blocking
Click OK.
NOTE An API token is generated.Make a note of the API token.

NOTE The token is only shown once and cannot be retrieved.Click Close.
To obtain the HTTPS port number for API calls
If you are not using the default port (Port 443), for administrative access, please copy the correct port and the external IP address from the URL. For example, https://<IP Address>:<port>,.
The port can be found in the URL along with the external IP address. For example,
https://<IP Address>:<port>, where<IP Address>is the external IP address and<port>is the port to use for administrative access.
To create an Address Group
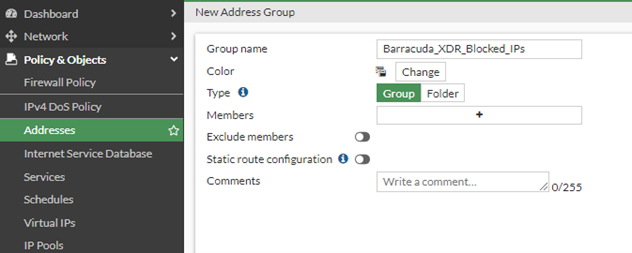
Next, create an Address Group called Barracuda_XDR_Blocked_IPs. Barracuda XDR uses this group to automatically block IPs on the firewall. Add this group to any preexisting firewall policies that block traffic to/from anomalous IP addresses.
In the left navigation menu, click Policy & Objects > Addresses.
Click Create New > Address Group.
In Group Name, type
Barracuda_XDR_Blocked_IPs.
NOTE Don’t include a space in the Group Name or ATR won’t function properly. We highly recommend using Barracuda_XDR_Blocked_IPs.In Type, select Group.
Click OK.

Enable HTTPS on the WAN Interface
Admin access from the WAN interface is required for XDR to have remote access to the firewall device. You can manage these settings by navigating to Network > Interfaces and adjusting the administrative access to the interface.

To configure XDR Dashboard
In Barracuda XDR Dashboard, click ATR Settings > Firewalls.
In the Firewalls table, click the Fortigate Firewall row.
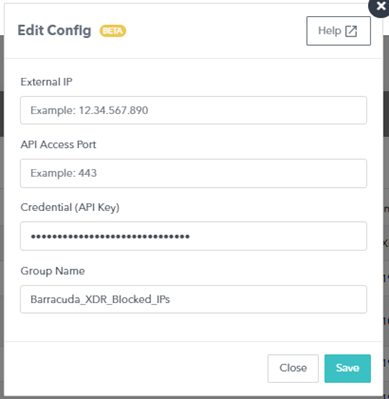
Click Edit Config.
In the Edit Config dialog box, enter the following:
External IP
API Access Port
Credential (API Key)
Group Name

Click Save.

.png)