

What ATR does
ATR determines whether an alert is malicious.
If the alert is identified as malicious, the IP Address is automatically added to the firewall or network security solution block list, depending on how malicious ATR determines it to be.
For more information about Automated Threat Response (ATR), see Setting up ATR.
Setting up ATR
The documentation below outlines the requirements for the Barracuda XDR Automated Threat Response. All action items listed under the Customer Requirements must be completed. All required data must be uploaded to the XDR Dashboard in the ATR Settings > Firewalls section.
To set up ATR for Cisco Meraki Firewall, do the following:
To enable API Access and generate an API Key from the Meraki Dashboard
To collect the Organization ID
To ensure the IP address can make inbound connections to the firewall
To configure the Barracuda XDR Dashboard
To enable API Access and generate an API Key from the Meraki Dashboard
For access to the API, enable the API for your organization.
Log in to the Meraki dashboard: https://dashboard.meraki.com.
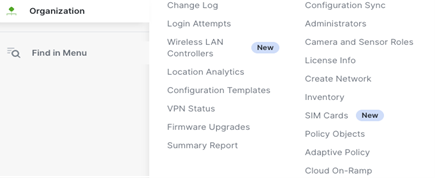
Navigate to Organization > Settings.
Ensure Barracuda’s endpoints can make API calls to the Meraki Dashboard by adding the following IPs:
35.155.74.247
44.239.173.232
18.211.110.238
54.209.207.251

Navigate to Organization > API & Webhooks > API keys & access.
Click Generate API Key.

Scroll down to API Access to generate the API key.
Copy, then store the API key in a safe place.
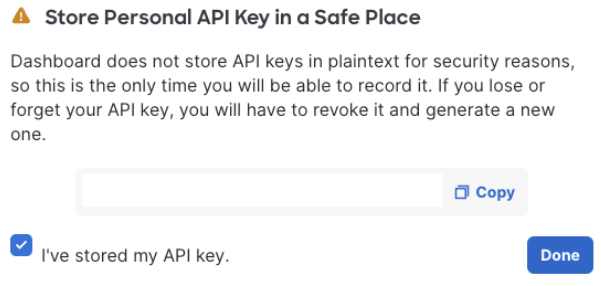
Click Done.
To collect the Organization ID
From the Meraki dashboard, from the bottom of the page, copy the Organization ID and store it in a safe place.

Navigate to Organization > Policy Objects.
Create a new Policy Object Group.
Add a test IP to this group.
In the Object label field, type Test.
Click Create group.

In Group name, type Barracuda_XDR_Blocked_IPs.
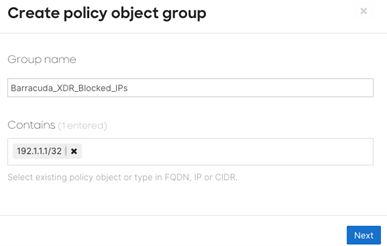
Click Next.
Navigate to the appropriate network.
Under Security & SD-WAN, select Firewall.

Create a new IPv4 Layer 3 Outbound Rule. Set the following parameters:
Policy: Deny
Rule Description:
Barracuda XDR ATR OutboundProtocol: Any
Source: Any
Src Port: Any
Destination: Type the name of the Policy Object Group you created in the previous procedure.
Dst Port: Any
Create another IPv4 Layer 3 Outbound Rule. Set the following parameters:
Policy: Deny
Rule Description:
Barracuda XDR ATR InboundProtocol: Any
Source:Type the name of the Policy Object Group you created in the previous procedure.
Src Port: Any
Destination: Any
Dst Port: Any
Select Finish Editing.
Click Save at the bottom of the screen.

To configure XDR Dashboard
In Barracuda XDR Dashboard, click ATR Settings > Firewalls.
In the Firewalls table, click the Meraki Firewall row.
Click Edit Config.
In the Edit Config dialog box, enter the following:
Credential (API Key)
Network Group Name
Organization ID
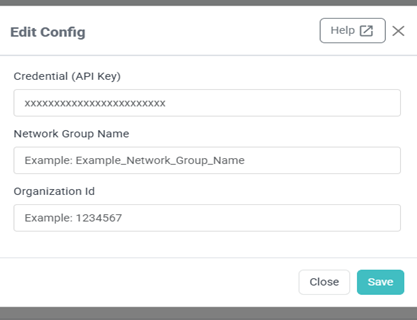
Click Save.
If you need to edit the configuration at any time, follow the Editing XDR ATR Settings for a Firewall procedure.